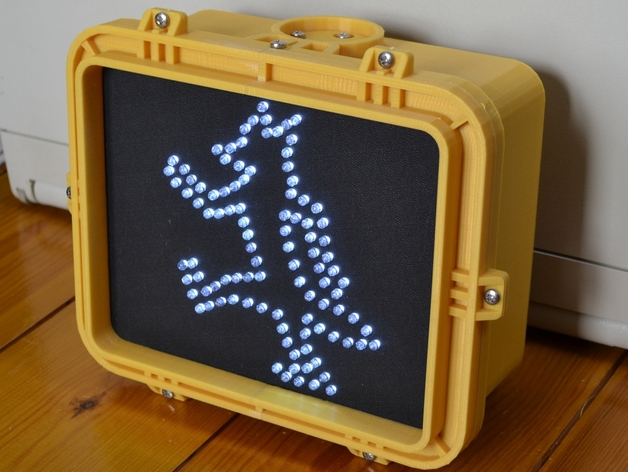
Zootopia Fox walk sign
thingiverse
So, this is the fox walk sign from the Zootopia movie poster. I made it for reasons that were largely fox-related and because it makes for a nice light. To make this, you'll need: 16mm M4 screws (16), 6mm M4 screws (6), 24 M4 nuts, 101 White 5mm LEDs, an appropriate resistor for your LEDs (I used a pot so I could choose the brightness), a sheet of black ABS that's 3mm thick and measures 21cm by 17cm with "Pinseal Texture" (you can find this on eBay), two DC 2.1mm barrel jack sockets (optional, but recommended for detachable power supply), some form of 12VDC supply, and a filament called "gold colour" or "golden yellow," which is slightly darker than standard yellow and matches the item perfectly. As for tools, apart from a printer with at least a 22cmx14cm bed, you'll need: a drill with a 4.9mm bit (you can get these; they're essential for fitting 5mm LEDs snugly), a soldering iron and solder, glue of some sort (a glue gun works well), acetone (optional but highly recommended), and a pillar drill or hand drill for drilling holes. You'll need to print two frame fronts, two frame backs, one of each box half, and two spacers. Everything can be printed directly without support, but it's crucial to take precautions against splitting, curling, and warping due to the size. The frame fronts have a thin lip around the inside that serves as printing support, which you'll need to snap off for use. To create the face plate, print the drill drawing image so that the box on it measures 21cm x 17 cm. Cut the paper to size and stick it to your ABS sheet. Then, drill out each dot using an awl to mark the centre of each one, then removing the paper and drilling holes first with a 1mm drill, followed by placing a new blank piece of paper on the front and duck taping the whole thing face down onto a piece of scrap wood for protection. Drill the holes again from the back with successively bigger drills until you reach the 4.9mm (I used three different sizes). If you're careful enough to make the holes vertical, you can use a hand drill instead of a pillar drill. Next, fit an LED into each hole and solder them all together. This is very tedious! Arrange your LEDs with four in series in each parallel string if yours have a voltage of 2.8V like mine do; this way, they can be run off a standard 12V supply. You'll need to work out the best arrangement for your LEDs yourself based on their voltage and the voltage of your supply. Remember to get your LEDs facing the right direction when soldering! The rest of the parts are easily assembled with screws and nuts that press into nut-shaped holes (if yours don't fit, you might need to file a bit). Refer to the picture or the SketchUp file in the .zip if you're unsure how they go together. However, the frame fronts need to be glued together since they would have ideally been one piece if that was printable. The best way I found to do this with ABS is to brush each face with acetone, press them together while clamping them in place, and leave overnight; if you lined them up correctly, you should end up with an almost invisible strong join (I recommend sanding the faces first so they're flat). Finally, glue the DC jacks into the two holes in the back box using a glue gun.
With this file you will be able to print Zootopia Fox walk sign with your 3D printer. Click on the button and save the file on your computer to work, edit or customize your design. You can also find more 3D designs for printers on Zootopia Fox walk sign.
