Zoetrope Praxinoscope convertible
prusaprinters
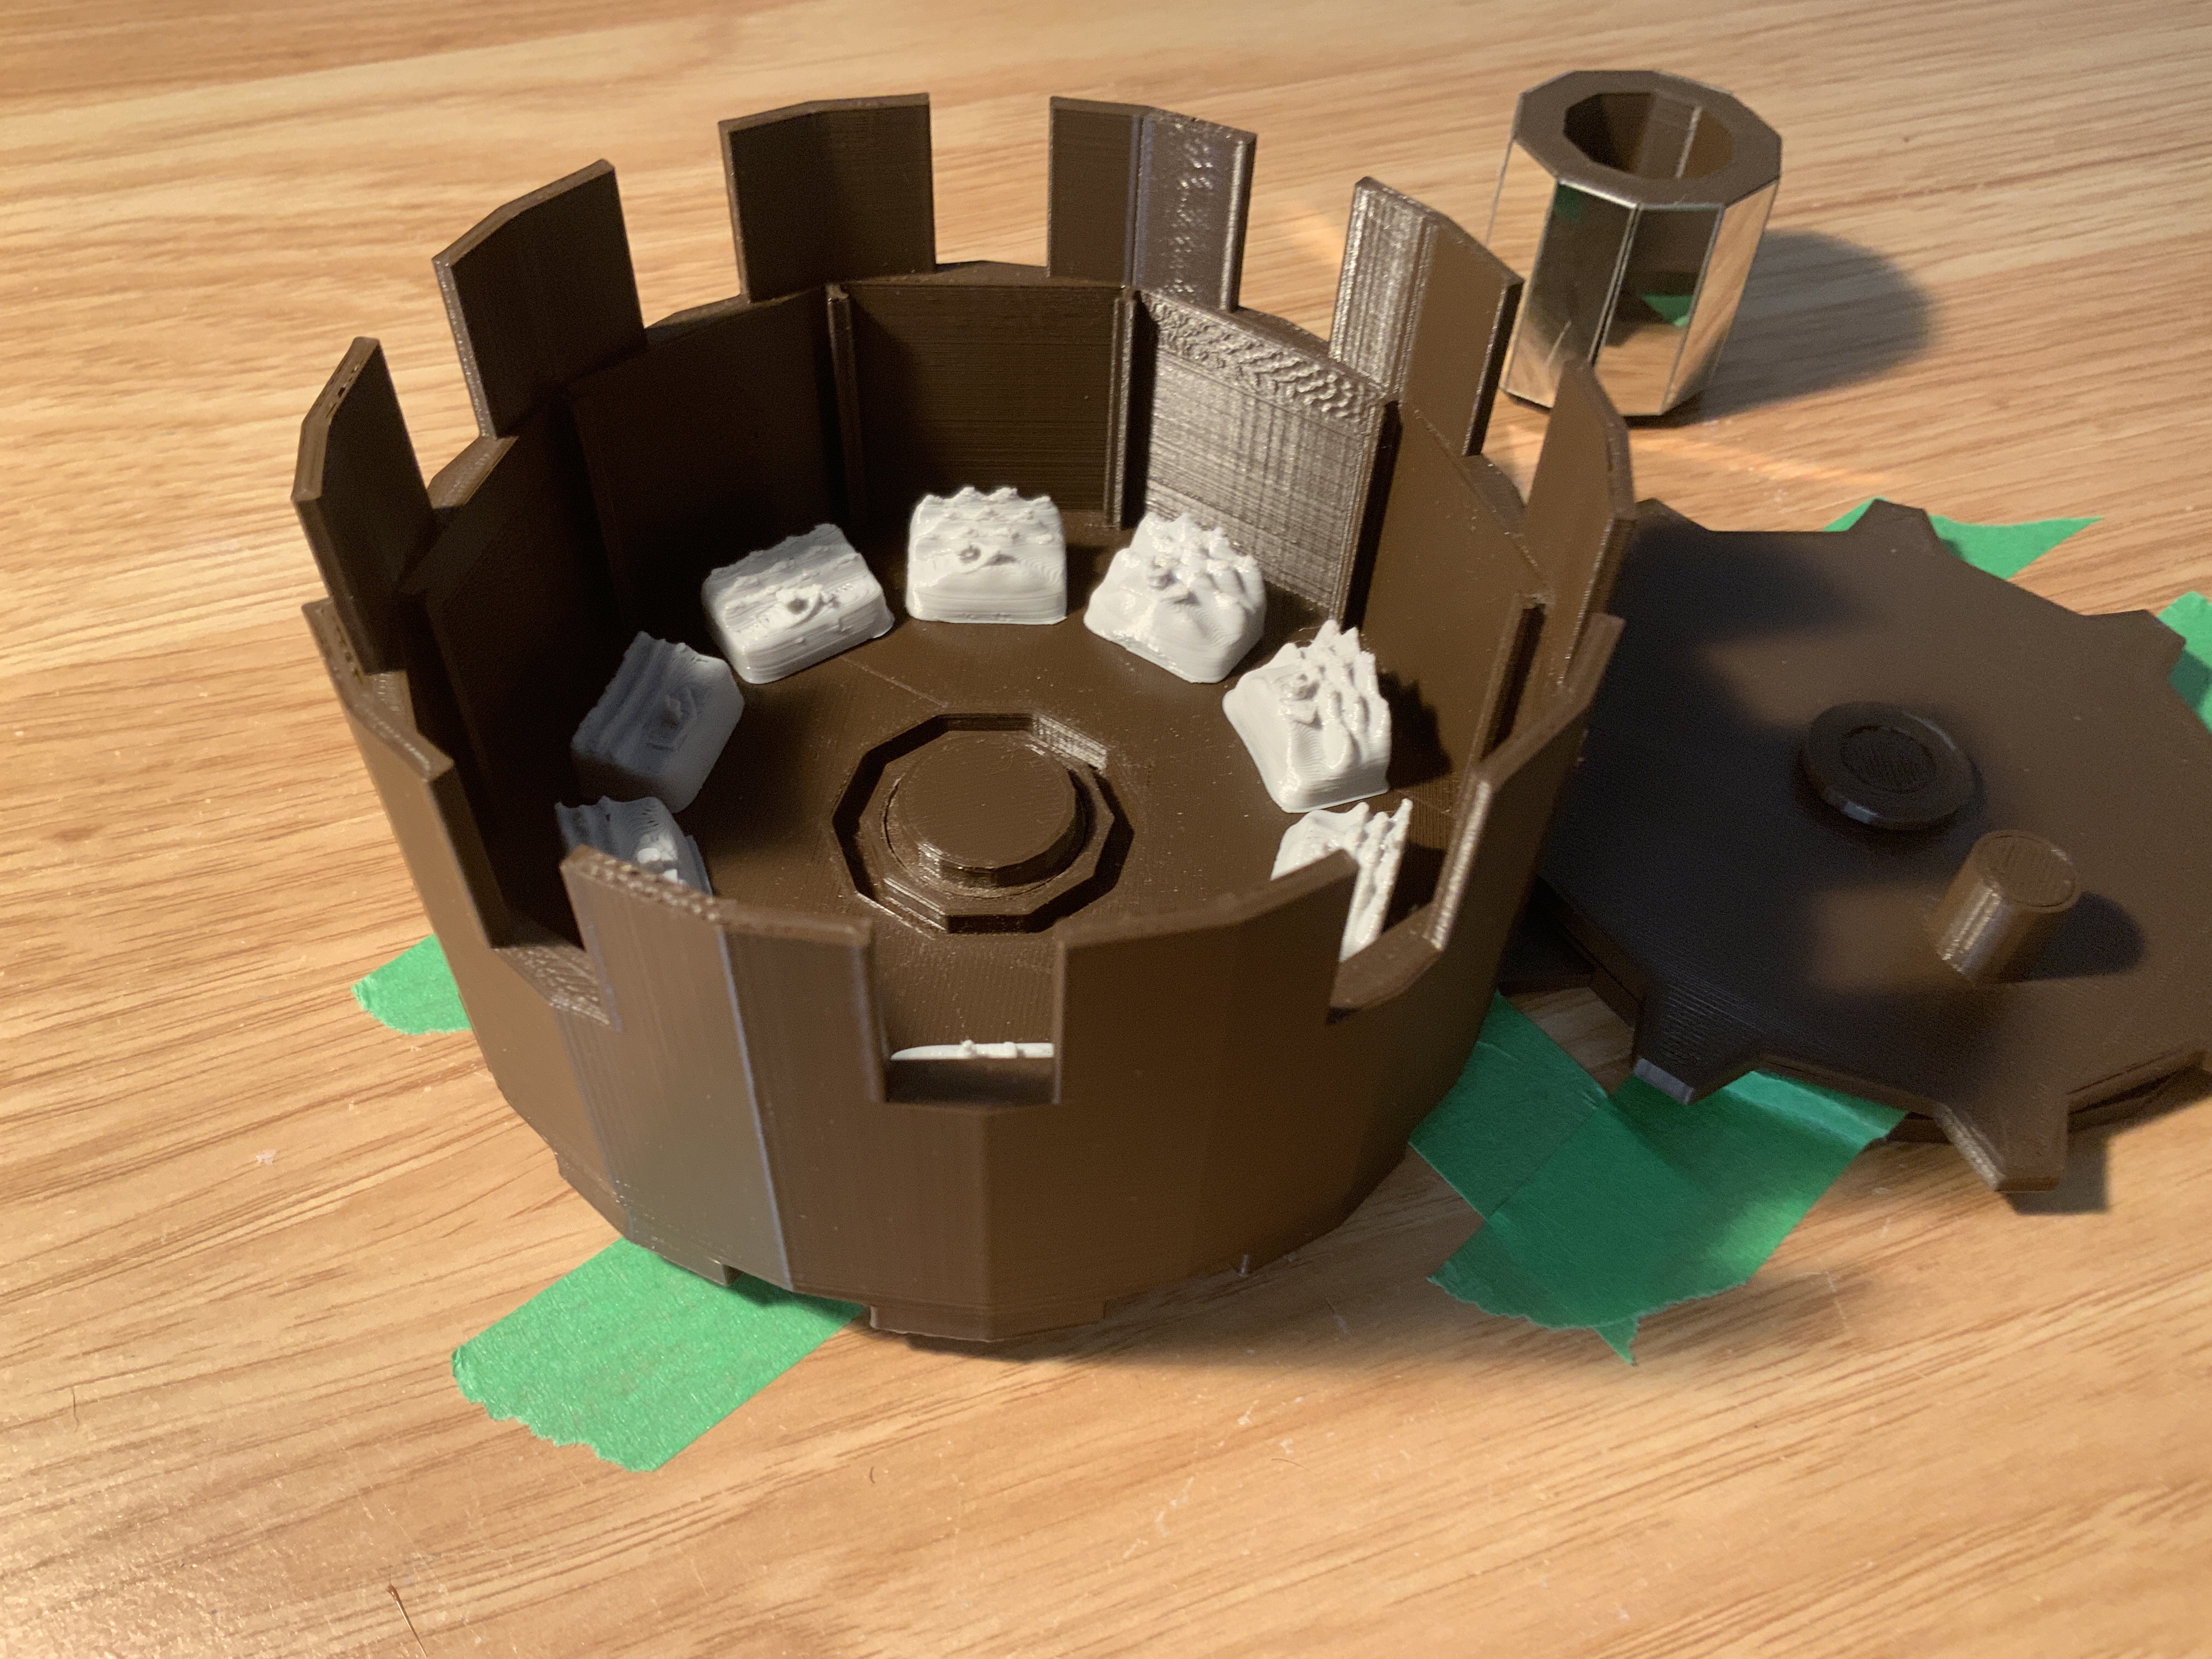
<p><i>(English below)</i></p><figure class="media"><oembed url="https://youtu.be/YTc9gza1Spo"></oembed></figure><h3><strong>Zootrope 3D convertible en praxinoscope</strong><br> </h3><h4><strong>Un peu d’histoire :</strong></h4><p>Le <a href="https://fr.wikipedia.org/wiki/Zootrope"><strong>zootrope</strong></a> est un jouet optique du 19e siècle, précurseur du cinéma. Il s’agit d’un tambour (cylindre) à l’intérieur duquel est placée une bande de papier contenant une série de dessins. En haut du zootrope se trouvent des fentes pour que le spectateur puisse voir les dessins. Quand le jouet entre en rotation, le spectateur voit alors les dessins les uns après les autres selon la vitesse de rotation, créant une animation en boucle.</p><p>Ce jouet aurait été créé par William George Horner et entre dans la série culturelle des jouets optiques d’animation et fait suite au phénakistiscope de Joseph Plateau. Le spectateur peut voir l’animation grâce à l’effet phi et à la persistance rétinienne.</p><p>Émile Reynaud a amélioré le zootrope en ajoutant des miroirs au centre, augmentant la quantité de lumière reçue par les images. Il créa donc le <a href="https://fr.wikipedia.org/wiki/Praxinoscope"><strong>praxinoscope</strong></a>. Reynaud a par la suite amélioré mainte fois son jouet pour créer le théâtre optique, première projection d’images animées couleur avec son synchrone et précurseur du cinématographe mis au point par les frères Lumière.</p><p>Jusqu’ici, les images contenues dans ces deux jouets optiques ne sont que papier. Étienne-Jules Marey, connu pour la chronophotographie, a construit un <a href="https://www.researchgate.net/figure/Etienne-Jules-Marey-Zoetrope-containing-small-sculptures-used-to-reproduce-the-movement_fig2_304338906">zootrope dans lequel il a placé des reproductions tridimensionnelles d’oiseau en vol</a>. Il s’agit donc ici d’un zootrope où l’élément animé est tridimensionnel.</p><p> </p><p><strong>Maintenant</strong>, j’ai tenté de m’inspirer de leurs travaux pour construire à mon tour un zootrope tridimensionnel, imprimé entièrement en 3D, mais pourquoi ne pas pousser plus loin ? Ce zootrope peut contenir des figurines tridimensionnelles et des images papier en même temps. Il ne s’agit pas d’une bande d’images, mais d’images et de figurines individuelles et interchangeables, donc le joueur peut décider lui même des figurines et images qu’il souhaite voir en mouvement, mais il a également le contrôle sur l’ordre de ces éléments, créant ainsi un nombre infini d’animations. Ce modèle vous laisse également la possibilité d’ajouter vos propres créations et de les animer à votre guise. Mais ce n’est pas tout, en imprimant une pièce supplémentaire et en y collant des miroirs, vous pouvez facilement convertir l’objet en praxinoscope. De plus, vous avez le contrôle totalement de la vitesse et du sens de la rotation.</p><p><br> </p><h4><strong>Impression :</strong></h4><p>Toutes les pièces sont imprimables sans support. Il est recommandé d’<strong>imprimer le zootrope en premier</strong> puisqu’il s’agit de l’objet le plus gros. Au besoin, vous pouvez changer l’échelle pour que le zootrope puisse être imprimé sur votre imprimante, mais vous devez également <strong>utiliser la même échelle pour tous les autres objets</strong>.</p><p>Dans mon cas, j’ai imprimé le zootrope à 66 %.</p><p>Il y a plusieurs pièces à faire imprimer, mais il est possible d’en imprimer certaines en même temps. Je vous conseille de <strong>choisir une couleur foncée pour le zootrope</strong> et une <strong>couleur pâle pour les figurines</strong> que vous pouvez également peinturer si vous le souhaitez. Vous pouvez imprimer avec la définition que vous voulez pour la plupart des pièces, mais pour les figurines, c’est mieux d’y aller avec des couches très fines. Le nombre de murs est à votre choix, tout comme le remplissage. Vous n’avez pas besoin d’une bordure, mais ceci est à votre discrétion.</p><p>Vous devez faire imprimer toutes les pièces du zootrope, mais vous pouvez choisir parmi les figurines d’animation. Toutes les pièces doivent être imprimé à plat, aucun support nécessaire.</p><p>À imprimer (3D) :</p><ul><li>Zootrope-praxinoscope (ou si vous ne voulez pas un praxinoscope, juste le zootrope.)<ul><li>Il y a également une version plus étroite, les fentes du haut sont plus étroite (narrow);</li></ul></li><li>Base M</li><li>Base Z</li><li>Connecteur</li><li>Manivelle</li><li>Anneau M</li><li>Miroir (si vous voulez le praxinoscope).</li><li>Figurines de votre choix parmi :<ul><li>Ours</li><li>Bateau</li><li>Bonhomme de neige</li><li>Papillon</li></ul></li><li>Images papier (2D) parmi (ceux-ci ont été fait pour la version à 66%, vous aurez peut-être à redimensionner) :<ul><li>Cheval <a href="https://www.imdb.com/title/tt2221420/?ref_=nm_flmg_dr_51">(celui photographié par Muybridge)</a></li><li>Igloo</li><li>Océan 1</li><li>Océan 2</li><li>Ciel</li><li>Arbre</li><li>Gabarit (si vous voulez créer vous-même vos animations).</li></ul></li></ul><figure class="image image-style-align-center image_resized" style="width:75%;"><img src="https://media.printables.com/media/prints/274293/rich_content/af9f7875-c14b-4b48-9d5c-4b7af170b630/img_1880.jpg#%7B%22uuid%22%3A%223f7c96cb-9d26-4c60-b936-27e3d74ece14%22%2C%22w%22%3A3666%2C%22h%22%3A3024%7D"></figure><p><br> </p><h4><strong>Assemblage :</strong></h4><ol><li>Sur une table (ou surface plate), mettez le <strong>Connecteur</strong> entre la <strong>Base Z</strong> et la <strong>Base M</strong>. Le connecteur doit toucher aux deux autres. Ensuite, utilisez du papier collant pour les fixer en place. (Pour plus de permanence, vous pourriez coller les pièces sur une surface. Si votre imprimante le permet, l’idéal est de faire imprimer les 3 pièces ensemble, en un morceau.)</li></ol><figure class="image image-style-align-center"><img></figure><figure class="image image-style-align-center image_resized" style="width:50%;"><img src="https://media.printables.com/media/prints/274293/rich_content/7ca10944-a2f2-49ec-9a53-490116d3dead/img_1882.jpg#%7B%22uuid%22%3A%2249277369-7d13-4efd-abe3-64fb103ab406%22%2C%22w%22%3A4032%2C%22h%22%3A3024%7D"></figure><p>2. Mettez le <strong>Zootrope-praxinoscope</strong> (ou le <strong>zootrope</strong>) sur la Base Z. Au besoin, sablez le trou. Le tambour doit pouvoir tourner. Ensuite, mettez la <strong>Manivelle</strong> sur la Base M, de sorte qu’une partie soit dans les encoches du zootrope-praxinoscope, et empêchez-la de sortir avec l’<strong>Anneau M</strong>. (Si vous ne voulez pas l’option de transformer le zootrope en praxinoscope, vous pouvez imprimer la pièce <strong>Zootrope</strong>.)</p><figure class="image image-style-align-center image_resized" style="width:75%;"><img src="https://media.printables.com/media/prints/274293/rich_content/b7574160-ee70-42c4-8103-9bdbfac46dc6/zootrope-assemblage-2.jpg#%7B%22uuid%22%3A%2290ff974e-f2ac-436f-a0a1-b59fbd2467a9%22%2C%22w%22%3A2048%2C%22h%22%3A2048%7D"></figure><figure class="image image-style-align-center image_resized" style="width:50%;"><img src="https://media.printables.com/media/prints/274293/rich_content/51d4b867-1d77-48e7-9fc7-2122eccc5870/img_1883.jpg#%7B%22uuid%22%3A%221a0f5d66-a201-42d5-ac37-e90a05dacf68%22%2C%22w%22%3A4032%2C%22h%22%3A3024%7D"></figure><figure class="image image-style-align-center image_resized" style="width:50%;"><img></figure><figure class="image image-style-align-center image_resized" style="width:50%;"><img></figure><p>3. Maintenant, insérez les <strong>figurines de votre choix</strong> à l’intérieur du zootrope (sur les boutons prévus à cet effet). En dessous de chaque figurine, un numéro est gravé. Vous pouvez suivre l’ordre ou créer un nouvel ordre. Vous avez également la liberté de créer de nouvelles séries de figurines, mais il est conseillé de créer une animation en boucle. <strong>À partir de ce moment, votre zootrope est fonctionnel !</strong> Vous n’avez qu’à tourner la manivelle et observer l’animation prendre vie au travers des fentes.</p><ol><li>Si vous souhaitez avoir un arrière-plan, faites imprimer les PDF et découper les images. Chaque morceau de papier devrait comporter une image et le chiffre qui lui est associé, et plier sur la ligne. Vous avez un choix de dessins, mais vous pouvez créer de nouvelles animations, mais il est conseillé de créer une animation en boucle. Ensuite, insérer chaque image dans le cadre prévu à cet effet. Vous pouvez respecter l’ordre, mais vous n’être pas obligé d’associer les chiffres des figurines aux chiffres des images.</li><li>Vous pouvez choisir d’avoir uniquement des figurines tridimensionnelles ou des animations papier.</li></ol><figure class="image image-style-align-center image_resized" style="width:75%;"><img src="https://media.printables.com/media/prints/274293/rich_content/863f9acc-2816-4a66-a5ff-5ba495d60509/zootrope-assemblage-3.jpg#%7B%22uuid%22%3A%2236011dac-fbf1-48c3-8c30-0f5d2ed1211a%22%2C%22w%22%3A2048%2C%22h%22%3A2048%7D"></figure><p>4. Si vous voulez convertir le zootrope en praxinoscope, collez des miroirs sur la pièce nommée <strong>Miroir</strong>. Il est conseillé d’acheter un type de miroir flexible et découpable avec des ciseaux. Insérez la pièce au centre du zootrope-praxinoscope. À présent, vous devez regarder le miroir pour voir l’animation. (Pas tout à fait compatible avec l’animation papier, mais fonctionne parfaitement pour les figurines 3D.) Il est recommandé d'utiliser une bonne source de lumière à proximité, spécialement en mode zootrope (les miroirs vont concentrer la lumière). Le miroir est la seule pièce que vous avez à acheter qui n’est pas imprimable en 3D.</p><ol><li>Des ambiances sonores ont également été créées pour accompagner l’animation des figurines dans le zootrope. Libre à vous de les écouter pendant que vous jouez.</li></ol><figure class="image image-style-align-center image_resized" style="width:75%;"><img src="https://media.printables.com/media/prints/274293/rich_content/241c7602-26fd-4fa7-8c08-74bf2705fc33/zootrope-assemblage-4.jpg#%7B%22uuid%22%3A%22ef139b78-148f-4a0e-8680-2b1d98449c41%22%2C%22w%22%3A2048%2C%22h%22%3A2048%7D"></figure><figure class="media"><oembed url="https://youtu.be/k-Bkdoyn8JQ"></oembed></figure><p><br> </p><figure class="media"><oembed url="https://youtu.be/TcK2wxmCoI0"></oembed></figure><h3><br><strong>3D Zoetrope convertible in praxinoscope</strong></h3><p> </p><h4><strong>A bit of history:</strong></h4><p>The <a href="https://en.wikipedia.org/wiki/Zoetrope"><strong>zoetrope</strong></a> is an optical toy from the 19th century, precursor of cinema. It is a drum (cylinder) inside which is placed a paper strip containing a series of drawings. On the top of the zoetrope are some opening so the spectator can see the drawings. When the toy is rotating, the spectator then sees the drawings ones after the others according to the speed of the rotation, creating a loop animation.</p><p>This toy was created by William George Horner and is a part of the cultural series of animation optical toy, following the phenakistiscope from Joseph Plateau. The spectator can see the animation through Phi effect and persistence of vision.</p><p>Émile Reynaud improved the zoetrope by adding mirrors in the center, increasing the quantity of light to the images. He then created the <a href="https://en.wikipedia.org/wiki/Praxinoscope"><strong>praxinoscope</strong></a>. Reynaud improved his toy multiple times to create the <i>théâtre optique</i>, first colored animated images projections with synchronised sound and precursor of the cinematograph patented by the Lumière brothers.</p><p>Up to then, the images inside both those toys were only on paper. Étienne-Jules Marey, known for chronophotography, built a <a href="https://www.researchgate.net/figure/Etienne-Jules-Marey-Zoetrope-containing-small-sculptures-used-to-reproduce-the-movement_fig2_304338906">zoetrope inside which he placed tridimensional reproductions of a flying bird</a>. It is here a zoetrope where the animated element is tridimensional.</p><p><strong>Now</strong>, inspired by their works, I designed a tridimensional zoetrope, entirely 3D printed, but why not push even further? This zoetrope can contain 3D figurines and paper images at the same time. It is no more a strip of paper, but individual images and figurines that can by changed at will, so the player can decide which figurines and images he wants to see in movement, but he can also control the order of those elements, creating an infinite number of animations. This model also gives you the possibility to add your own creations and animation them at will. But it’s not all, by printing one more piece and gluing some mirrors to it, you can easily convert the object into a praxinoscope. Furthermore, you have complete control over the speed and direction of the rotation.</p><figure class="media"><oembed url="https://youtu.be/YTc9gza1Spo"></oembed></figure><h4><strong>Printing:</strong></h4><p>All the pieces are printable without support. It is recommended printing<strong> the zoetrope first</strong> since it is the biggest object. If needed, you can rescale the zoetrope to fit your 3D printer, but you need to <strong>use the same scale for all objects</strong>.</p><p>In my case, I printed my zoetrope at 66%.</p><p>There are a lot of pieces to print, but it is possible to print some of them at the same time. I suggest choosing<strong> a darker color for the zoetrope</strong> and <strong>a paler color for the figurines</strong> that you can paint if you want. You can print with the layer height you want for most of the pieces, but for the figurines, it is better to go with thin layers. The number of walls is yours to choose, like the infill. You don’t need a raft, but this is to your discretion.</p><p>You need to print all the pieces of the zoetrope, but you can choose among the animation figurines. All the pieces need to be printed flat, without support.</p><p>To print (3D):</p><ul><li>Zoetrope-praxinoscope (or if you don’t want a praxinoscope, just the zoetrope.)<ul><li>There is now a narrow version of both, the slit on top are narrower;</li></ul></li><li>Base M</li><li>Base Z</li><li>Connector</li><li>Manivelle (handle)</li><li>Anneau M (ring)</li><li>Mirror (if you want a praxinoscope)</li><li>Figurines of your choice:<ul><li>Bears</li><li>Boat</li><li>Snow man</li><li>Butterfly</li></ul></li><li>Paper images (2D) among (those are made for the 66% version, you might need to rescale):<ul><li>Horse <a href="https://www.imdb.com/title/tt2221420/?ref_=nm_flmg_dr_51">(the one photographed by Muybridge)</a></li><li>Igloo</li><li>Ocean 1</li><li>Ocean 2</li><li>Sky</li><li>Tree</li><li>Template (if you want to create animation by yourself).</li></ul></li></ul><figure class="image image-style-align-center image_resized" style="width:75%;"><img src="https://media.printables.com/media/prints/274293/rich_content/73f05fe4-b4c5-4b4e-9f2e-e74c613f1e46/img_1880.jpg#%7B%22uuid%22%3A%2259e4fedd-ac41-4b97-ae23-a14eed355a0f%22%2C%22w%22%3A3666%2C%22h%22%3A3024%7D"></figure><h4> </h4><h4><strong>Assembly:</strong></h4><ol><li>On a table (or flat surface), put the <strong>Connector</strong> between <strong>Base Z </strong>and <strong>Base M</strong>. The connector should touch both pieces. Then, use tape to fix in place. (For a more permanent installation, you can glue the piece to the surface. If your printer allows it, the ideal is to print the 3 pieces together, in one piece.)</li></ol><figure class="image image-style-align-center"><img src="https://media.printables.com/media/prints/274293/rich_content/373d90e5-698b-4615-836f-91ba515a7baf/img_1881.jpg#%7B%22uuid%22%3A%22c0c3372c-717d-462b-90b6-64cbbb9b0e99%22%2C%22w%22%3A4032%2C%22h%22%3A3024%7D"></figure><p><img class="image_resized" style="width:50%;"></p><p>2. Put the <strong>Zoetrope-praxinoscope </strong>(or <strong>Zoetrope</strong>) on Base Z. If needed, sand the hole. The drum should be able to turn. Next, put the Manivelle (handle) on Base M, but the gear should go partly inside the small holes of the zoetrope-praxinoscope, and to prevent it from getting out, put <strong>Anneau M</strong> (ring). (If you don’t want the option to transform the zoetrope into a praxinoscope, you can print the <strong>Zoetrope</strong>.)</p><figure class="image image-style-align-center image_resized" style="width:75%;"><img></figure><figure class="image image-style-align-center image_resized" style="width:75%;"><img src="https://media.printables.com/media/prints/274293/rich_content/09e7aa37-e55b-4225-a342-cbd6aa087e00/zootrope-assemblage-2.jpg#%7B%22uuid%22%3A%220483507b-3fc7-46d3-8938-9e28d5b29c19%22%2C%22w%22%3A2048%2C%22h%22%3A2048%7D"></figure><p>3. Now, insert the <strong>figurines of your choice</strong> inside the zoetrope (on the pins). Under each figurine, there is an engraved number. You can follow the order or create a new order. You also have the liberty to create a new series of figurines, but it is better to model a looping animation. <strong>From that point on, your zoetrope is functional!</strong> You just have to turn the handle and observe the animation take life by the holes. </p><p> </p><ol><li>If you want a background, print the PDF and cut the images. Each piece of paper needs to have a picture and his number, and folded on the line. You have the possibility to use the drawings, but you can also create new animation, but it is better to create loop animation. Then, insert each picture in its frame. You can respect the order, but you don’t have to associate the numbers of the figurines to the numbers of the pictures.</li><li>You can choose to have only the 3D figurines or just paper drawings.</li></ol><figure class="image image-style-align-center image_resized" style="width:75%;"><img src="https://media.printables.com/media/prints/274293/rich_content/863f9acc-2816-4a66-a5ff-5ba495d60509/zootrope-assemblage-3.jpg#%7B%22uuid%22%3A%2236011dac-fbf1-48c3-8c30-0f5d2ed1211a%22%2C%22w%22%3A2048%2C%22h%22%3A2048%7D"></figure><p>4. If you want to convert the zoetrope into a praxinoscope, glue some mirrors on the piece called <strong>Mirror</strong>. It is suggested to buy the flexible type of mirror that you can cut with scissors. Insert the piece in the middle of the zoetrope-praxinoscope. Now, you need to watch the animation through the mirrors. (Not totally compatible with the paper animation, but perfect for the 3D figurines.) It is suggested to use a good light source near, especially in zoetrope mode (the mirrors concentrate the light). The mirror is the only piece you will have to buy than is not printable.</p><ol><li>Sound ambiances have also been created to go with the figurine animation of the zoetrope. You are free to listen to them while you are playing.</li></ol><figure class="image image-style-align-center image_resized" style="width:75%;"><img src="https://media.printables.com/media/prints/274293/rich_content/241c7602-26fd-4fa7-8c08-74bf2705fc33/zootrope-assemblage-4.jpg#%7B%22uuid%22%3A%22ef139b78-148f-4a0e-8680-2b1d98449c41%22%2C%22w%22%3A2048%2C%22h%22%3A2048%7D"></figure><p><br> </p><figure class="media"><oembed url="https://youtu.be/k-Bkdoyn8JQ"></oembed></figure><figure class="media"><oembed url="https://youtu.be/TcK2wxmCoI0"></oembed></figure><p> </p>
With this file you will be able to print Zoetrope Praxinoscope convertible with your 3D printer. Click on the button and save the file on your computer to work, edit or customize your design. You can also find more 3D designs for printers on Zoetrope Praxinoscope convertible.