Z-Sync Belt Tensioner
prusaprinters
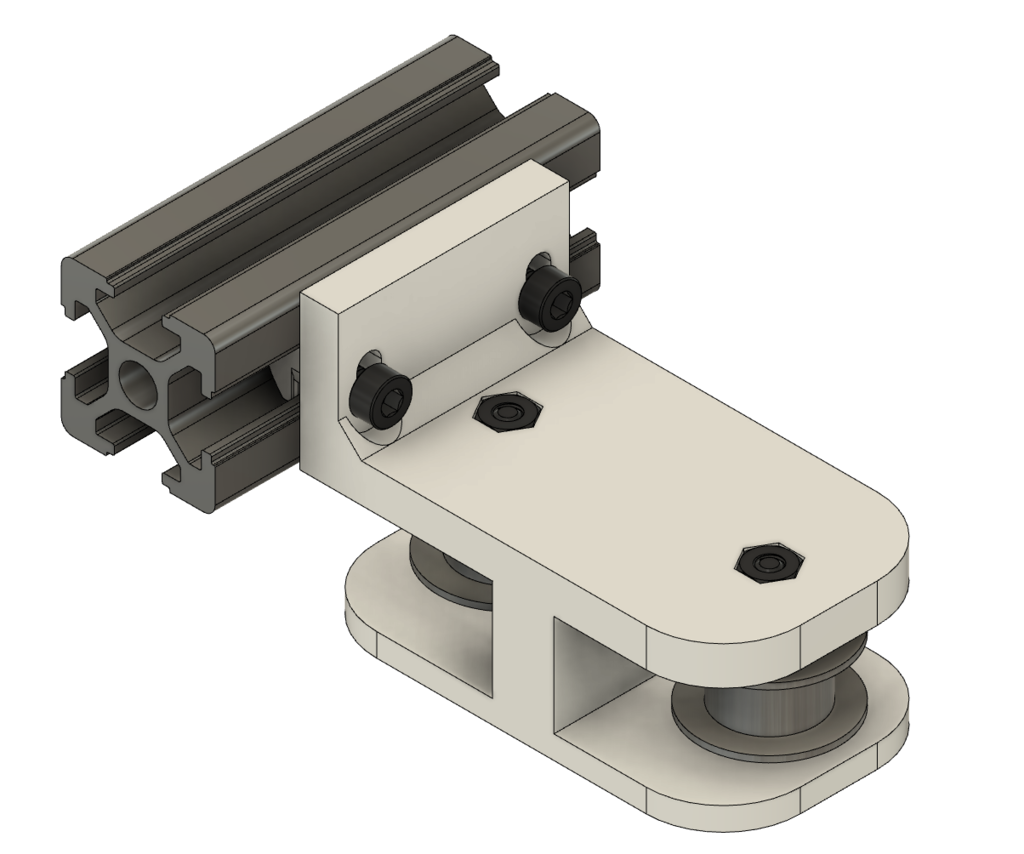
<p>I use the Z-Sync belt from <a href="https://www.tinymachines3d.com">Tiny Machines</a> on my CR-10S Pro. I found the belt to be a little loose, so I made this belt tensioner to take out some of the slack. It mounts to the top cross brace and has some adjustability to make it align with the Z location of your belt.</p><p>In addition to the printed part you will need:</p><ul><li>(2) GT2 toothless idler bearings - see photo</li><li>(2) M3 T-Nuts</li><li>(2) M3 Nuts</li><li>(2) M3x20 Screws</li><li>(2) M3x10 Screws</li></ul><p>I've included my Fusion 360 file which you can use to more easily modify the design if desired.</p><p>You can see it installed here:</p><figure class="media"><oembed url="https://www.youtube.com/watch?v=xQOSNNhfZ3g"></oembed></figure><p> </p><p>UPDATE 2020-03-08: My nephew printed one of these and found that he needed less tension. He modified the design and gave it back to me to post here. You'll find an additional STL named ZSyncBeltTensioner-LessTension.stl and a Fusion 360 model to go along with it. This version also rides lower than the original and is still adjustable a bit in Z. Choose the one that works best for you, or remix it starting from the model.</p><p><strong>Note</strong>: If you only need only a small amount of additional tension, then just install 1 idler pulley.</p><h3> </h3><h3>Print Settings</h3><ul><li><strong>Rafts: </strong>No</li><li><strong>Supports: </strong>No</li><li><strong>Resolution: </strong>0.2mm</li><li><strong>Infill: </strong>20%</li><li><strong>Filament Used:</strong> <a href="http://www.amazon.com/s?url=search-alias&field-keywords=Hatchbox+PLA&tag=tv-auto-20">HatchBox PLA - Black</a></li><li><strong>Print Orientation</strong>: Print this on its side and no supports are required.</li></ul><h3>Post-Printing</h3><ul><li>Place an idler pulley into the main bracket and insert an M3x20 screw. The screw head should fit into a recess at the bottom of the print.</li><li>Insert an M3x10 screw into one of the slots on the face of the bracket.</li><li>Place the bracket between the loops of the belt. The bracket should be parallel to the belt, roughly in the middle of the top extrusion. You put it in sideways like this so that you can insert it with no tension on the belt.</li></ul>
With this file you will be able to print Z-Sync Belt Tensioner with your 3D printer. Click on the button and save the file on your computer to work, edit or customize your design. You can also find more 3D designs for printers on Z-Sync Belt Tensioner.