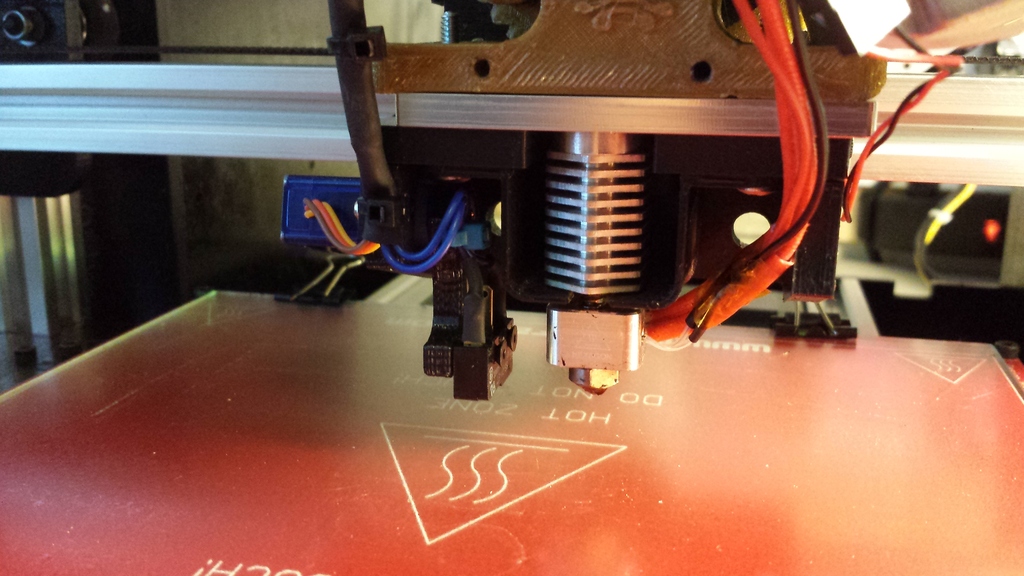
Z Probe Servo Mount for MakerFarm Prusa i3v for Auto Bed Leveling (HXT900)
prusaprinters
<p><strong>UPDATE: Added longer version of Z probe for longer hot ends.</strong></p> <p>This replacement X carriage bracket and switch arm allow you to mount a servo-actuated Z probe to your MakerFarm Prusa i3v printer.</p> <p>The Z probe serves two purposes: it registers the Z home off the glass (instead of the frame) and it allows the printer to probe in multiple locations and compensate for a bed that isn't perfectly level. Both require a newer version of the Marlin firmware. See details in the instructions.</p> <p>There are several versions of this solution out there. I designed this one because I wanted to tuck the switch up tighter under the carriage when it wasn't deployed. This is only for aesthetics.</p> <p>Note this part will not fit with the standard MakerFarm hot end fan shroud. It will fit with my improved Hexgon cooling system:</p> <p><a href="https://www.thingiverse.com/thing:335613">http://www.thingiverse.com/thing:335613</a></p> <p>The bracket and switch arm are sized for the inexpensive and readily-available Hextronic HXT900 servo, available here:</p> <p><a href="http://www.hobbyking.com/hobbyking/store/RC_PRODUCT_SEARCH.asp?strSearch=HXT900">http://www.hobbyking.com/hobbyking/store/RC_PRODUCT_SEARCH.asp?strSearch=HXT900</a></p> <p>You can use the limit switch that came with the i3v kit. See the instructions for details.</p> <p>NOTE: this probe arm was designed around the Hexagon hot end. If your hot end is longer, you may need to use a spacer to raise the extruder and hot end up off the mounting shelf to get enough clearance to use this Z probe.</p> <p>Video of the servo probe in action:</p> <p> <figure class="media"> <oembed url="http://youtu.be/yazApS1ISxo"></oembed> </figure> </p> <h3>Instructions</h3> <p>The servo fits through the hole in the bracket and is attached with the screws that come with the servo. Depending on your printer calibration, you may need to drill out the holes before installing screws.</p> <p>The servo horn that comes with the servo should snap into the arm and when mounted to the servo with a screw, it should be trapped in place and very rigid without any further attachment. If needed, a 2.04mm hole is provided and may be tapped to install an M2.5 screw through the servo horn to secure it to the arm.</p> <p>The limit switch may be mounted directly to the arm with M2.5 screws. The holes are sized to be directly tapped with an M2.5 tap so no other hardware is necessary.</p> <p>You can use the limit switch that came with the MakerFarm kit. You will need to remove the spring arm for the best accuracy. Just grasp it firmly with pliers and carefully twist it free from the housing. Be careful not to crack the body of the switch.</p> <p>If you find that the switch from MakerFarm requires too much force to actuate and it deflects the bed too much to get an accurate measurement, you can try this switch, which requires only 25g to activate, instead:</p> <p><a href="http://www.digikey.com/product-search/en?vendor=0&keywords=SW1005-ND&stock=1">http://www.digikey.com/product-search/en?vendor=0&keywords=SW1005-ND&stock=1</a></p> <p>To use the probe, you will need to upgrade and configure the Marlin firmware in your printer. Zennmaster has provided an excellent guide for setting up auto-bed leveling on the i3:</p> <p><a href="http://zennmaster.com/random-things/auto-bed-leveling-for-the-makerfarm-prusa-i3-part-1-assembly-and-basic-setup">http://zennmaster.com/random-things/auto-bed-leveling-for-the-makerfarm-prusa-i3-part-1-assembly-and-basic-setup</a></p> Category: 3D Printer Parts
With this file you will be able to print Z Probe Servo Mount for MakerFarm Prusa i3v for Auto Bed Leveling (HXT900) with your 3D printer. Click on the button and save the file on your computer to work, edit or customize your design. You can also find more 3D designs for printers on Z Probe Servo Mount for MakerFarm Prusa i3v for Auto Bed Leveling (HXT900) .
