Z Axis Stabilizer, Sidewinder X2 upgrade
prusaprinters
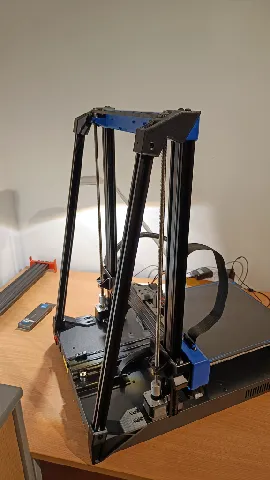
Bed slingers all have problems with z-axis wobble. It gets worse as the height of your print increases. It's important to stabilize the z-axis as much as possible.There is usually a solution with threaded rods. I think they look cheap. So I came up with a different idea. My previous model was a fully printed one. But the problem with that design was that it couldn't be adjusted and it was also quite massive.So in this version I tried to address those issues. It looks cleaner, it is more stable, it can be individually adjusted to correct the z-twist and it can be used to mount even more things to the V-slot aluminum profile.Building instructionsRemove the support structure from your printed parts. The parts are designed to be tight so removal must be done well.Ensure that the profiles can slide into the top and bottom parts.Insert the T-nuts into both ends of your profiles. 2 on each side, facing each otherScrew your profiles into the top and bottom pieces, but do not tighten the screws on the top pieces.Remove the original screws from the top and bottom of your printer's z-axis and replace them with M4 screws with an extra 4mm length (M4 20mm & M4 12mm).Fasten the pieces (together with the aluminium profile attached) from the sides of the printer. be careful with the top piece. it needs some force, but make sure that it sits correctly first. Remarks: The top piece must snap into the holes. To remove it, bend it slightly upwards with a screwdriver.Tighten all M4 screwsWith the upper screws loosened or slightly tightened, you can now bend the Z-axis slightly forwards and backwards. A right angle can be used as an aid. Tighten the upper M3 screws into the profile when you are satisfied.You are finished.If the printer now makes a noise when the Z-axis is moved, check again that the Z-axis is at a right angle. If it is, the problem is more likely to be elsewhere. Needed Materials2x Aluminium V-Slot 2020 Profile, 550mm8x T-Nut M38x M3, 8mm and use of washer recommended4x M4, 20mm 4x M4, 12mmPrint Settings SuggestionsWith "slug" supports "everywhere" or well-placed custom supports to get clear wholes.PLA/PETG works wellUse cubic/gyroid Infill with 40% or moreAdd-On:Mount for 3D Digital Spool Rack (from Creality) to directly weight the remaining filamentNeeded Materials2x M3, 8mm and use of washer recommended2x T-Nut M3 Have fun.I would love to see what you make of it!And feel free to comment.Do you like it? Donations are welcome: Buy me a coffee
With this file you will be able to print Z Axis Stabilizer, Sidewinder X2 upgrade with your 3D printer. Click on the button and save the file on your computer to work, edit or customize your design. You can also find more 3D designs for printers on Z Axis Stabilizer, Sidewinder X2 upgrade.