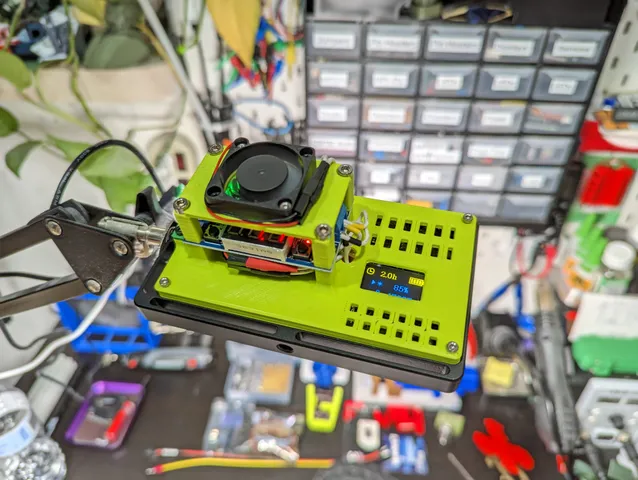
YiaMia Light Panel AC power conversion (ForeverBattery)
prusaprinters
Description:Convert your light panel into a high CRI desk light and never have to worry about the battery dying in the middle of a project.I love the quality of light produced by my YiaMia light panels that I picked up on amazon back when they were on sale for cheap (or available at all…). The probelm I had was that the battery would die after a few hour powered on, even if they were plugged in charging the whole time. For this reason I developed the ForeverBattery. It uses a cheap voltage regulator from amazon, two 5v raspberry pi fans, and some printed parts to convert it to a plug in desk light. You loose the ability to use it unplugged, but gain the ability to use it at max power and never have the battery die.As an aside, I should mention that these YiaMia light panels don't seem to be availible to purchase anymore, probably bought up by all of us r/flashlight people, so this project will probably really only be useful for those of us who bought one a while back. the electronics part of it should be able to be used on other lights of similar build though. BOM:YiaMia Light panel: No longer seem to exist for sale anywhere on the internet…LM2596 DC to DC Voltage Regulator 4-40V to 1.5-35V Buck Converter: https://www.amazon.com/dp/B07WQJ2GD6?psc=1&ref=ppx_yo2ov_dt_b_product_details5v DC fans (x2): https://www.amazon.com/Dorhea-Raspberry-30x30x7mm-Brushless-Cooling/dp/B07G97L9TL/ref=sr_1_3?keywords=raspberry+pi+fan&s=electronics&sr=1-3AC to DC power supply, I used a cheap 12v 2A one from amazon that came with a barrel jack to screw terminal connector: https://www.amazon.com/gp/product/B01GD4ZQRS/ref=ppx_yo_dt_b_search_asin_title?ie=UTF8&psc=1Soldering iron.Some random stranded wire, I used some 22AWG stuff I had in stock.M3x20 screws (x4).M2x8 screws (x2-4).m2x6 screws (x6).M2 nuts (x2-4).Raspberry Pi heat syncs (Optional but recommended, for the mosfet and buck converter on the voltage regulator, they were getting up to over 65c on mine at 80% power).Appropriately sized heat shrink tubing.Something to heat up the heat shrink.Printed parts from here.If you don't have a 3D printer I have made the printed parts available on my Etsy store here: https://www.etsy.com/Substratum3D/listing/1426367790/printed-parts-for-yiamia-light-panel-ac?utm_source=Copy&utm_medium=ListingManager&utm_campaign=Share&utm_term=so.lmsm&share_time=1679016317320 Considerations: I recommend printing the parts in ABS, ASA, or PETg because the light can get pretty warm when run on high output levels. You might be fine using PLA, it's worth a try if that's all you have. I used Polylite ABS. This should be obvious but, MAKE SURE YOU SET THE OUTPUT VOLTAGE BEFORE ATTATCHING IT TO THE LIGHT. I used a multimeter and set the output to 4.2v under no load. The voltage drops to 4.1v under load which is to be expected and is fine.Also, whatever you do, DO NOT let the positive + lead of the LiPo short out. You will be in for a bad day I promise. With all that out of the way, the process is pretty straightforward if you have some experience tinkering with electronics.Remove the backplate with a tiny torx bit.Desolder the battery leads from the PCB (I folded them back onto the cell and taped them up good with some kapton tape).Solder on some of your 22 gauge wire on to where the battery used to be soldered to.Install the new top plate.Install the first fan on the top plate, it just slides into place on the posts, you can add some glue if you want but it's not really needed.Attach the fan and light power wires to the output of the voltage regulator either with the screw terminals or solder pads.Attach the second fan to the top plate with some M2 screws and nuts.Wire that fan into the output of the voltage regulator.Screw everything together, not too tight as your screwing into plastic.Install the heat synca. Put the bigger one onto the Buck converter (Big gray square thing in the topish middle of the voltage regulator), and the smaller one on the MOSFET (Smaler square thing just to the left of the buck converter).Make sure you install the strain relief clamp on the power-in wires coming into the voltage regulator.Double check your wiring and plug it in, everything should come on and work now.
With this file you will be able to print YiaMia Light Panel AC power conversion (ForeverBattery) with your 3D printer. Click on the button and save the file on your computer to work, edit or customize your design. You can also find more 3D designs for printers on YiaMia Light Panel AC power conversion (ForeverBattery).
