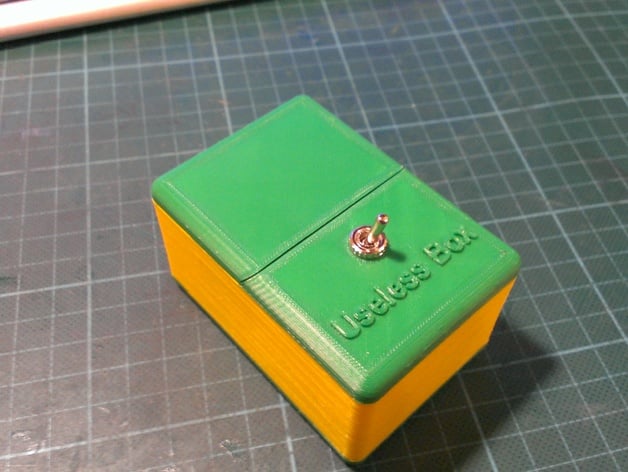
Yet another useless box with Arduino and 5g servo
thingiverse
Why I Created yet Another Irresistible Box? Because I Could! Because I Felt Unsettled By All the Designs on Thingiverse. Some Used Motors, While I Had Only Servos to Work With. Others Supposed to Use Direct Motor Connection, But I Wanted to Program Several Scenarios with Arduino Instead. And Some Just Didn't Impress Me At All. So I Set Out to Create a Design that Was Completely Unique. Here's What My Box Had to Do: * Be as Compact as Possible * Have No Screws Visible on the Outside Panels * Use 5g Servos for Movement * Be Powered by an Arduino Nano * Run Off a 9V Battery Block * Have a Hidden Power Switch And It Gets Even Better - I Wanted to Add Some Extra Features to Make My Box Stand Out. I Created Two Playing Modes. One Was the Normal Mode, Where the Player Simply Tapped the Switch and the Box Would Flip Back on Themself. But If the Player Bothered the Box Too Much (At Least Four Times with Less Than Two Seconds Between Each Tap), The Box Would Tease the Player. Want to See It in Action? Check Out This Video! Unfortunately, My First Attempt Was a Total Disaster. It Was Too Complex and Nearly Impossible to Assemble. But I Didn't Give Up. I Made Some Changes and Created a Second Design, but There Are Still a Few Annoyances in Assembly. There are too many screws that are hard to reach. So I've Included the Solidworks File so You Can Remodel and Fix the Issues Yourself. One Note - Make Sure to Use Alkaline Batteries! Arduino Has a Tendency to Hang When Working with Cheap Batteries, And You May Notice It on the Video. UPDATE: To Avoid the Arduino Hanging Issue, I Added a Step-Down Converter (MC34063-Based). You Can Buy This Online or Make Your Own. This Improved Things Slightly, But I Think 9V Block Might Not Be the Best Option for Driving the Servo After All. Using a LiPo 7.4V 300mAh Battery Would Work Better. Printer Settings: * Printer: RepRap * Resolution: 0.3mm Nozzle, 0.2mm Layer * Infill: 20% Post-Printing Assembly May Take Some Time, But Here's the Algorithm to Follow: Print Everything and Then Drill Screw Holes with a 1.5mm Drill. Mount the 'Cap Mount' Part Using a Piece of 1.5mm Rod. Glue the Cap to the Mount and Secure It with a Small Spring at the Special Hook on the Bottom. Attach the Arm to the Servo and Cut Any Excess Material So It Fits Perfectly. Solder the Servo Wires to Arduino, Black to GND Pin, Red to 5V Pin, and Yellow to D2. Next, Solder the Switch Wires to the Arduino (GND and D4 Pins) and Power Cables from the Battery Connector (Minus Wire Directly to GND Pin, Plus Wire Through the Power Switch to VIN Pin). Upload Firmware and Try It Out. Now You Can Adjust Servo Arm Position or Correct Moving Bounds in the Firmware. Finally, Secure All Servo Parts with Screws, Mount the Top Plate on the Main Box, and Attach Arduino Using Just Two Screws (One Underneath the Power Switch and Another Diagonal for Stability).
With this file you will be able to print Yet another useless box with Arduino and 5g servo with your 3D printer. Click on the button and save the file on your computer to work, edit or customize your design. You can also find more 3D designs for printers on Yet another useless box with Arduino and 5g servo.
