Yarn Cone for Knitting, with Drill Mount Adapter (Parametric)
prusaprinters
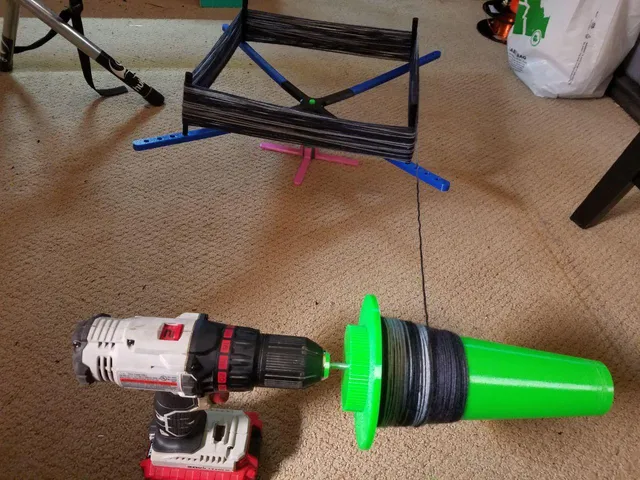
Title: Drill Mountable Yarn Winding Cones (Parametric)Designer: DaniAngelLicense: Drill Mountable Yarn Winding Cones (Parametric) © 2023 by DaniAngel is licensed under CC BY-NC-SA 4.0Summary: This project is a parametric design of yarn winding cones for use with automatic knitting machines. I use this CSM, or circular sock machine, remixed by JeepingJohnny. In order for the machine to work properly, the yarn must freely flow into the machine. Yarn flows most smoothly off of a cone. Cone wound yarn is not always commercially available in the material, gauge, and color desired. Thus, the need arises for the aspiring knitter to wind their own cones with whatever yarn they want. Winding cones is easy when mounted to a motor, such as a drill. Note: You will enjoy the winding experience much more if you have a Yarn Swift. I use the Amish Style Yarn Swift by troysmith31 at Thingiverse.com.Hardware Needed: 1 @ 6mm x 70mm Machine Screw2 @ 6mm Hex Nuts of the same thread specifications as the above screwLoctite or other thread locking compoundYou will need two nuts and one machine screw to complete this project. I have designed the .STL files around a 6mm x 70mm screw and two 6mm hex nuts. If you have other screws and nuts, you can modify the design in OpenSCAD and create your own custom .STL files. Loctite or other thread securing compound is highly recommended. Print Settings: I have included .3mf, .gcode, and .stl files for printing. The included gcode files have the following specifications:PETGNozzle: 0.4mm15% gyroid infill4 perimeters4 solid layers top and bottomSupport Material is needed only for the Adapter.stl and is very minimal.Print temperature: 235C While I chose PETG, you can use most other rigid type of filament you may have on hand. Assembly: (refer to photos)Use a 6mm machine screw to fully seat the nuts into the recesses on both the Adapter and Knurled Nut. After both nuts are seated, insert the screw into the adapter from the side opposite the nut and screw it all the way down. Using a pencil or marker, make at mark on the screw threads next to the nut. Back the screw out until you see the mark. Apply Loctite, or other thread securing compound, to the threads just above your mark (about 5mm worth of threads from the mark towards the screw head). Tighten the screw and set this aside and allow the Loctite to cure.Usage Instructions: (refer to photos)Take the completed adapter (with screw and nut) and insert it into the narrow end of the cone, screw threads first. Let gravity be your friend and drop the adapter into the cone. The threaded portion of the screw should come out of the bottom of the cone. If not, tip the cone over, retrieve the adapter, and try again. (You should be able to accomplish this with very little practice) Pull down on the screw and twist until the hex shaped adapter is fully seated in the Adapter Recess inside of the cone base. Next screw the Knurled nut onto the screw with the embedded nut facing AWAY from the cone. The Knurled Nut should contact the bottom of the cone. Finger tight is good enough. Do not over-tighten. Mount the cone assembly in your favorite drill or Motor. I recommend using a Yarn Swift when winding cones. Start by taking the end of the Yarn and securing it in the slot in the base of the cone. If your yarn is thin, you may find folding over the end of the yarn once or twice makes it more secure for you to insert into the slot. Operate the drill with one hand and use the other hand to guide the yarn and apply a little tension. As you wind the yarn, keep the top ½" to 1" of the cone free. You'll have an unpleasant mess if loops of yarn pop off the top. With a little practice you'll get a feel for how much tension and how much of the cone you can use. Once your yarn is wound, remove the cone from the drill and unscrew the Knurled Nut. Dump the adapter out of the cone by turning the cone upside down. Congrats! You now have cone wound yarn for your knitting project! Pleasantries:Please let me know what you think of this tool. I would love to see your makes and hear your thoughts. What worked for you? What would you change? Knit On! DaniAngel
With this file you will be able to print Yarn Cone for Knitting, with Drill Mount Adapter (Parametric) with your 3D printer. Click on the button and save the file on your computer to work, edit or customize your design. You can also find more 3D designs for printers on Yarn Cone for Knitting, with Drill Mount Adapter (Parametric).
