Y-axis rework for Anet A8
prusaprinters
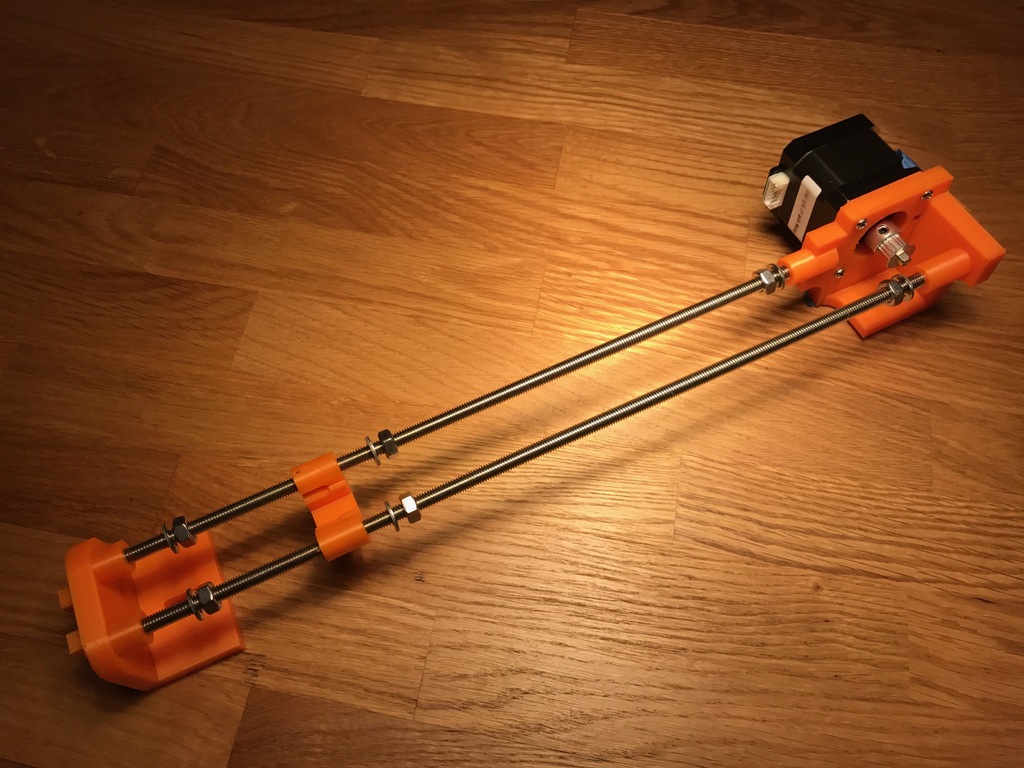
<p>Added 2018-05-006:</p> <p>So finally I uploaded the OpenSCAD files so that you guys can improve this design.</p> <p>Removed 2017-04-14:</p> <p>Removed the old versions, now there are files only for the latest version.</p> <p>I have changed the spec for the threaded rods to 340 and 290 mm.</p> <p>Added 2017-03-23:</p> <p>I remade the two endpoints by moving the screws a little bit to the left to make more room for the belt and belt mount. Also made the cylinders where the screws are inserted into less depp for a more easy assembly into the printer. The files have version number "2.1".</p> <p>Added 2017-02-19:</p> <p>I have added a lower profile belt tensioner that gives 8mm more Y space in the front, file "Y-axis belt3.stl".</p> <p>I have also added files for the belt mount under the heat bed, files "Y belt bedmount.stl" and "Y belt bedmount w offset.stl"</p> <p>The stock design for the Y-axis on a A8 printer is not good. The Y-axis belt is clamped between the front and back of the printer. When the belt is tensioned the front and back will be bent towards each other and the Y Engine mount will rotate slightly. Also when the Y-carriage make direction changes the front and back moves a litte bit in relation to the print head and the frame. This can lead to imperfections on the print.</p> <p>One solution is to print frame stabilizers to make the front/back more stiff and resilient to bend. However, the principle to have the frame cope with belt tension is wrong.</p> <p>With this model I'm trying another approach, to decouple the Y-axis belt tension from the frame. The belt, roller, motor is contained in an integrated module. The belt tension is balanced by the two 6mm threaded bars and not by the frame. This module is then only attached to the back frame of the printer.</p> <p>As a bonus we get a nice belt tensioner for Y.</p> <p>There are two files for the belt mount under the hot bed. One to use when the hotbed H alu bracket is turned upside down (Y_belt_bedmount_w_offset.stl) and another when the H bracket is mounted with the middle section of the H downwards (Y_belt_bedmount.stl).</p> <h3>Print Settings</h3> <p><strong>Printer:</strong></p> <p>Anet A8</p> <p><strong>Rafts:</strong></p> <p>No</p> <p><strong>Supports:</strong></p> <p>Yes</p> <p><strong>Resolution:</strong></p> <p>0.2</p> <p><strong>Infill:</strong></p> <p>At least 40% and 95% on belt tensioner</p> <p><strong>Notes:</strong></p> <p>i Would strongly recommend an infill of 90% with the belt tensioner to get it strong.</p> <p>You could also print the motor part with the motor mount down on the heated (thanx naifa). the model needs to be placed 0.9mm beneath Z=0 in order to flatten out the motor mount.</p> <h3>Post-Printing</h3> <p>Remove structures (obviously).</p> <p>The 6 mm holes for threaded rods might have to be drilled to dimension.</p> <p>The four "pins" that is supposed to fit in the four holes of the front may need some sanding to fit.</p> <h3>Instructions</h3> <p><strong>Bill of materials</strong></p> <p>1 pc. 6 mm stainless steel threaded rod, 340 mm long.</p> <p>1 pc. 6 mm stainess steel threaded rod, 290 mm long.</p> <p>6 pc. 6 mm stainless steel locknut.</p> <p>6 pc. stainless steel washer for 6 mm screw.</p> <p>1 pc. 3 mm axle or screw without head, 17 mm long.</p> <p>1 pc. belt roller for GT2 belt, 16 teeth, 6 mm wide (or original roller)</p> <p><strong>Assembly</strong></p> <p>Note that the belt mount under the bed will be removed completely since it is too bulky. You need to make a clamp of 1-2 mm metal with two holes matching the holes where the original belt was. Clamp the belt between the metal clamp and the bed with two screws and a nut.</p> <ul> <li>Cut the 6mm threaded bars into two pieces of 340 and 290 mm length</li> <li>Touch up the end on the rods where you cut</li> <li>Assemlbe the rods, the endstops, the belt roller and all nuts and wahsers as in the pictures</li> <li>Remove the Y blank rods by pulling the through the hole in the front</li> <li>Remove the belt mount and remove the bed</li> <li>Remove the stock Y motor mount</li> <li>Insert the assembled unit to its position in the printer as in the pictures</li> <li>Place the bed in place, wrap the belt around the motor axle pulley and put the belt roller in place with the 3mm axle (with the belt around it)</li> <li>Center the 6mm rods between the front and back mounts and turn the back two nuts until they rest against the back mount</li> <li>Tension the belt by moving the belt roller carriage forward and turning the nuts so that they help tensioning the belt to the desired tension</li> <li>Fasten the motor mount in the back frame using the original screw/nut that held the stock motor mount</li> <li>Turn the frontmost two nuts on the rod until they rest against the front mount, do NOT tension so that the front is pressed forward and bends. There is no need for tension here other than to prevent the front mount from being loose</li> <li>If the printer is mounted on a base plate: Fasten the motor mount to the base plate with a screw in the slotted hole on the motor mount</li> <li>You may need to check that the belt is in parallell with the blank bars, I had to move the belt roller on the Y motor axis a couple of mm away from the motor</li> </ul> Category: 3D Printer Parts
With this file you will be able to print Y-axis rework for Anet A8 with your 3D printer. Click on the button and save the file on your computer to work, edit or customize your design. You can also find more 3D designs for printers on Y-axis rework for Anet A8.
