Y axis mount motor holder UPGRADE prusa Mk3 / Mk3s / Mk3s+ Threaded inserts
prusaprinters
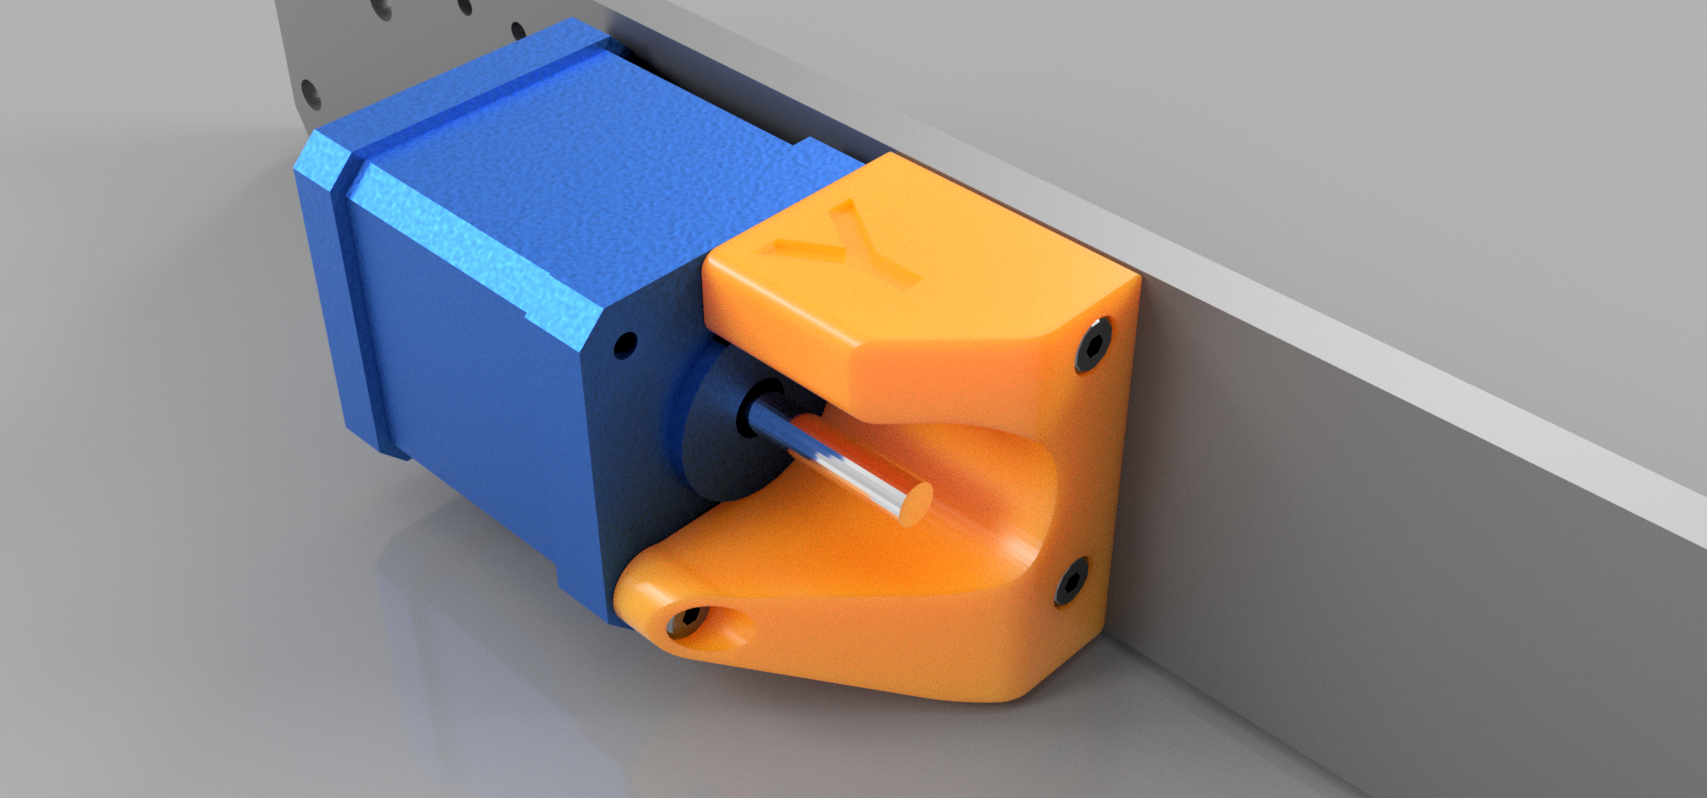
<figure class="image image_resized" style="width:19.92%;"><img src="https://media.prusaprinters.org/media/prints/140036/rich_content/1414df66-ddb7-4128-b26c-105d822ddd12/en.jpg#%7B%22uuid%22%3A%22d3887e7d-d1c6-4c91-839d-7e0d6c55e064%22%2C%22w%22%3A450%2C%22h%22%3A450%7D"></figure><h3>Y holder motor upgrade for Prusa Mk3 Mk3s Mk3s+<br><br> </h3><p>Upgrade your Nema 17 mount to improve vibrations, noise, belt alignment and rigidity.<br><br>→ Easy screwed to panel with <strong>strong ruthex M3 Threaded inserts</strong>.<br><strong>→ 1mm gap</strong> between motor and rear panel.<br>→<strong> x3 mouting screws</strong> used for better rigidy of the motor.<br>→ +0.5mm offset motor for<strong> perfect belt alignment</strong>.<br>→ All screws you need are on your<strong> Prusa spare bag</strong>.<br> </p><blockquote><p><strong>Last update : 07 march 2022</strong><br>Motor is now fixed to the holder by 3x M3 screws ( thx to <a href="https://www.prusaprinters.org/social/28706-poy74fl">poy74fl</a> ) and move back to 0.5mm for perfect Y belt alignement on the shaft.</p></blockquote><p> </p><figure class="image image_resized" style="width:75%;"><img src="https://media.prusaprinters.org/media/prints/140036/rich_content/1c14f5b7-c8d9-49c5-a019-44ec503ffb28/final-y-mount-upgrade-3d2.png#%7B%22uuid%22%3A%22f7052c82-2427-4249-8cf0-0ab538622baf%22%2C%22w%22%3A1707%2C%22h%22%3A798%7D"></figure><figure class="image image_resized" style="width:75%;"><img src="https://media.prusaprinters.org/media/prints/140036/rich_content/3928de30-3731-4d17-9e05-c5e3e4734e29/final-y-mount-upgrade-3d4.png#%7B%22uuid%22%3A%22c5cd361d-2096-44a5-a8a5-ff730192a490%22%2C%22w%22%3A1707%2C%22h%22%3A798%7D"></figure><figure class="image image_resized" style="width:75%;"><img src="https://media.prusaprinters.org/media/prints/140036/rich_content/b86ec752-4096-46c4-b8a1-67a056436a2b/plan-de-coupe.png#%7B%22uuid%22%3A%22c275aa7a-193c-42fa-a443-461fab6bb415%22%2C%22w%22%3A1305%2C%22h%22%3A773%7D"></figure><p> <br><strong>Products list :</strong></p><figure class="image image-style-align-left"><img src="https://media.prusaprinters.org/media/prints/140036/rich_content/499356eb-43cd-4352-a5d8-0441f23f62e7/spare-bagmini.jpg#%7B%22uuid%22%3A%22074745b5-548b-4da2-bd46-06085a1b7b99%22%2C%22w%22%3A200%2C%22h%22%3A150%7D"></figure><p> </p><ul><li>3x Hex M3 10mm </li><li>2x Hex M3 30mm</li><li><a href="https://www.amazon.fr/gp/product/B09MTRHBRL/ref=ppx_yo_dt_b_asin_image_o01_s00?ie=UTF8&th=1">2x ruthex threaded inserts M3S 4mm</a><br> </li></ul><p> </p><figure class="image image-style-align-left"><img src="https://media.prusaprinters.org/media/prints/140036/rich_content/4f5ecfe3-8789-46ed-a659-9689364f5b18/m3smini.jpg#%7B%22uuid%22%3A%22ed4fa0c6-d13a-481e-a3b5-9ffa81e461e7%22%2C%22w%22%3A200%2C%22h%22%3A200%7D"></figure><p> </p><p>You can improve this upgraded Y axis holder by replacing the top ruthex M3S 4mm and its Hex M3 10mm by <a href="https://www.amazon.fr/gp/product/B08BCRZZS3/ref=ppx_yo_dt_b_asin_image_o01_s00?ie=UTF8&th=1">1x ruthex M3 5.7mm</a> and 1x Hex M3 12mm.</p><p><br> </p><p> </p><p> </p><p><strong>Printing instructions :</strong></p><ul><li>PETG / PC / ASA / ABS</li><li>4 perimeters</li><li>50% Gyroide infill</li><li>0,15 mm layer height<br> </li></ul><p>You enjoyed this part?<br>Publish your print and support me with a 5 stars and a like !</p><p> </p><p><strong>Why ruthex M3 nuts instead cheaper nuts ?</strong></p><figure class="media"><oembed url="https://www.youtube.com/watch?v=G-UF4tv3Hvc"></oembed></figure><h5> <br> </h5><h5>What's the problem with the Prusa factory design mount for Y motor ?<br> </h5><p>Factory design Y holder motor part has differents issues :<br> </p><ol><li><strong>Wrong angle of the motor axle</strong><br>When you screw it on the rear panel of the frame, the motor axle is no more perpendicular to Y axle. </li><li><strong>Bad belt tension</strong><br>The motor axle misalignment cause not fit perfect with the belt and can cause belt tension issue</li><li><strong>Noise and vibrations</strong><br>The Y motor touch the rear panel and noises and vibrations are amplified significatively on the frame.</li><li><strong>Brittle screw of the motor </strong><br>The Y motor should be fixed by 4 screws to the holder but the factory design use only 2<br> </li></ol><p> </p><figure class="image image-style-align-center image_resized" style="width:19.99%;"><img src="https://media.prusaprinters.org/media/prints/140036/rich_content/1c76828f-cc9b-44ee-89d1-c5a2bbbec236/fr.webp#%7B%22uuid%22%3A%2259a39b07-0f63-4851-b1bb-183ac5d5be0a%22%2C%22w%22%3A626%2C%22h%22%3A539%7D"></figure><h3>Amélioration du support moteur Y pour Prusa Mk3 Mk3s Mk3s+<br> </h3><p>Upgrade le support de fixation du moteur Nema 17 pour réduire les vibrations et le bruit, gagner en rigidité et centrer plus efficacement la courroie Y sur l'axe.<br><br>→ Vissage facile au châssis avec les fameux <strong>inserts filetés ruthex M3</strong><br><strong>→ Espace d'1mm </strong>entre le moteur et le châssis.<br>→<strong> x3 vis M3 sont utilisée</strong> pour fixer le moteur à son support pour une excellente rigidité.<br>→ Décalage du moteur de 0.5mm pour un alignement parfait de la courroie.<br>→ Toutes les vis nécessaires au montage sont dans le <strong>sachet “Spare”</strong> fournit par PRUSA</p><p> </p><blockquote><p><strong>Dernière MAJ : 07 mars 2022</strong><br>Le moteur est désormais fixé au support par 3 vis M3 ( merci à <a href="https://www.prusaprinters.org/social/28706-poy74fl">poy74fl</a> ) et légèrement reculé de 0.5mm pour un parfait centrage de la courroie Y sur l'arbre d'entrainement.</p></blockquote><p> </p><figure class="image image_resized" style="width:75%;"><img src="https://media.prusaprinters.org/media/prints/140036/rich_content/1c14f5b7-c8d9-49c5-a019-44ec503ffb28/final-y-mount-upgrade-3d2.png#%7B%22uuid%22%3A%22f7052c82-2427-4249-8cf0-0ab538622baf%22%2C%22w%22%3A1707%2C%22h%22%3A798%7D"></figure><figure class="image image_resized" style="width:75%;"><img src="https://media.prusaprinters.org/media/prints/140036/rich_content/3928de30-3731-4d17-9e05-c5e3e4734e29/final-y-mount-upgrade-3d4.png#%7B%22uuid%22%3A%22c5cd361d-2096-44a5-a8a5-ff730192a490%22%2C%22w%22%3A1707%2C%22h%22%3A798%7D"></figure><figure class="image image_resized" style="width:75%;"><img src="https://media.prusaprinters.org/media/prints/140036/rich_content/b86ec752-4096-46c4-b8a1-67a056436a2b/plan-de-coupe.png#%7B%22uuid%22%3A%22c275aa7a-193c-42fa-a443-461fab6bb415%22%2C%22w%22%3A1305%2C%22h%22%3A773%7D"></figure><p> <br><strong>Products list :</strong></p><figure class="image image-style-align-left"><img src="https://media.prusaprinters.org/media/prints/140036/rich_content/499356eb-43cd-4352-a5d8-0441f23f62e7/spare-bagmini.jpg#%7B%22uuid%22%3A%22074745b5-548b-4da2-bd46-06085a1b7b99%22%2C%22w%22%3A200%2C%22h%22%3A150%7D"></figure><p> </p><ul><li>3x Hex M3 10mm </li><li>2x Hex M3 30mm</li><li><a href="https://www.amazon.fr/gp/product/B09MTRHBRL/ref=ppx_yo_dt_b_asin_image_o01_s00?ie=UTF8&th=1">2x inserts filetés ruthex M3S 4mm</a><br> </li></ul><p> </p><figure class="image image-style-align-left"><img src="https://media.prusaprinters.org/media/prints/140036/rich_content/4f5ecfe3-8789-46ed-a659-9689364f5b18/m3smini.jpg#%7B%22uuid%22%3A%22ed4fa0c6-d13a-481e-a3b5-9ffa81e461e7%22%2C%22w%22%3A200%2C%22h%22%3A200%7D"></figure><p> </p><p>Vous pouvez encore améliorer la fixation en remplaçant l'insert du haut M3S et sa vis M3 10mm par <a href="https://www.amazon.fr/gp/product/B08BCRZZS3/ref=ppx_yo_dt_b_asin_image_o01_s00?ie=UTF8&th=1">1x ruthex M3 5.7mm </a>et 1x Hex M3 12mm.</p><p><br> </p><p> </p><p> </p><p><strong>Instructions d'impression :</strong></p><ul><li>PETG / PC / ASA / ABS</li><li>4 perimètres</li><li>50% remplissage Gyroide</li><li>0,15 mm hauteur de couche<br> </li></ul><p>Vous aimez cette pièce ?<br>Publiez votre impression et aidez moi avec un j'aime et 5 étoiles !</p><p> </p><p><strong>Pourquoi un insert fileté ruthex au lieu d'un insert moins cher ?</strong></p><figure class="media"><oembed url="https://www.youtube.com/watch?v=G-UF4tv3Hvc"></oembed></figure><h5> <br> </h5><h5>Quel est le problème avec le support moteur Y d'origine Prusa ?<br> </h5><p>Le design de la pièce d'origine présente plusieurs défauts :<br> </p><ol><li><strong>L'axe du moteur n'est pas parfaitement perpendiculaire à l'axe Y</strong><br>Quand vous vissés le support moteur au cadre arrière de la Prusa, le moteur prend légèrement de l'angle et sont axe n'est plus perpendiculaire à l'axe Y.</li><li><strong>Mauvaise tension de la courroie</strong><br>Le désalignement de l'axe du moteur provoque une tension inégale sur la courroie Y.</li><li><strong>Bruits et vibrations</strong><br>Le moteur Y touche le châssis arrière ce qui amplifie le bruit et les vibrations lors des impressions.</li><li><strong>Fixation fragile du moteur Y à son support</strong><br>Le moteur Y Nema 17 est prévu pour être fixé par 4 vis à son support. Le support Prusa n'utilise que 2 vis ce qui entraine une souplesse indésirable de sa fixation.</li></ol>
With this file you will be able to print Y axis mount motor holder UPGRADE prusa Mk3 / Mk3s / Mk3s+ Threaded inserts with your 3D printer. Click on the button and save the file on your computer to work, edit or customize your design. You can also find more 3D designs for printers on Y axis mount motor holder UPGRADE prusa Mk3 / Mk3s / Mk3s+ Threaded inserts.
