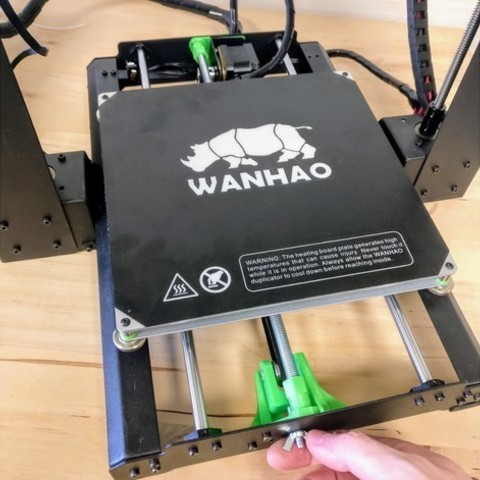
Y-axis Brace and Tensioner for Wanha Di3
cults3d
What A Y-axis brace and belt tensioner with consideration for the Y motor staying perpendicular to the belt even when using stepper dampers is recommended. Stepper dampers can lower noise, but I've tested them and found no effect on print quality. Why For easy adjustment of the Y axis belt-tension. For tightening the Y axis without flexing the frame and throwing the Y motor out of alignment, which is especially helpful when using stepper dampers. A guitar-tuning app is used to tune the tension of belts to 100Hz, but the perfect tension or accuracy of the app is unknown. Options The tensioner can be used without the bracing rod by drilling a hole in the frame for the third M3 screw for the YTensionerBody. The stock idler can be used, or a second version made for two flanged bearings instead, which require two M5 washers. The RearBracket comes in two versions: with a small 1° angle to compensate for the motor bracket bending slightly and with a larger 3° angle to also compensate for a stepper damper being flexible. Hardware needed Preferably one 3mm drill and one 5,5 - 6mm drill. Two M3x5mm screws (re-use from old idler bracket), two M3 nuts, one M5 nut, preferably winged, one M5 locknut for stock idler or one standard M5 nut for flanged bearings. One M5x25 screw with hexagonal head and one M5x30 screw with hexagonal head. Either an M8 threaded rod, 377mm long (print two "M8CenteringNuts") or a 5/16-18" threaded rod, 10,9" long (print two "5-16-18 Nuts"). Optionally, two flanged bearings with inner Ø5mm, outer Ø16mm, thickness 5mm and two M5 washers. Print recommendations Five walls, 0.16 layer height. Installation See pictures for details. Mount the DrillHelper and make sure it is level with the top of the frame. While holding it in place, drill a 3mm hole and then a 6mm hole. To get a cleaner exit, use a 5.5mm drill before the 6mm hole. De-burr, use a file if necessary. - Insert the M3 nuts in the YTensionerBody (glue them if you like). Install it on the frame, it should be level with the upper edge of the frame but 0,5-1mm below. - Assemble the BearingHolder, start with inserting the 30mm hexagonal screw in the bottom and put the belt around the bearing(s). Insert the 25mm hexagonal screw through the Holder and bearing(s). - Remove the screws holding the motor mount and put a RearBracket between the frame and mount. If you use a Stepper damper, choose the 3° version, otherwise choose the 1° version. - Screw on a M8CenteringNut on each end of the threaded rod and insert in it's sockets. Screw the nuts towards the frame on both ends until it is locked in place. Debugging Q: I get a ticking noise from the belt when the bed travels near one end of the printer. A: It is likely that you need to adjust one of the screws that holds the belt under the bed, or the belts position on it. This will prevent the belt from trying to climb the bearing edge/flange.
With this file you will be able to print Y-axis Brace and Tensioner for Wanha Di3 with your 3D printer. Click on the button and save the file on your computer to work, edit or customize your design. You can also find more 3D designs for printers on Y-axis Brace and Tensioner for Wanha Di3.
