XY Adjuster for MINI/+
prusaprinters
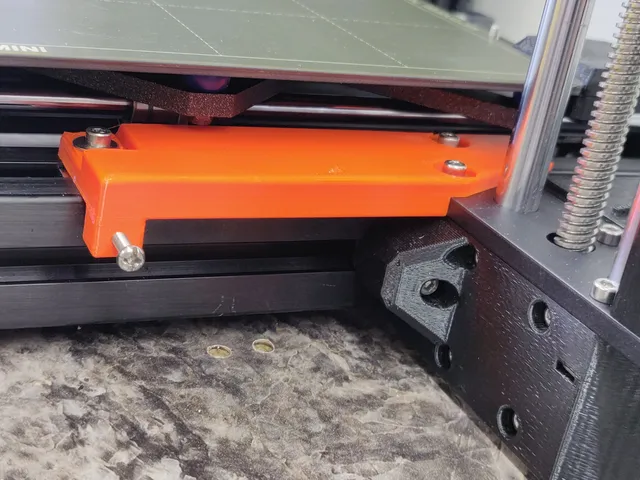
Problem statement: The MINI's XZ tower does not have a squaring/alignment mechanism, possibly resulting in an X-Y non-90-degree skew. This skew really matters when printing pieces that have to mate together.This adjuster piece and procedure allows for fine adjustment of the X-Y skew angle. What you'll need3 washers - 10mm OD, ~3.2mm ID1 screw M3x12 0.5mm thread 1 screw M3x20 0.5mm thread1 M3 30x30 T-nut (can be moved from the rear buddy box long-screw location) InstallationPrint this adjuster in PETG, with the top surface down. Supports needed at the screw slot end. I printed in PETG 0.2mm layer height, with 0.25mm support contact Z distance. Mostly thread the adjuster screw hold with an M3 0.5mm thread tap, leaving a bit of material in the hole so that the screw is not loose. Install the new M3x20 screw in the adjuster hole.Remove the Z-axis (aka XZ tower) by removing the two screws thru the "MINI-Z-bottom", aka Buddy board box, and the top-side screw into the Y-axis T-nut. Also remove the left-most 3mm screw holding the Buddy board box to the "Z plate bottom" (the 5mm thick aluminum bracket that the Z-axis bolts to).Remove the "MINI-Y-plate-front" (front plastic piece of the Y-axis), and move one of the T-nuts from the side to the top of the right-hand extrusion. Reassemble the Y-axis front plastic. With this mod you will only be using the forward side T-nut. (A good time to re-lube the bearings)Re-mount the Z-axis to the Y-axis, with the adjuster placed over the Z plate bottom. Install washers in the rear-top-side screws holes. Use only the forward side Buddy board box screw position (throw the long screw in your spare parts bin). Install a M3x12 screw and washer into the adjuster front screw slot into the moved T-nut.Tighten the top-side screw thru the Z plate bottom into the Buddy board box. Leave the other three screws slightly loose for now. AdjustingInstall the Aligner jig onto the XZ carriage, and lower the Z down to a couple millimeters from the bed plate. Make sure that your X-axis rods are not twisted! Move the Y-axis until one of the left-right printed lines is visible along the back side of the jig.Slightly snug the screw through the Buddy board box. This pulls the XZ tower up against the Y-axis extrusion. This will probably cause a X-Y skew to be clockwise. Press the forward edge of the new adjuster up against the Y-axis extrusion and turn the adjuster screw until the printed line on the bed plate appears parallel to the edge of the jig. Turning in the adjuster screw will pull the X-Y skew counter-clockwise. You may need to slightly loosen the screw through the Buddy board box to allow for turning the adjuster screw in.While holding the adjuster screw against the Y-axis extrusion, tighten the top-side Y-Z clamp screw, and snug-tighten the adjuster forward top-side screw. Check the tightness of the screw in the forward Buddy board box.Remove the alignment jig and print a first layer calibration. Check for parallel of the printed lines with the left-right lines on the bed plate. Also make sure that the in-out printed lines are parallel to the left & right printed lines to make sure the bed plate is on square.Rinse and repeat adjustment until you are happy. Notesa) You may wish to cut a notch in the alignment jig to allow access to the XZ tower clamp screw while the jig is in the down position.b) This adjuster does not help with the X-Z skew. See Prusa's guide for this adjustment. Note that other Y-to-Z axis braces may not fit with this adjuster in place. I strongly recommend the Bed Leveling Mod for Z-axis adjustment. Make sure to use the low-profile nuts on the right underside heater plate mounting so as to clear the adjuster screws.c) The MINI assembly instructions say to "tighten all screws in this particular order: First, the M3x12 screw at the top. Second, the M3x40 screw on the side. Third, the M3x20 screw on the side." Prusa offers no guidance on alignment check or adjustment for X-Y skew, either in the assembly manual or in the "Squaring your MINI" guide. Hum…d) I have not checked fit with a MINI+, which has a different linear bearing clamp on the Y-axis. I assume this provides for more clearance, not less. Please comment about fit if you have a MINI+ Other resourcesExcellent video explaining the problem - Prusa Mini + / Squaring X Y Axis SkewBed leveling mod - https://github.com/bbbenji/PMSBLMAligner jig - https://www.printables.com/model/61817-prusa-mini-alignerOfficial Prusa "Squaring your MINI" page - https://help.prusa3d.com/article/xz-axis-skew-correction-mini_158518 - Unfortunately, Prusa does not discuss the XY skew problem.MINI YZ-axis assembly manual - https://help.prusa3d.com/guide/2-yz-axis-assembly_196824Fusion 360 model file included.Did you build it? Please leave a comment and rating.
With this file you will be able to print XY Adjuster for MINI/+ with your 3D printer. Click on the button and save the file on your computer to work, edit or customize your design. You can also find more 3D designs for printers on XY Adjuster for MINI/+.