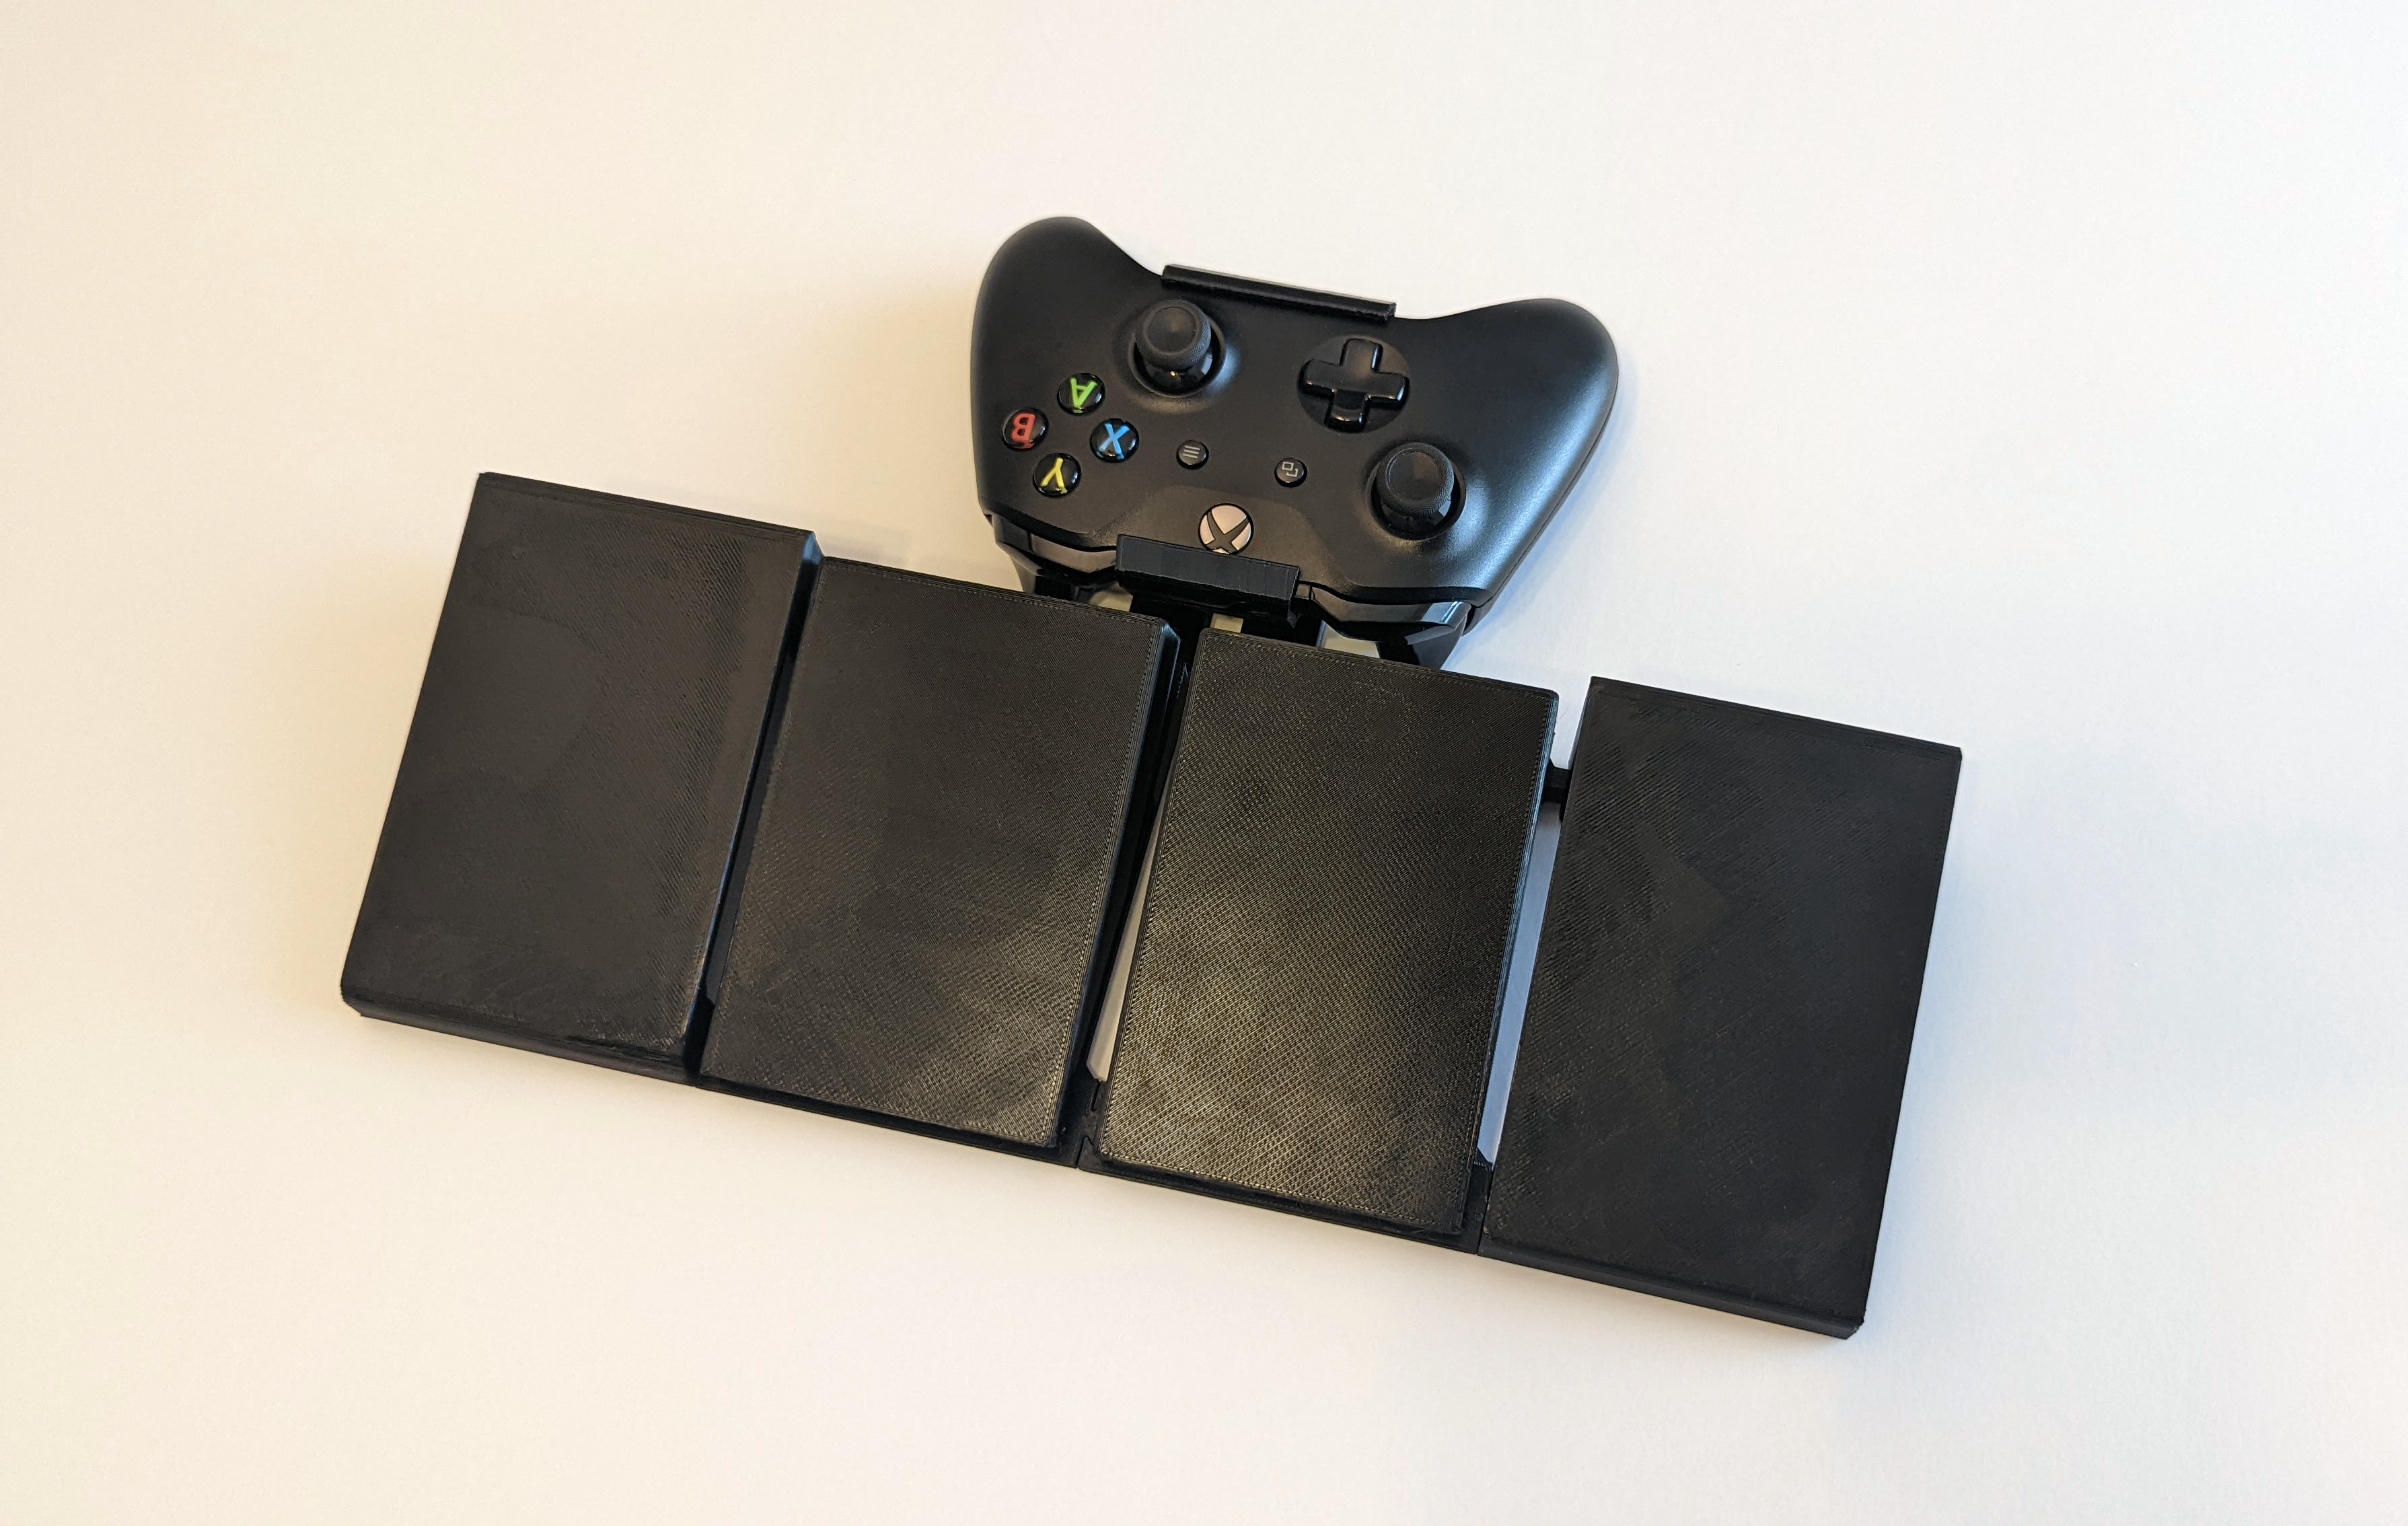
Xbox/PC Copilot Controller Pedals
prusaprinters
<p>This fully 3D printed snap-on mod enables you to use pedals with a second Xbox Controller (via Copilot) on an Xbox or PC. This device can be used with the triggers, bumpers, face buttons, or dpad.</p><figure class="image image-style-align-center image_resized" style="width:75%;"><img src="https://media.printables.com/media/prints/220907/rich_content/4a41fa0c-2bd9-4f38-ad6b-81cbd3c9ccda/pedal_01.png#%7B%22uuid%22%3A%2210f3909f-46ef-420a-8433-8385a7593347%22%2C%22w%22%3A4032%2C%22h%22%3A2268%7D"></figure><p>The goal of this device is to enable people who experience pain or discomfort in their hands to offload problematic button presses to their feet without a full adaptive controller set-up. If you need support setting up Copilot on Xbox or PC Special Effect put together a <a href="https://www.youtube.com/watch?v=bsni-vug3sU">great tutorial</a>.</p><h4>Printing and Assembly:</h4><figure class="image image_resized" style="width:75%;"><img src="https://media.printables.com/media/prints/220907/rich_content/9dd2949e-65df-4738-a09f-10af1cbe174f/pedal_02.png#%7B%22uuid%22%3A%2276c94fd7-f2fe-4ec1-a51b-10deab6c77f1%22%2C%22w%22%3A2904%2C%22h%22%3A1987%7D"></figure><p><br>Left and Right can be tricky here since the controller is designed to be used facing away from you (the right pedal presses the left trigger, etc). The parts are named based on the orientation of the controller as if you are holding it (“_RT” = Right trigger, which is the left pedal). All of the parts are oriented in an appropriate printing orientation, however some parts do need support so you may find success trying different orientations. </p><h5>Pedal Base:</h5><p><i>Print without support</i></p><p>There are two sides (named LT and RT for the triggers they hit). You can print only one, but having both will help stabilize the setup.</p><p><br>There are optional “footrests.” Some people experience fatigue holding their foot on the pedal even with stiff springs; these footrests can help alleviate that by providing a solid base at the same height and angle to rest your feet when not pressing the pedal. <strong>If you would like to attach foot rests, print the pedal bases that contain the connector piece to hook onto the rests.</strong></p><figure class="image image_resized" style="width:75%;"><img src="https://media.printables.com/media/prints/220907/rich_content/517a2ee2-dcba-4003-810b-869d259e8d61/pedal_03.png#%7B%22uuid%22%3A%22a96505c6-717d-4457-8b40-e89086c3f627%22%2C%22w%22%3A4032%2C%22h%22%3A2268%7D"></figure><p> </p><h5>Gears:</h5><p><i>Print with support.</i></p><figure class="image image_resized image-style-align-center" style="width:75%;"><img src="https://media.printables.com/media/prints/220907/rich_content/40d3e342-ffed-4cc0-ae8a-35ecc931c6cc/pedal_04.png#%7B%22uuid%22%3A%22bbcd66bb-b501-402c-adab-6057782a690b%22%2C%22w%22%3A4032%2C%22h%22%3A2268%7D"></figure><p>The gears snap into place on the pedal. It’s best to snap in on one side and then the other. It’s a tight fit, so you may need to pry the edge back and give it a shove. If you’re having trouble, some people have found success with something small to pry it with (like a butter knife).</p><figure class="image image-style-align-center image_resized" style="width:75%;"><img src="https://media.printables.com/media/prints/220907/rich_content/4c539426-44c7-4c3d-9b46-6615657759dc/pedal_05.png#%7B%22uuid%22%3A%22076b6000-7e16-4bed-a0ec-6c41a8fb075b%22%2C%22w%22%3A4032%2C%22h%22%3A2268%7D"></figure><p>If you’re having trouble getting the gear to spin freely, I’ve also included a version of the gear with a print-in-place axle that should help (although the gear can be a bit wobbly with that version). If you go that route, make sure you print >5 wall thickness to ensure the axle is solid enough that it won’t snap. <br> </p><h5>Pedal Top:</h5><p><i>Print without support</i></p><p>The pedals do have sides depending on which holes are needed for the face buttons or DPad. There is also a version that does not have any holes if you only plan on using the pedals with the triggers.</p><p>The hinges are designed to be used with un-extruded 1.75mm PLA. Simply slide it through and trim the ends. </p><figure class="image image_resized image-style-align-center" style="width:75%;"><img src="https://media.printables.com/media/prints/220907/rich_content/72bc73aa-65a1-4d23-bc98-0a0198b7c7a9/pedal_06.png#%7B%22uuid%22%3A%22de64539f-9bbb-4425-842e-bee467ed8cb8%22%2C%22w%22%3A4032%2C%22h%22%3A2268%7D"></figure><h5><br>Controller Holder:</h5><p><i>Print with supports</i></p><p><br>There are two versions here, one for a 3rd Gen (2016) Controller and one for 4th Gen (2020). Supports are needed for the dovetail connectors and port access holes.</p><h5>Connecting the bases together and to the controller holder:</h5><p>The dovetails from the base should slide into the holder. You will need to slightly pry the arm outwards while sliding in.</p><figure class="image image-style-align-center image_resized" style="width:75%;"><img src="https://media.printables.com/media/prints/220907/rich_content/c067c7a3-4a5a-4a88-8215-bf930d5c5f97/pedal_07.png#%7B%22uuid%22%3A%22948eee2a-d16f-409e-be95-d825fd00b8a9%22%2C%22w%22%3A4032%2C%22h%22%3A2268%7D"></figure><p><br>There is a dovetail joint that connects the back of the pedals. If you find these slip off when using the pedal, some glue or a strip of tape can help. </p><h5>Trigger Rack:</h5><p><i>Print without supports</i></p><p>This is the piece designed to press the triggers. It should slide between the pedal base and gear smoothly. You may need to break it in a bit to clear away printing imperfections.</p><figure class="image image-style-align-center image_resized" style="width:75%;"><img src="https://media.printables.com/media/prints/220907/rich_content/5d2b91df-0817-42ea-ac33-b14c7cdb73e0/pedal_08.png#%7B%22uuid%22%3A%22bb6bbd64-15eb-492e-8e9f-c0a73ebe1928%22%2C%22w%22%3A4032%2C%22h%22%3A2268%7D"></figure><p>Note: The racks need to be slid all the way in before snapping the controller in place.</p><h5>Snapping the controller in/out:</h5><p>After the trigger racks are in place you can snap in the controller. Put the top of the controller under the top lip and press down until the bottom snaps into place. Snap it out at any time by popping the bottom back first.</p><figure class="image image-style-align-center image_resized" style="width:75%;"><img src="https://media.printables.com/media/prints/220907/rich_content/d0009463-1bcd-4d81-afac-95a372b083f4/pedal_09.png#%7B%22uuid%22%3A%22e8527926-deed-4d2d-bcfb-42e019d8d952%22%2C%22w%22%3A4032%2C%22h%22%3A2268%7D"></figure><p>The pedals should now push down the triggers all the way when fully engaged.</p><figure class="image image_resized image-style-align-center" style="width:75%;"><img src="https://media.printables.com/media/prints/220907/rich_content/ad07d888-2062-4d72-9b7f-8b68e562c20e/pedal_10.png#%7B%22uuid%22%3A%2255ad89ef-4cba-4773-8ddf-377d1bac002a%22%2C%22w%22%3A4032%2C%22h%22%3A2268%7D"></figure><h5><br>Face Button, Dpad Arms, and Bumpers:</h5><p><i>Print with support (bumpers are okay without)</i></p><p>These are designed to fit in the holes on the end of the pedal, each arm is labeled per button. Depending on your tolerances, you may need to trim down the nub a bit or add glue. </p><figure class="image image_resized image-style-align-center" style="width:75%;"><img src="https://media.printables.com/media/prints/220907/rich_content/3c7031b2-fd30-456e-b06b-805abde5d4fa/pedal_11.png#%7B%22uuid%22%3A%221b523ef0-1f19-41bb-a6d4-1b3371c3eaf9%22%2C%22w%22%3A4032%2C%22h%22%3A2268%7D"></figure><h5><br><br>Springs:</h5><p><i>Print without support</i></p><p>There are six different springs of varying thickness depending on the resistance on the pedal that works best for you. The triggers will work okay without or with lighter springs, but the facebuttons/DPad/bumpers tend to need thicker ones. The springs are designed to sit up against the lip in the pedal at the back of the rack.</p><figure class="image image-style-align-center image_resized" style="width:75%;"><img src="https://media.printables.com/media/prints/220907/rich_content/93c96df4-94ec-4b8f-9c68-4fbb2ab10ac0/pedal_12.png#%7B%22uuid%22%3A%229f3a6a3e-8805-4afc-8897-010a06b38d2e%22%2C%22w%22%3A4032%2C%22h%22%3A2268%7D"></figure><p>Bonus: you can stack springs together for ultimate customization!</p><h5>Optional Foot Rests:</h5><p><i>Print without support.</i></p><p>If you opted for the footrests, these push down onto the outsides of the pedals. Depending on the tolerances of your printer, they may need a good shove or a bit of glue.</p><p><br> </p><p> </p>
With this file you will be able to print Xbox/PC Copilot Controller Pedals with your 3D printer. Click on the button and save the file on your computer to work, edit or customize your design. You can also find more 3D designs for printers on Xbox/PC Copilot Controller Pedals.
