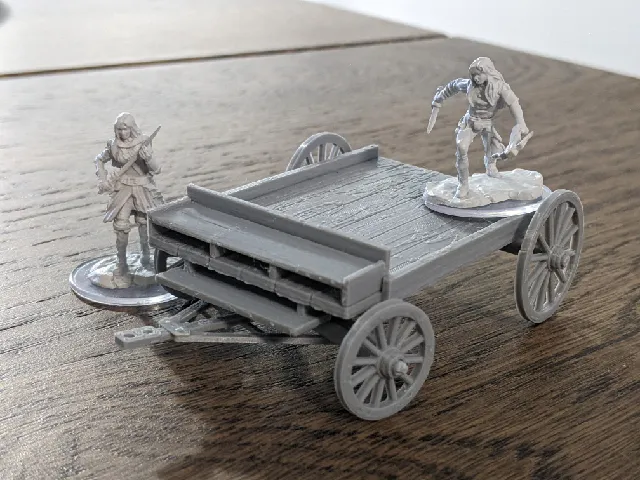
Wooden Flat Bed Wagon - D&D Scatter
prusaprinters
A traditional wooden wagon that's easy to put together, extensible, takes up 2x3 in a 1" grid system, and features a rotating front axle - a fantastic addition to any tabletop campsite, town, dock, or really anywhere you need to liven up with some scatter. Easy to print, put together, and paint - with enough wood detail to pop with a simple drybrush or a dark wash.I designed these as part of a new Camp Terrain Set I'm collaborative on with rfgy16 . You can check out the other items in the set below (with more to come!):Wooden Flat Bed Wagon - D&D ScatterBedroll Variations - D&D ScatterI've designed the front hitch such that it can be extended to link with different attachments depending on how I want to use it on the table - which means I can re-use it with different beasts of burden, on its own, staked to something, the list goes on! In particular I'm pleased the the front axel can be rotated, because it feels far more realistic than in a static ‘forward’ pose. I have a few ideas for extensions/remixes already, so look forward to optional add-ons in the near future!This design is intended for FDM printing, so that the majority of folks can reliably print it - but if you'd like to try it out in resin please let me know how it goes. If there are any tweaks I can make to optimize resin, I can make that happen.I'd love to see how you print and use this for your own games - so please do share. And as always, comments and criticism is welcome :) How to Put it TogetherTo start, you'll want to print out each model in the set, and 2 copies of each wheel. Then follow the steps below:Put the Front Axle Column through the Bed and Frame to line them up. Glue the frame to the underside of the Bed - but be sure NOT to glue the Front Axle Column in place if you'd like it to be able to rotate later.Attach a Rear Wheel to either end of the Rear Axle. You may need to sand them down a little bit to get an easy fit. Glue the wheels in place.Attach a Front Wheel to either end of the Front Axle. Similar to the rear, you may need to sand down the axle a little bit if the fit is too tight. Glue the wheels in place.Glue the Rear Axle into the slot at the back of the Frame, making sure the wheels are evenly spaced on either side of the Bed. The flat side of the Axel should be facing away from the Frame (toward the ground when the whole thing is finished)Slot the Front Axle onto the Front Axle Column - it should be able to rotate on the column.CAREFULLY add glue to the bottom of the Front Axle + Front Axle Column. You only want the column to attach to the Axle - none of the pieces above. This is how it'll be able to rotate.Attach the Footrest to the underside of the Bed by gluing it just in front of the FrameGlue the Hitch to the underside of the Front Axle, so that the front of the Hitch is out in front of the FootrestGlue the Seat onto the front of the BedFinally, glue the Backrest onto the Bed immediately behind the Seat. The backrest has a little groove meant to fit over the Front Axle Column so that it can rotate freely - be careful not to add glue there or else it'll stop rotating. How I Designed ThisI work primarily in Blender for modeling, and I've been working on creating detailed Geometry Nodes for generating realistic and detailed textures for 3D printing. I've recently refined my ‘wooden plank’ node as part of my Waterwheel model, and I'm finding opportunity to use it in many other designs - like this Wagon!
With this file you will be able to print Wooden Flat Bed Wagon - D&D Scatter with your 3D printer. Click on the button and save the file on your computer to work, edit or customize your design. You can also find more 3D designs for printers on Wooden Flat Bed Wagon - D&D Scatter.
