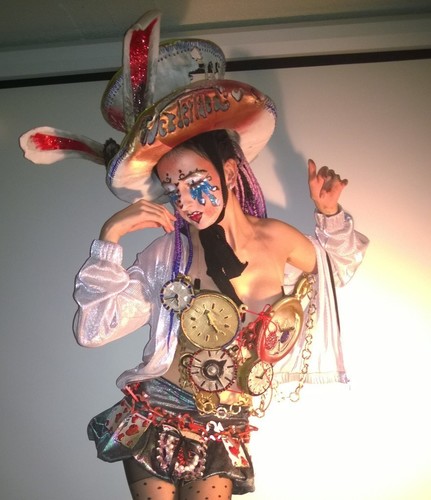
Wonderland
pinshape
This here is my first bigger project, involving over 100 grams of plastic. It was primarily designed for the Halloween contest and the party I'll attend. The costume is called "Wonderland"! It's intended to help you tap into your personal creative sense or serve as a focal point at a Halloween party. Most parts visible are 3D-printed, including cards, chains, hats, and more. For a complete costume, you'll need shoes and a skirt (and maybe a shirt, depending on the temperature). I recommend viewing this costume as an art collection of dreamy, playful, colorful objects to use for your Halloween costume. You can choose to use just the hat or belt, or any combination that suits you. Don't forget to decorate the objects with small jewelry or other little parts – it's entirely up to you. In the documentation, you'll find details on every object and how I painted and decorated them. Before printing anything from Wonderland, I strongly recommend taking a look at the documentation. However, I know documentations can be tedious. For those short on time, here are some key points: You'll need glue (use the right type, like plastic glue) and cord or tie. You might also want rubber glitter jewelry (the fake kind), color (acrylic, spray paint, or anything else you prefer), EL wire or LED light sources, food, and drink to keep your energy up during the project. Each object is designed to be secured with bolts and glued – no problem! They all fit on a 25 x 21 cm printbed without any issues. If you encounter problems, just get in touch with me. Print Settings: Printer: RepRap Model: Prusa i3 MK2 Rafts: No Supports: No Resolution: See documentation. Infill: See documentation. Notes: Check the documentation (documentation.pdf) for detailed print settings. If you're short on time, just print everything with 350 micron, 5% infill, one perimeter, and two bottom and top layers. This will speed up the process, allowing you to complete the project in three days. Keep in mind that this will result in some quality issues with overhangs – but read the documentation for a solution! Post-Printing: Just plug, glue, paint, and party! See documentation for more information on how I designed this. This project inspired me to learn new programs like FreeCAD, Meshmixer, and 3D Builder since I'm fairly new to digital design and 3D printing.
With this file you will be able to print Wonderland with your 3D printer. Click on the button and save the file on your computer to work, edit or customize your design. You can also find more 3D designs for printers on Wonderland.
