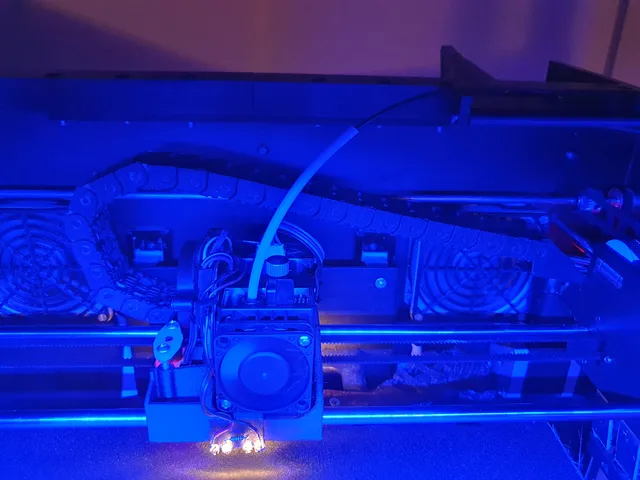
Witbox Hemera + BLtouch/3D touch upgrade + 1 handled nozzle change
prusaprinters
Minimal position change of nozzle (only 1.8 mm loss in Y-direction). Requires printbed to be higher by approx. 3mm.Additional components for the hemera printhead:12V E3D HemeraBLtouch1 or 3D touch (needs to be cut)Glas fiber matHigh temperature silicone glueKapton tapeIdler + longer timing belt i.e. QitinDasen 5m GT2 Zahnriemen 2mm Pitch 6mm Breite, mit 5Pcs Zahnriemenscheibe und 5Pcs Idler 20 Zähne 5mm Bohrung, 5Pcs Spanner Torsionsfeder, 2Pcs Zahnriemen Klemmen, 2mm Allen Wrenchcables + connectorselectric tapeLong M3 worm screws to fix the HemeraM3*6 worm screws M3*10 set head screws, M3*20 screws and M3 nuts to fix componentsM4*30 seat head screws to replace Z-sleight screws to avoid collision.Teflon spray to lubricate4 white 3mm LEDsSleight needs to be printed in carbon fiber reinforced Polyamide due to the required stiffness and temperature resistance. All 2.5 mm holes need a thread to be cut with an M3 thread cutter.The Hemera is fixed by screwing long M3 worm screws through the M3 threads in the sleight into the M3 nuts of the hemera. Main positioning is done between the ribs of the sleigth and the stepper of the hemera.In order to protect the printhead against the heat of the hotend it needs to be insulated with glas fiber mat and capton tape, that may be glued on with high temperature silicone glue, as shown in the pictures. The Heatblock also needs to be moved upwards by 1 rotation. It will collide with the glas fiber cushins on the sides of the sleight allowing 1 handed nozzle changes.Cable chain is a redesign of the Claghorn cable chain to make it more print and assembly friendly as well as wider for more cables. The cable chain is closed by the cable chain spring element. 25 Links are required.The sleight reuses 3 of the 4 linear bearings. The 4th bearing did not fit underneath the hemera and was replaced with a PA bearing. Dependent on your printers tolerances the bearing may be too tight, hence 3 versions. Be adviced to print all 3 and check which one runs best. Linear bearing should be printed in pure PA. All 4 bearings are clipped into the sleight from below. May be done prior or after getting the linear bearings on the sleightGlue the Y-Endstop mover on the Y-Endstop in order to avoid collisions of the cable chain with the Printbed holder and its screws. Replace the 2 upper M4 hex screws of the Z-sleight with M4*30 sethead screws to avoid collision with the cable chain.Both cooling fan and 3D touch need to be cut as displayed in the pictures. The 3D touch needs to be installed and fixed with a M3 nut as displayed in the pictures (this is to allow adjustment in case a BLtouch 1 is used). Distance from print should be 6,35 mm.LEDs and LED holders may not be nescessary. If applied it should be glued on.If no cable connections are done in front of the Y-Stepper the Y-Stepper cable protection may not be nescessary.==> Requires ability to print carbon fiber reinforced PA: May be archived on the existing Witbox printhead by installing i.e.: “Turmberg3D - Titan Heatbreak für 1.75mm Filament kompatibel mit Anycubic Mega S, X und Chiron” with an aluminium space holder and a carefully cut teflon tube.
With this file you will be able to print Witbox Hemera + BLtouch/3D touch upgrade + 1 handled nozzle change with your 3D printer. Click on the button and save the file on your computer to work, edit or customize your design. You can also find more 3D designs for printers on Witbox Hemera + BLtouch/3D touch upgrade + 1 handled nozzle change.
