Wireless relay module project box
prusaprinters
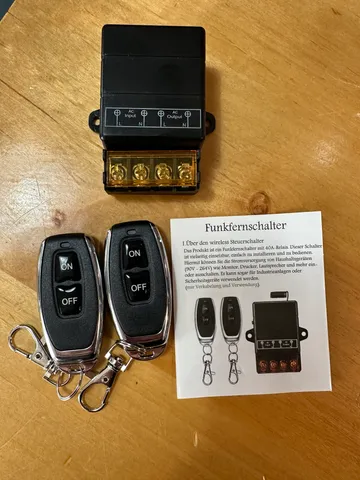
This device is a radio relay switch ("funkfernschalter") for turning on or off a remote appliance using a simple fob switch. I bought it to control my workshop dust collector, so I could turn the unit on or off from any of the tool stations in my shop. The project box below was designed to hold the relay module on the bottom, provide a pass-thru hole for the antenna wire, provide a way to clamp down the power cord, and allow room for a 120V single receptacle on the surface. Additionally, two diagonal holes allow for the box to be screwed directly to my shop wall.In addition to the radio module ($23 at Amazon), you will need a power cord (mine was 5/16-inch outer diameter) and matching rubber grommet (5/8-inch O.D., 5/16-inch I.D.). Additionally, you'll need (4) 6-32 x ½-inch machine screws, (2) 6-32 nuts, and (2) M3 x 12mm cap head screws. The M3 screws aren't critical as any small screw that will fit the hold-down clamp will work. You will also need a single 120V receptacle and about six inches of 14/2 wire to make leads for the receptacle.Assembly is straightforward. Attach load, neutral, and grounding leads to the outlet receptacle. The power cord comes in through the rubber grommet and is held in place by two M3 cap head screws, or any small screws you may have. The M3 screws will self-thread.The power cord grounding wire is connected to the grounding wire coming off of the receptacle. The load and neutral lines of the power cord connect to the load and neutral "Input" side of the radio module. The load and neutral leads from the receptacle attach to the "output" terminals. I suggest making all the electrical connections before clamping down the power cord and pushing the grommet into place.The antenna wire is pushed out through the access hole in the box, and the radio module is attached by using two 6-32 x 1/2-inch machine screws with nuts. The screw heads should sit flat with the bottom of the box.Affix the box to the wall before installing the receptacle and cover.The receptacle installs as with any other, but using the included screws to thread the box as you go. The outlet cover attaches to it using two more 6-32 x 1/2-inch screws. All that's left is to plug in your appliance, plug the box into an existing outlet, and use the fobs to remotely turn on or off the appliance.
With this file you will be able to print Wireless relay module project box with your 3D printer. Click on the button and save the file on your computer to work, edit or customize your design. You can also find more 3D designs for printers on Wireless relay module project box.