Wired Virtual Wall Barrier for iRobot Roomba Automatic Cleaner
thingiverse
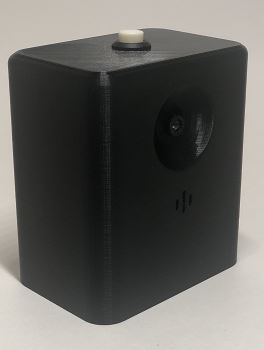
Now you can print your own Roomba wired virtual barrier. No batteries needed. The following components will be needed. As you likely won't be able to buy parts in "singles" print a few of these to make more around your home and or give to friends. Should still come out cheaper than buying one of the branded versions and will be batteryless with more virtual walls to spare. *** Main Components Required: *** - 1 x Container_Bottom.STL - 1 x Container_Wired.STL - 1 x [Arduino Nano (or clone)](https://amzn.to/3lbAi9b) - 1 x [BJT NPN Transistor - 2N3904](https://amzn.to/3mbelsj) - 1 x [5mm 940nm LED](https://amzn.to/3m6xQlW) - 1 x [Circular Rocker Switch](https://amzn.to/3m9lA3Q) - 1 x [1000Ω, .25 watt resistor](https://amzn.to/37a0axl) - 2 x [3mm Diameter - 10mm Length Hex Head Countersunk Screw](https://amzn.to/3l7jVuv) - 1 x [6 foot USB Mini-B cord](https://amzn.to/366PSir) - 1 x [5v 1A USB Wall outlet plug](https://amzn.to/33ibeaq) *** Optional Components Needed for "PCB" route (much cleaner and faster assembly): *** - 2 x [5mm Terminal Connector (for LED and switch)](https://amzn.to/3fBwbSN) - 1 x Protoboard PCB (or I designed a custom PCB) Few things to note, for the BJT NPN Transistor, I selected it kit as that will be more useful to you than having 100 pcs of just one 2N3904 for some other projects you may want to do. The cost difference is marginal even at the smallest quantity sizes. Or, you can get 100 of them if you so choose it, but around 20 or so come in the kit with other varities of transistors to spare in NPN and PNP. The 2 x 5mm Terminal connector is selected the same way so you have some 3 pins instead of just the 2 pins that would be utilized with the PCB. All the above links are affiliate links, and I would get a small commission if you use them to get your components. **If requested, I could provide all the individual pieces as a kit including the custom PCB** that I designed and created specifically for this application. Just throw up a few comments letting me know. After typing out the BOM, I realized you will have quite a few extra parts if you only wanted to build one or two, you're going to have some left over components. If you're already into the electronics, well then you probably already have quite a bit of stuff on the list! *** The Arduino Code *** Just copy and paste into your Arduino IDE, you will likely need to add the IRremote.h library if you don't already have this in your Arduino library. //#include <avr/sleep.h> //#include <avr/wdt.h> //#include <IRremote.h> //SYS CLOCK SET TO 16000000 Hz Currently in boarddefs.h for IRRemote library // Modified Timer in boarddefs.h - PWM Pin #9 instead of #3? IRsend irsend; int switchIn = 2; int switchRead = HIGH; int khz = 38; // 38kHz carrier frequency for iRobot uint16_t counter = 0; // watchdog interrupt ISR (WDT_vect) { wdt_disable(); // disable watchdog } // end of WDT_vect void setup () { pinMode(switchIn, INPUT_PULLUP); irsend.enableIROut(38);//Lib function } void loop () { switchRead = digitalRead(switchIn); if(switchRead == LOW) { static int khz = 38; // 38kHz carrier frequency for iRobot //Bit0 = 1ms High, 3ms Low (yes millisecond, not microsecond) //Bit1 = 3ms High, 1ms Low (yes millisecond, not microsecond) static unsigned int irSignal[] = {3000, 1000, 1000, 3000, 3000, 1000, 1000, 3000, 1000, 3000, 1000, 3000, 3000, 1000, 1000, 3000}; //value is in microseconds irsend.sendRaw(irSignal, sizeof(irSignal) / sizeof(irSignal[0]), khz); // disable ADC (analog to digital conversion) ADCSRA = 0; // clear various "reset" flags MCUSR = 0; // allow changes, disable reset ("setup" for the watch dog timer) WDTCSR = bit (WDCE) | bit (WDE); // set interrupt mode and an interval WDTCSR = bit (WDIE) | bit (WDP2) | bit (WDP0); // set WDIE, and 1 second delay wdt_reset(); // pat the dog set_sleep_mode (SLEEP_MODE_PWR_SAVE); // ******* timed sequence follows noInterrupts (); sleep_enable(); // sets the SE (sleep enable bit) // turn off brown-out enable in software MCUCR = bit (BODS) | bit (BODSE); MCUCR = bit (BODS); interrupts (); // ******* guarantees next instruction executed, enables interrupts sleep_cpu (); // what actually sleeps the CPU // cancel sleep as a precaution - arduino is actually woken up by the interrupt - clears the SE (sleep enable) bit sleep_disable(); } } // end of loop If you just paste this directly into your Arduino sketch, it should work - make sure you have the IRRemote.h library installed. I could give more explanation on some bits of the code if warranted. There is a watch dog timer in the code as it is capable of working with batteries as well, and I created a version that used that so as to reduce battery power consumption. In that case, I used (2) 1.5 volt battery series with a boost converter. I just didn't remove out the code for the wired version, but nonetheless it works the same. *** Remove the two comment slashes from the "Includes" at the top of the sketch. Markdown was making it act funny. If this benefits you, and you would like to show me thanks ... [Buy me a coffee!](https://www.buymeacoffee.com/Renaissance3D) Let me know if you have any questions.
With this file you will be able to print Wired Virtual Wall Barrier for iRobot Roomba Automatic Cleaner with your 3D printer. Click on the button and save the file on your computer to work, edit or customize your design. You can also find more 3D designs for printers on Wired Virtual Wall Barrier for iRobot Roomba Automatic Cleaner.
