Wire dispencer
prusaprinters
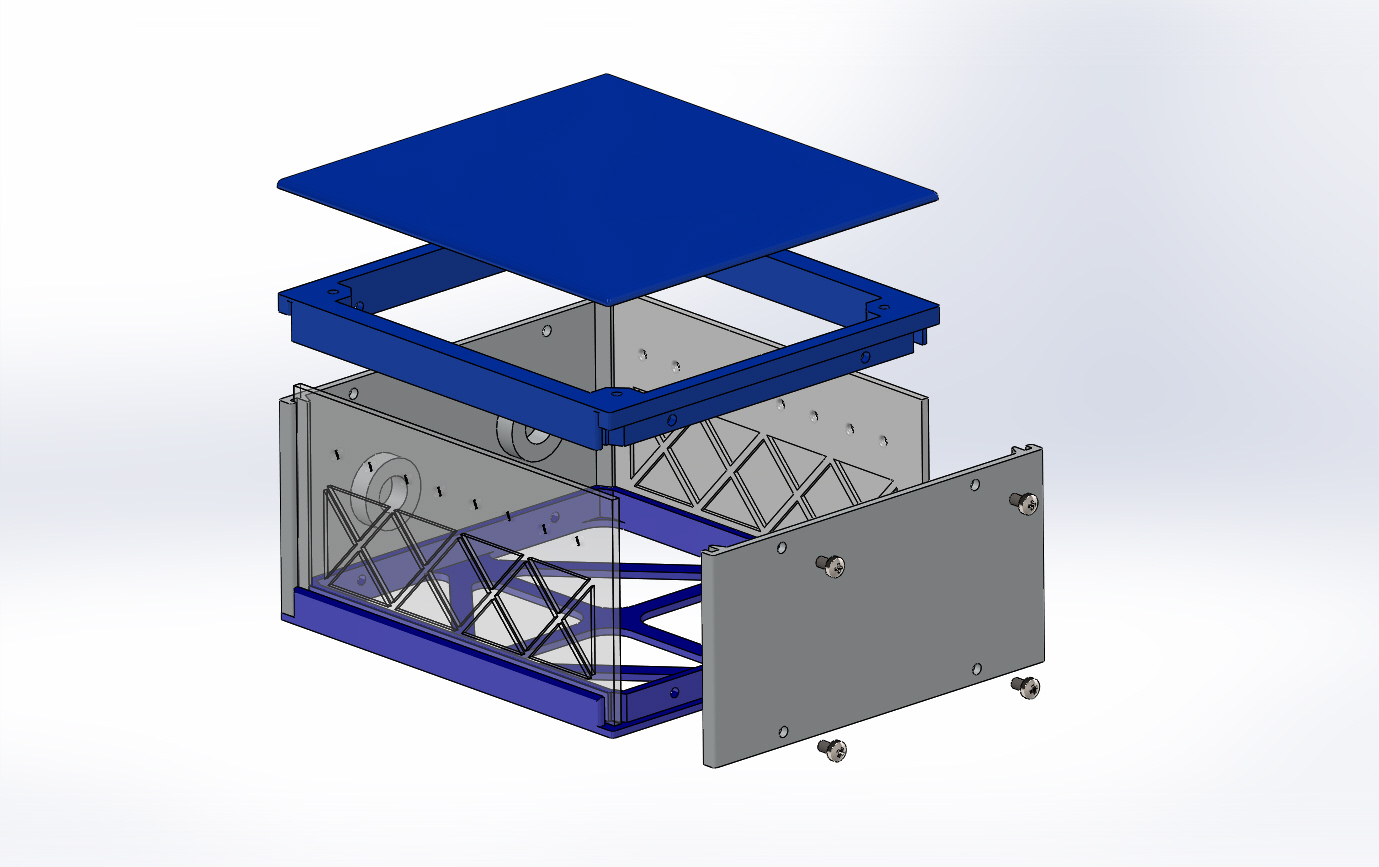
<p>Many of us encountered the problem when making an object with multiple wiring.<br>Wires all over the workbench, spools are rolling off the table or disappear miraculously .<br>My solution is a customizable Dispenser for the wires on spools.</p><p>This is a modular dispenser system for 1 to ..... layers to your own needs.<br>The basic (one layer) consist off:<br>nr.1 Base plate, nr.2 left and nr.3 right side panel, nr.4 connection ring, nr.5 front/back panel (need 2 of them) and nr.6 top/lid.</p><p>Every other extra layer needs:<br>nr.2 left and nr.3 right side panel, nr.4 connection ring (2x), nr.5 front/back panel (2x),</p><p>I made spools for different AWG and wire length capable to hold 10 to 20 mtr.<br>Spool A is 15mm wide and holds up to 10mtr. AWG 26-28<br>Spool B is 20mm wide an holds up to 15mtr. AWG 24-28<br>Spool C is 30mm wide and holds 10mtr. AWG 20-22 or 20mtr AWG 24-28</p><p>The holes in the front plate are 2.2mm wide made for AWG20 max.</p><p>Hardware used:<br>M3 6-8mm (8x for every layer).<br>M3 12-14mm (for bolding 2 connection rings together) option.<br>10mm 124mm long rod (2 for every layer).<br>Glue optional</p><p> </p><p><strong>How to build it.</strong></p><p>Printing the housing.<br>First print the parts 1, 2, 3, 4, 6. and part 5 (2x) for one layer (two rows of spools 6-8 spools).<br>To extend to an second layer print the parts 2, 3 and 4, 5 (2x).</p><p>Printing the spools.<br>Print spool 20 and/or 30mm part 1 as many times as you require (6x 30mm spool or 8x 20mm spools or a combination will fit).<br>Print spool part 2 equal times as the first part.<br>Print the spacer washer as many as needed.</p><p>Assemble the spool rod.<br>Assemble the spools part 1 and 2 together they should have as snug to tight fit but you can always secure it with glue.<br>Take a 124mm long 10mm rod and slide the spools over it, a washer between the spools make them rotate free from each other.</p><p>Building the housing.<br>Need 8x 3mm 6-8mm screws for each layer.<br>Screw part 2 on part 1, slide in the 2 part 5.<br>Place the spool rods and screw part 3 on part 1.</p><p>When using only one layer.<br>Place part 4 and secure with screws and glue part 6 on it if it will not have a snug fit.<br>(this applies also to the last layer)</p><p>When using multiple layers.<br>Secure 2x part 4 together either with glue or bold them together with 4x 12-14mm M3 screws</p><p>The next layer.<br>Screw part 2 on part 4, slide in the 2 part 5.<br>Place the spool rods and screw part 3 on part 4.</p><p>Note.<br>before placing the next level, guide your wires thru the front.</p><p>This can also be found on thingiverse: https://www.thingiverse.com/thing:5137648</p>
With this file you will be able to print Wire dispencer with your 3D printer. Click on the button and save the file on your computer to work, edit or customize your design. You can also find more 3D designs for printers on Wire dispencer.