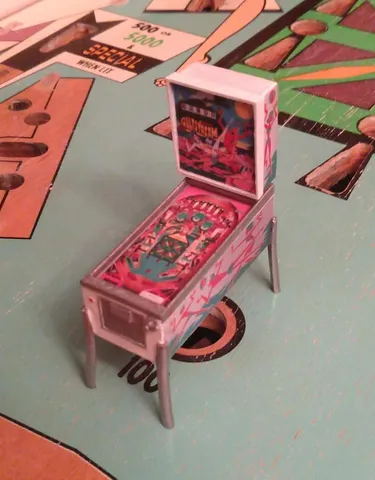
Williams 1973-era EM Pinball Machine
prusaprinters
This is not a perfect 1:25 scale model, but it's close, and it's printable. If you're looking for a scale model, go here: https://www.thingiverse.com/thing:3348131 If you want a Christmas ornament though, you're in the right place. Non-printed materials you might want for assembly: Printed sheet of Gulfstream decals 2-part epoxy resin Vacuum chamber Torch lighter Spray paint Heat gun Glue Print Settings Printer Brand: Creality Printer: CR-10 Rafts: No Supports: No Notes: Required printed parts: 1x Pin Body 1x Pin Plunger 1x Pin Coin Door 1x Pin Backboard 4x Pin Leg 1x Pin Leg Jig 1x Pin Leveling Jig Notes: All parts are already oriented as they should be printed. None of the pieces require support. Pin Backbox and Pin Plunger both have horizontal overhangs, but they should be short enough to print unsupported. The Pin Plungercan be printed with a 0.4mm nozzle, but use a 0.3mm line width. Post-Printing Note: Optionally, spray paint all the pieces with a base colour before assembly. ie: Silver for legs, plunger, and coin door, maybe white for the Body & Backboard. Caution though - The paint may affect your glue's effectiveness during assembly. Pin Body assembly: Glue playfield decoration onto the body, allow to dry. Waterproof the playfield, somehow - ie, multiple light coats of a spray polyurethane. Find a flat, level (relative to gravity) surface, where there's little to no dust and/or air movement. You might want a box, pot, tupperware container, or something handy to cover during drying. Set Pin Leveling Jig on your clean, level surface. Rest Pin Body on Pin Leveling Jig, so that playfield is level (relative to gravity). Mix up a little 2-part epoxy resin, like what they use for tabletops. Vacuum chamber the resin as desired, but don't exceed pot-time. Pour epoxy resin over the playfield, to desired depth, to give the impression of playfield glass. Very briefly torch the resin surface to pop the bubbles - careful not to melt the plastic or burn the resin. Cover while resin cures, to prevent dust settling into the resin. Pin Backbox assembly: Same as Pin Body, but the backglass is level when laid flat, so you won't need a Leveling Jig. Glue Backglass decoration to Backbox, waterproof, lay flat, pour resin, torch, cover, cure. Pin Leg assembly: Glue legs to body. Hit one leg with a heat gun, just enough to soften it. Use the Pin Leg Jig to apply a 5-degree angle to the leg. Hold the leg gently against the jig as it cools. Repeat for the other three legs. Other: The Pin Coin Door and Pin Plunger should just easily glue into their corresponding voids on the Pin Body. How I Designed This Angle notes: Playfield is slanted at 3.6-degrees Legs are angled 5-degrees off vertical Category: Model Furniture
With this file you will be able to print Williams 1973-era EM Pinball Machine with your 3D printer. Click on the button and save the file on your computer to work, edit or customize your design. You can also find more 3D designs for printers on Williams 1973-era EM Pinball Machine.
