Weighted Mini Monitor Stand
prusaprinters
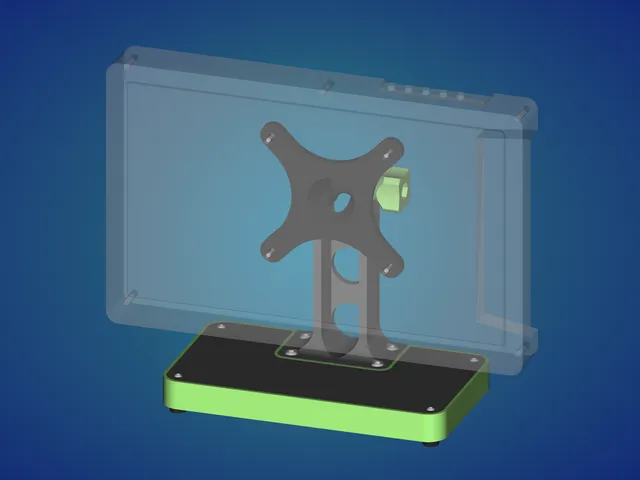
This was designed as a replacement for a really bad folding wire stand that came with a 10.1" LCD monitor.The base is a hollow shell which is meant to be filled with heavy material to weigh it down and provide stability.There's only tilt adjustment, but it seemed that more than this would be over-complication.The support column has holes which can be used for cable routing. Build OptionsThe stand base options are hollow and are intended to be filled with something to add weight. Base types are numbered:Bottom-fill with no cover. For weight stuck in with resin or similar material.Bottom-fill with optional cover. Can be filled with resin or loose weight.Top-fill with cover. Can be filled with resin or loose weight.I chose to use some old screws and various junk metal, sealed in with clear epoxy resin, and this has worked very well to keep the monitor stable. Hardware required:4 M5 x 12 screws (preferably button or pan head.)4 M5 nuts (not needed for bases with printed M5 threads.)M6 x 50 hex head bolt and M6 hex nutM3 x 10 or M3 x 8 screws (minimum 4, maximum 12, depends on build.) Some covers are made for countersunk screws. PrintingUse any filament you want, but note that the feet are ideally for a flexible material.Clear filament works well if the weight filling is meant to be shown. Resin will fill some gaps in the walls and make it look a little clearer than the part on its own.More perimeters and infill generally means better resin sealing potential, but less clarity. Bases 1 and 2 require some support material - see example .3MF for PrusaSlicer, etc.Exact layer height is not too important for most, but I would recommend 0.2mm for the bases and covers for fit accuracy.Take note of the outer seam on base - it's best set to a rear-facing position for a clean forward-facing finish.0.4mm or 0.6mm nozzles should work fine for all parts. Resin Filling for BaseSome notes based on experience with this project:Fill with objects carefully; They should not be proud of the base bottom and/or surfaces where the cover will touch.Don't let resin get into the screw holes. If in doubt about the integrity of the print you can attach the column before casting, although this can make getting a flat and level setup difficult if filling from the bottom.Clean up any spillage on exterior or cover-touching surfaces. Epoxy spills can be wiped away from surfaces with a tissue or rag and some isopropanol.Leakage can be peeled or chipped away carefully if you catch it at the point when the resin is stiff but not fully cured.
With this file you will be able to print Weighted Mini Monitor Stand with your 3D printer. Click on the button and save the file on your computer to work, edit or customize your design. You can also find more 3D designs for printers on Weighted Mini Monitor Stand.