Watch Movement Holder (Adjustable)
prusaprinters
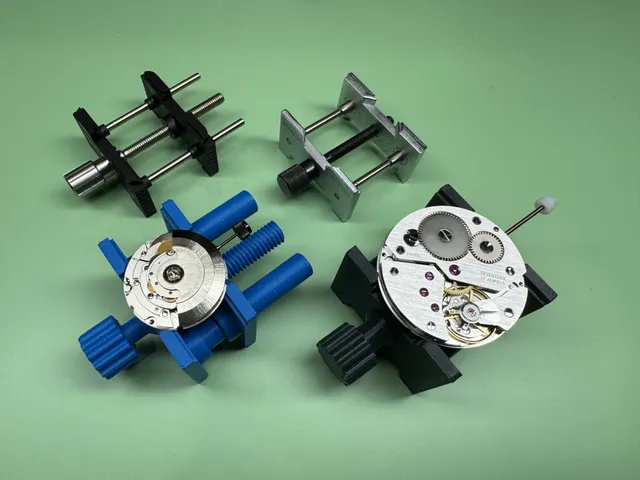
***Update - A second pair of platform and attachment models have been uploaded; these allow for better holding of smaller diameter movements. ***This movement holder is based on the classic Slick-style holders now produced by watchmaking tool manufacturers like Bergeon and Horotec. The simple design allows the user to quickly adjust the distance between two movement supporting plates. The tabs holding the movements differ on both ends so that movements with smaller or larger diameters can be supported. This design has been tested on movements 11.5 ligne (25.6mm diameter) up to 18s (45mm). It consists of 4 parts:Lead screw with knurled handleCollar for screwPlatform plateAttachment plateI recommend printing this model with EXTRA perimeters. The PrusaSlicer default of 2 perimeters leads to weak layer adhesion, which can cause the rods to break. I found that using a minimum of 4 perimeters allows prints in PLA, PETG, and PC Blend to be very rigid and strong enough to withstand repeated use. Given the option of different filament types, I personally prefer PETG for this model. These models can be printed without brim and without supports. The lead screw should be oriented handle side down onto the build plate, threaded side up. The platform and attachment plates should be oriented wall side down, with rod side up. The collar features 3 teeth that engage with notches in the lead screw. Orient the collar so that the teeth are facing the build plate (there should be no overhang). The rods of the platform plate should slide easily into the holes of the attachment plate. The diameter of the rods is undersized slightly from the holes so a small amount of play is acceptable. If you have a difficult time sliding the attachment plate onto the rods, you may try moving them back and forth repeatedly to remove any burrs or excess blobs of plastic. The same goes with the threads of the lead screw and the threads built into the attachment plate. Screwing and unscrewing should occur easily. Try to remove any tightness in the screwing or sliding action. If you have difficulty getting a smooth action, you may want to try printing the lead screw and/or platform models individually to better maintain dimensional accuracy. For assembly, fit the lead screw through the platform plate. Note the three notches in the cylinder just below the threaded end of the lead screw. The 3 teeth of the collar fit into these notches. Mount the collar, noting the positioning of the teeth and notches. It should snap into place. Now, fit the attachment plate onto the rods and threaded end. Be sure to match the orientation of the tabs. The narrower and wider tabs should be on their respective sides. Finally, assess function of the movement holder by turning the screw to widen or narrow the gap between the plates. Here is a video showing the assembly process:Enjoy!
With this file you will be able to print Watch Movement Holder (Adjustable) with your 3D printer. Click on the button and save the file on your computer to work, edit or customize your design. You can also find more 3D designs for printers on Watch Movement Holder (Adjustable).