Watch Band (Print-in-place)
prusaprinters
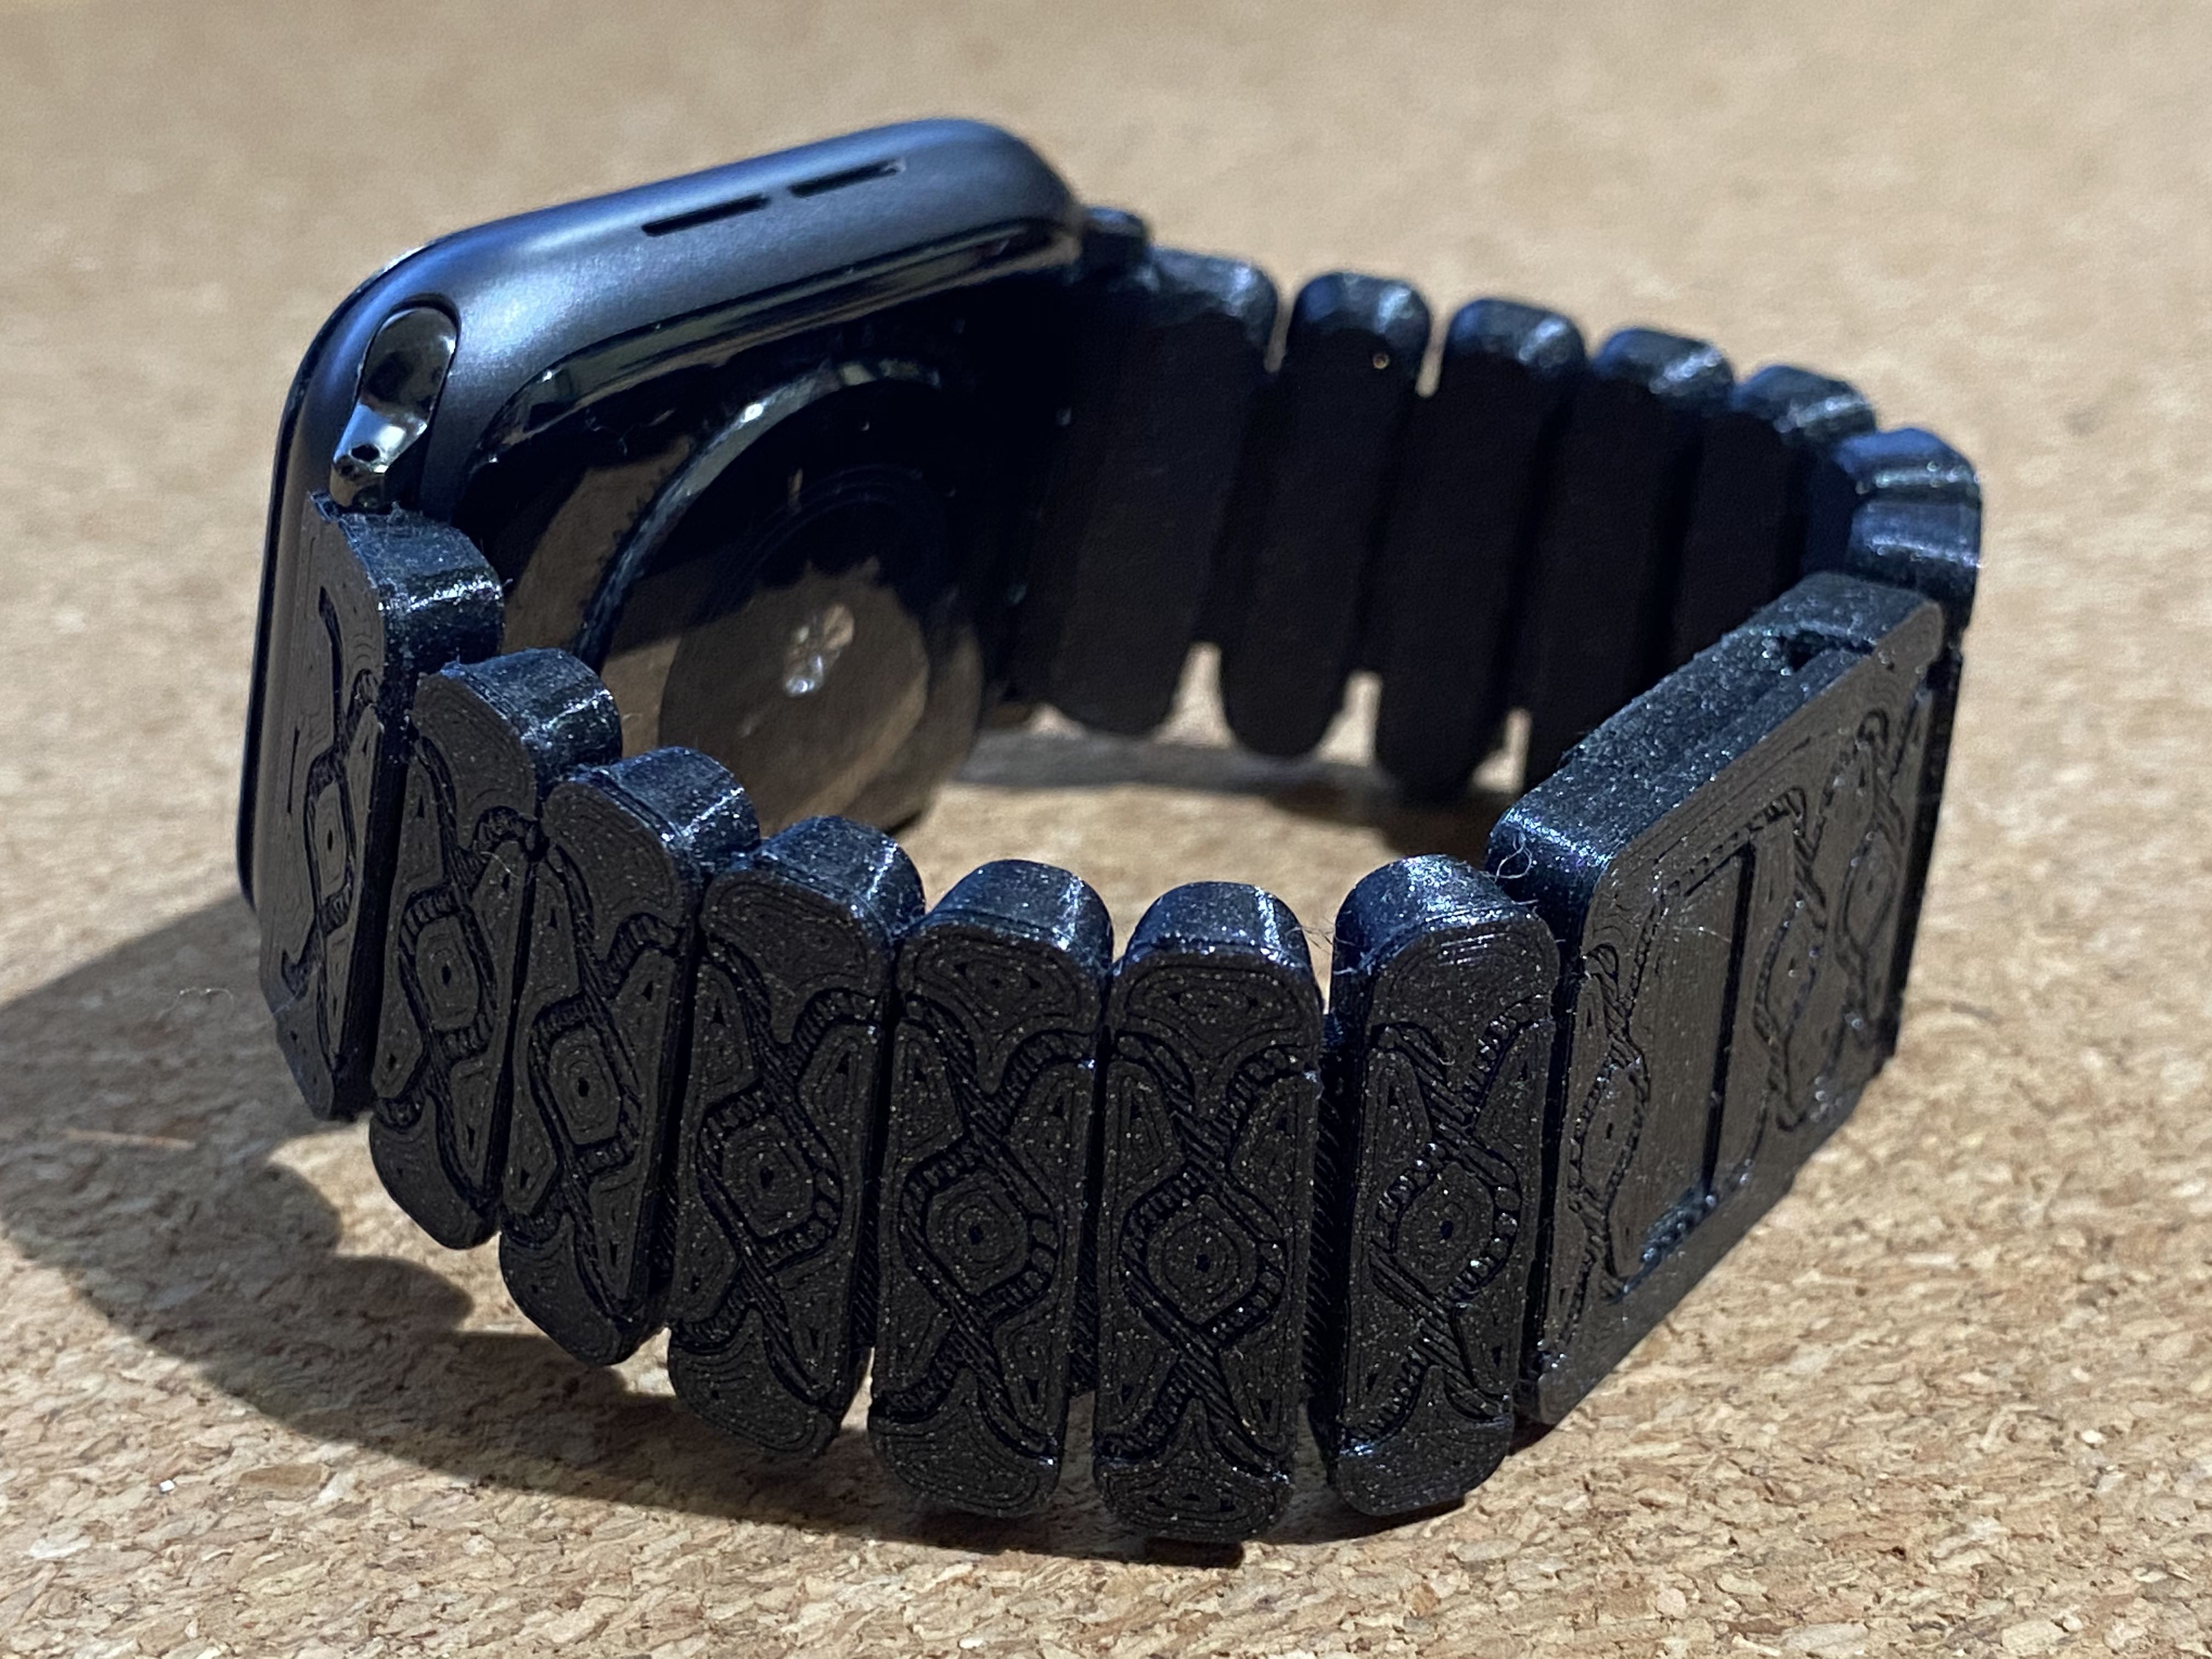
<p>This is a printed-in-place watch band, in my case for an Apple Watch but it can be adapted to any watch.</p> <p>With this design I wanted to accomplish two main things:</p> <ol> <li>To lear more about the capabilities of FDM printers.</li> <li>Create a good looking watch band that can be produced at home!</li> </ol> <p>I believe with this design I accomplish both goals.<br/> For the first point the inspiration was the print-in-place "Engine Benchmark" from Sunshine (<a href="https://www.youtube.com/watch?v=DFjD8iOUx0I">https://www.youtube.com/watch?v=DFjD8iOUx0I</a>) where small bridges are used to hold in place the individual parts and after printing they are broken to free the parts.</p> <p>For the second point I didn't want to use flexible filament because I have the impression that those bands, although perfectly functional, tend to have a more "kid's look".</p> <p>You can have a look at it in here:<br/> <figure class="media"> <oembed url="https://www.youtube.com/watch?v=B53iiJ3syWI"></oembed> </figure> </p> <p>In the files you will find the stl files for different band versions together with the original f3d to easily modify them for your own watch model.<br/> In the f3d file there are several predefined User Parameters that control different aspects of the design, feel free to play with them!</p> <p>There are version of 6links and 7links.<br/> With both sides of the band with 6links it fits a ~17cm perimeter arm. The extra link in the 7link bands should give ~7mm more each. Or you can edit the f3d file and add more links by coping one of them and displacing them.</p> <p>In addition to the printed band you will need two more things:</p> <p><strong>First</strong><br/> The connection links for your watch. For Apple Watch 4,5,6.<br/> Something like this:<br/> <a href="https://www.amazon.com/Stainless-Compatible-Hardware-Connector-Replacement/dp/B077XWJQ9Y/ref=sr_1_4?dchild=1&keywords=Apple%2BWatch%2B5%2Bconnector%2Bband&qid=1605470414&sr=8-4&th=1">https://www.amazon.com/Stainless-Compatible-Hardware-Connector-Replacement/dp/B077XWJQ9Y/ref=sr_1_4?dchild=1&keywords=Apple%2BWatch%2B5%2Bconnector%2Bband&qid=1605470414&sr=8-4&th=1</a></p> <p>or this:</p> <p><a href="https://www.amazon.com/Stainless-Compatible-Hardware-Connector-Replacement/dp/B076S3TSR9/ref=sr_1_1_sspa?dchild=1&keywords=Apple+Watch+5+connector+band&qid=1605470414&sr=8-1-spons&psc=1&spLa=ZW5jcnlwdGVkUXVhbGlmaWVyPUEyUkgxRE5COENEWERPJmVuY3J5cHRlZElkPUEwMTg4MTM3MlNKV0s4Rk43TFZUOCZlbmNyeXB0ZWRBZElkPUEwMjg5MTk5RDgyUUpOUlpJVlJSJndpZGdldE5hbWU9c3BfYXRmJmFjdGlvbj1jbGlja1JlZGlyZWN0JmRvTm90TG9nQ2xpY2s9dHJ1ZQ==">https://www.amazon.com/Stainless-Compatible-Hardware-Connector-Replacement/dp/B076S3TSR9/ref=sr_1_1_sspa?dchild=1&keywords=Apple+Watch+5+connector+band&qid=1605470414&sr=8-1-spons&psc=1&spLa=ZW5jcnlwdGVkUXVhbGlmaWVyPUEyUkgxRE5COENEWERPJmVuY3J5cHRlZElkPUEwMTg4MTM3MlNKV0s4Rk43TFZUOCZlbmNyeXB0ZWRBZElkPUEwMjg5MTk5RDgyUUpOUlpJVlJSJndpZGdldE5hbWU9c3BfYXRmJmFjdGlvbj1jbGlja1JlZGlyZWN0JmRvTm90TG9nQ2xpY2s9dHJ1ZQ==</a></p> <p>I suggest getting first the links, then measure the diameter of the pins and check/modify the pin-hole diameter of the design (There is a predefined user parameter "pin_diameter").</p> <p><strong>Second</strong><br/> The band locking clip uses rectangular magnets of dimensions 10 x 5 x 1mm glued with supper glue. Like these ones:<br/> <a href="https://www.amazon.com/Pieces10x5x1mm-Personalized-Multi-Use-Whiteboard-rectangle/dp/B07CPNC8SY/ref=sr_1_1?dchild=1&keywords=magnet+10x5x1&qid=1605470703&sr=8-1">https://www.amazon.com/Pieces10x5x1mm-Personalized-Multi-Use-Whiteboard-rectangle/dp/B07CPNC8SY/ref=sr_1_1?dchild=1&keywords=magnet+10x5x1&qid=1605470703&sr=8-1</a></p> <p>Before printing it have a look at the printing instructions.</p> <h3>Print instructions</h3><p>There are a couple of parameters that I found out make this print easier.</p> <p>First of all, this print contains many small bridges to make the interlocking of the individual links, those bridges work better with you print the model with <strong>1 single perimeter</strong>.</p> <p>Also I noticed less stringing and less bubbles on the external surfaces when lowering the temperature to 205-210.</p> <p>The design of the band allows it to be printed with any of the two sides on the bed.<br/> This gives the possibility to have a more smooth surface on the upper (external) side of the band.</p> <p>Summary:</p> <ul> <li>1 perimeter (in my testing this was crucial)</li> <li>Detect bridging perimeters ON</li> <li>215/60 first layer, 205/60 all other layers</li> <li>0.15 Layer height</li> <li>100% infill</li> <li>One of the two halves will need supports under the locking clip.<br/> I suggest to add them with a Support Enforcer only under the locking clip instead of doing it automatically and generating supports where not needed.</li> </ul> <p>The rest of the settings are the default Prusament - 0.15mm layer height - Prusa Mini.</p> <p>I have used so far Prusament Galaxy Black PLA.</p>
With this file you will be able to print Watch Band (Print-in-place) with your 3D printer. Click on the button and save the file on your computer to work, edit or customize your design. You can also find more 3D designs for printers on Watch Band (Print-in-place).