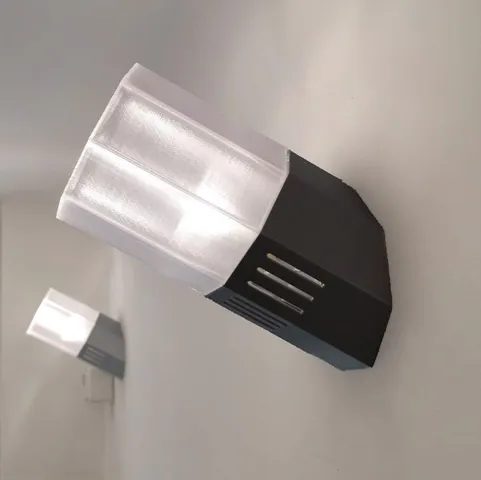
Wall-Mount Torch Lamp
prusaprinters
Simple, wall mount, torch style lamp for GU-10 LED bulbs. The torch is tilted by 30° to mainly illuminate the ceiling, giving the room a nice ambient light. The glass scatters some of the light and creates an eye catching spot on the wall. Print instructionsThis lamp consists of three parts: The Socket will be mounted on the wall (two drills, horizontal distance of approx. 6 cm, use appropriate screws and dowels for your wall surface) and holds the lamp and cover, which are just clicked into the socket part. Use PETG for a better heat resistance, although LED bulb usage is highly recommended, anyway). The Cover slides over the socket and hides the cables and the lamp socket. I used a silver-metalic PLA to give it a metallic appearance. Slots on the bottom ensure air circulation for heat transfer. Finally, the Glass, which is printed using a transparent PETG filament. -SocketCoverGlassMaterialPETGPLA (silver)PETG (transparent) Z-Step0,20 mm0,30 mm0,30 mm Infill15%0%0% Position-30° pitch180° pitch180° pitch Consumption22,7 g41,1 g64,5 g Printing time2h 25m2h 20m3h Notes: For a smoother surface, no inflill is used for the Cover and the Glass parts. This is working fine, as they are not exposed to any mechanical stress. All parts can be printed without any supports (see Position in the table above). Additional material 1 pc. GU-10 ceramic socket 2 pcs. M3x12 screws and 2 pcs. M3 nuts (to mount the GU-10 socket). 1 pc. screw terminal block (2 lines) in 10mm pitch to comfortably connect the light mains cables. If you cannot find these items at your local electronics supplier, all these items are available from Amazon. Assembly instructions Only the Socket part demands some assembly (see assembly image): Screw the two unisolated cable ends from the ceramic socket into the terminal block; approach from the same side, but use one line for each cable. Press in the nuts into the two hexagonal holes (use the scew-in technique). You need to turn over the Socket part to access these holes. Screw the ceramic socket onto the Socket part using the two prepared screws. Click in the terminal block into the pin at the lower end of the Socket part. Mounting instructions Mounting the lamp of the wall, is pretty simple and straigth forward. Of course you need a power outlet at the spot, where you want to install the lamp. Drill two holes for dowels (if required) at a horizontal distance of approximately 6 cm (there is a 5 mm tolerance for both the distance and the horizontal line). The cable outlet should be in between these mounting holes, at the same level or slightly 2-3 cm above.Now lead through the cables through one of the two holes in the Socket part and screw the socket to the wall.Screw the cables to the terminal block in the Socket part. If you find a Neutral cable (normally yellow/green colour coded), you don't need to connect it. Just make sure, it does not touch any conductive parts.Finally, slide the Cover part carefully over the Socket part, put in a LED GU-10 lamp into the ceramic socket, and slide the Glass part into the over part. Warning This device operates on 220V mains. You must be aware of the safety requirements working with 220V networks. Remove the fuses before working on 220V networks. Make sure, there is no power in the cables.
With this file you will be able to print Wall-Mount Torch Lamp with your 3D printer. Click on the button and save the file on your computer to work, edit or customize your design. You can also find more 3D designs for printers on Wall-Mount Torch Lamp.
