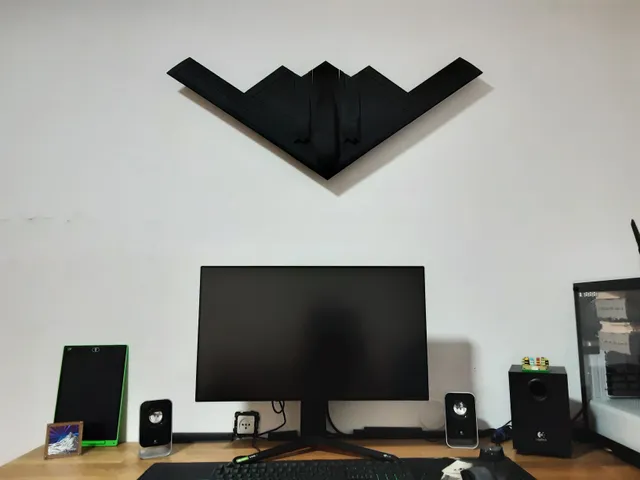
Wall Mount B2 Bomber
prusaprinters
2.9.2023 Update:You were and I was wrong, forgot to add type of tab. Description updated, files added (some filenames had changed to avoid confusion)____________________________________________________ The B2 bomber is one of the most unique aircraft ever designed. It is visually striking, involve complex and novel modern building techniques, technologies and cutting-edge research.In order to admire that and have a piece of it, I've designed this wall-mount model based of design by Shafier Khan over at GrabCAD.I've fixed the model to be one solid body, than sliced it and added tabs for alignment and structural integrity. This model is both designed for ease of 3D printing and to be visual pleasing.The model was designed with a wingspan of 1 meter in mind, resulting in overall dimensions of 1000mm x 400mm x 96mm.____________________________________________________Alright, let's get technical:Material:it is preferred to be printed in matte black PLA for 2 reasons: be similar to the original aircraft and everything in matte black looks cool AF =]Amount of material:if used proposed settings, the whole model weights about 1.6 kg, meaning 2 spools of 1 kg should be enough.Temps:I suggest printing temp. tower before printing. I've found out that my material (eSun ePLA matte black) is better printed at 200/65 rather than the usual 210/60 recommended for PLA. Variation is mainly due to stringing reduction and better bed adhesion.Settings:4 parameters top/bottom/sides @ 15% gyroid. Print all parts so that the straight faces alongside the width of the aircraft (direction- nose to tail) is on the bed. It'll make it easier to glue and visually pleasing in the final product. It still means there's straight faces printed in some angle to the build plate, therefore maybe some of you prefer slight sanding before gluing- I didn't.important note: these settings are a little overkill but the model you see printed and mounted in the pictures is actually the 2nd model I've printed. 1st model was 2 parameters @ 10% gyroid but it had only the upper wall mount (there's two mounts right now) and someday at 3am the model bracket broke and fell on my (very expensive) PC screen. One of the most scariest scares I've had in a long time and I've decided to beef it up because the cockpit smashed and there was no way to fix it & I felt it was kinda wasted (original model designed to require only 1kg/1 spool of PLA but the peace of mind that if it'll take a hit again it'll probably stay fine and not destroyed is worth it to me for the price of another spool).Therefore, print the Wall Mount (x2) with 6 parameters @ 50% gyroid to ensure no failure will occur to this critical, weight supporting parts.Parts: there are 10 parts of the aircraft itself, 11 tabs and the wall mount parts. Some can be printed together but preferably print the aircraft parts separately.From now on I'm going to refer to the different parts in the names I've given to them in one of the pictures.So the main reason to print each aircraft part separately (other than the obvious size of some of them) is that there are some sharp corners that tend to lift (given earlier story, I've printed it twice and some parts failed along the way so some more than twice). Therefore, I haven't hardcoded in the STLs/STEPs lily pads but you might consider adding them to the sharp corners of Exhaust Left, Exhaust Right & Tail.BOM (bill of materials, meaning in this context how much of every part to print):Tip Left (x1)Wing Left (x1)Intake Left (x1)Exhaust Left (x1)Cockpit (x1)Tail (x1)Tip Right (x1)Wing Right (x1)Intake Right (x1)Exhaust Right (x1)Big Tab (x7)Mid Tab (x2)Small Tab (x2)Wall Mount (x2)Top Mount Leg (x1)Bottom Mount Leg (x1)This build also requires six DIN912 M3x20 screwsImportant notice about tabs!the tabs, as it is, is mathematically fit perfect wherever they need to- which means that if you print it as-is without changing dimensions- IT WILL NOT FIT.This is by design since everyone's printer tolerances is different and the aircraft parts don't fit INTO each other so there's no concern there.My suggestion is this:Print all aircraft parts.Print one each of a tab type at 97% overall scaleTest fit. The perfect fit according to my experience is that they fit quite snuggly into their respective slots but still slide easily. This will help in the gluing process since glue is applied to both parallel faces of aircraft parts AND tabs and if the tabs will be too snug, in the mating process the glue might get hard before aircraft mating faces are touching- rendering all the parts involved in the gluing useless and need to reprint.If 97% is not right for you, experiment accordingly until reached satisfaction with the fit of the tabs.Assembly Instructions:I've used about 5 small tubes (around 2gr each) of CA glue.The general steps for gluing 2 adjacent parts:Apply glue inside tab slotInsert tab decisively & fast until it can go in anymore.Apply glue to tab socket on the other part and the mating faces of the aircraft parts.put together swiftly, in one motion, not slowly.Apply pressure with both arms towards to joint, making sure there aren't any gaps.After gluing the entire aircraft, connect two Mount Leg(s) parts to the aircraft.their names -Top/Bottom- corresponds to the orientation you see in all of the pictures: nose down therefore is Bottom and tail is up therefore it is Top (I think this is the best way to display it but this is just a way to distinct the two different mount legs- you can mount it in whatever angle you wish).After that, the mounting process goes like this:Put one of the Wall mount parts onto the Mount Leg parts (they're identical, there's no Top/Bottom distinction here).Put the model wherever you want to mount it on the wall and mark the 1st wall mount.Put the aircraft aside.Mount the 1st wall mount. Tighten the screw/bolt to the wall all the way, then SLIGHTLY release so the mount can rotate around the screw.Put the 2nd wall mount on the mount leg other than the one corresponding to the one you've just anchored to the wall.Mate the model with the mount, than rotate it to the desired angle, mark the 2nd Wall Mount on the wall.Put the aircraft aside.Mount the 2nd Wall Mount to the wall and tighten both mounts screw so that they're aligned.Put the model onto the wall, making sure the mount legs sit fully within the wall mounts.if not so, adjust accordingly. I think I've covered everything, sorry for the length but this is not that easy build and wanted to make sure you know everything I know.If someone will have any questions, please feel free to ask in the comments and I'll answer them (and perhaps fix the description if needed).
With this file you will be able to print Wall Mount B2 Bomber with your 3D printer. Click on the button and save the file on your computer to work, edit or customize your design. You can also find more 3D designs for printers on Wall Mount B2 Bomber.