Wall box for power bricks or what you want (custiomizable on Onshape)
prusaprinters
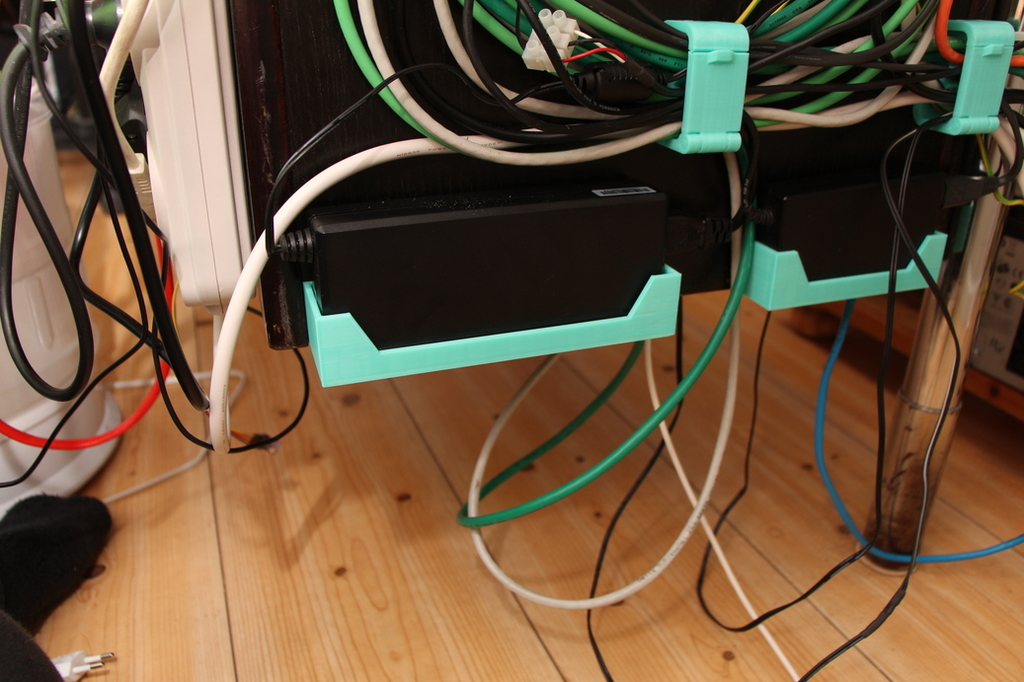
<p>Tired of bundles of cables and power bricks cluttering the floor under and behind furniture collecting dust?</p> <p>Make your cleaning easier by getting the stuff off the floor.</p> <p>Screws used: 4.2 x 16 mm countersunk wood screws, M5 countersunk and similar should work too.</p> <p>This is a wall box to mount power bricks either on a wall or on the back side of furniture. Take a look at my hinged cable organizer to manage those pesky cables as well: <a href="https://www.thingiverse.com/thing:4640618">https://www.thingiverse.com/thing:4640618</a></p> <p>Copy and customize it on Onshape: <a href="https://cad.onshape.com/documents/c66f4e12efd51e4a09977e34/w/72c308eb6661a7285583ad35/e/bd04ee7096e96e5a988baf34">https://cad.onshape.com/documents/c66f4e12efd51e4a09977e34/w/72c308eb6661a7285583ad35/e/bd04ee7096e96e5a988baf34</a></p> <h3> Print Settings</h3> <p><strong>Printer:</strong></p> <p>Raptor 2</p> <p><p class="detail-setting rafts"><strong>Rafts: </strong> <div><p>No</p></div><strong>Supports:</strong></p> <p>No</p> <h3> How I Designed This</h3> <p><strong>How to customize</strong></p> <p><div><p>Open the link to Onshape. Log in or create an account. Copy my design.</p> Now you should be able to edit your copy. Look at the right hand side of the model view, there should be a few squares with icons.</div></p> <p>Click the Icon with a<strong>cube and blue table</strong> (grid), you should now see the configuration panel with two tabs.<strong>Configurations</strong> and<strong>Configuration properties</strong>.</p> <p>Under<strong>Configurations</strong> there is a table with all the variations of this design. Type the name of your new variation in to the<strong>empty box at the end</strong> of the table. You now get a new row in the table for your configuration.</p> <p><strong>Right click</strong> your new configuration and select<strong>Switch to<em>name</em></strong></p> <p>Edit the measures, to get them right stand the power brick on it's side with the cables closer to the top. Make sure to measure it where it's thickest and give it a bit extra, no need to make this super tight.<br/> The height should be measured below the cables so the box wont interfere with them</p> <p>The cut out in front is to make the screw holes accessible, adjust the #hole_spacing to make the cut out look nice (an even number is good to make it easier to measure out the spacing on the wall).</p> <p>Under<strong>Configuration properties</strong>, set the<strong>name</strong> to the<em>same as your configuration name</em>. That way you automatically get the right name on your STL-file.</p> <p>Now to export you file, on the left side of the screen near the bottom under<strong>Parts</strong>, you should see your customized part.<strong>Right click on it</strong> and select<strong>Export...</strong>.<br/> In the export dialog, click<strong>Format</strong> and select<strong>STL</strong>, the rest should be fine. Click<strong>OK</strong> and you get your file.</p> </p> Category: Organization
With this file you will be able to print Wall box for power bricks or what you want (custiomizable on Onshape) with your 3D printer. Click on the button and save the file on your computer to work, edit or customize your design. You can also find more 3D designs for printers on Wall box for power bricks or what you want (custiomizable on Onshape).