Vibration Dampening Microphone Mount for Clarinet (Spring Loaded, Toolless)
prusaprinters
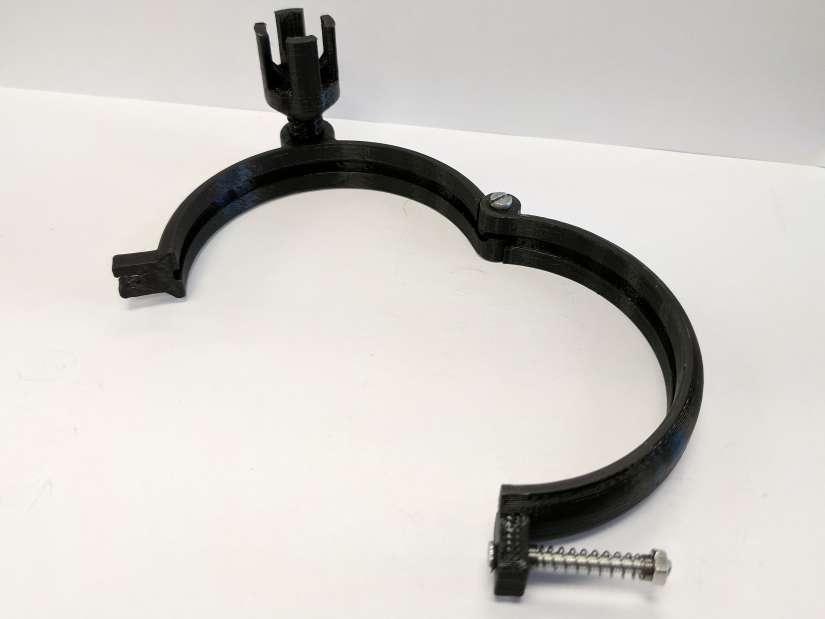
<p><em>Edit: Photos are now posted, and Mk2.5 is now confirmed to work.</em></p> <p><em>Edit 2: There are now files for clarinets with an 80 mm bell, but those have a tab on the side instead of a receiver for the threaded insert.</em></p> <p>This thing is a system designed to clamp around the bell of a clarinet and hold a microphone for performance or recording. It was designed from scratch by myself, and it will be continuously updated probably until the end of 2017. I don't know if there is a standard size for clarinet bells, but if not, you can easily edit the design in Onshape, where the CAD files are publicly hosted, allowing you to change it as you wish.</p> <p>On one side of the two piece clamp is a hinge, which is held together by n M3x15mm screw and nut. The other is a tool less latch which holds the clamp together using a M3x(>20)mm screw, two M3 nuts, and a spring from a regular old pen. The piece that holds the microphone is separate, which allows the whole clamp to be stored in a more compact way. This extra piece is held in place using integrated threads on the insert itself as well as one of the two clamp pieces. this setup allows for the microphone to face either up or down, as well as being securely attached. The microphone itself is suspended inside of the insert using small elastic bands for vibration dampening. these bands can be anything, but I used dental elastic bands used for braces.</p> <p>The clarinet that I made this model for has a bell with an outer diameter of just over 70mm. If yours is different, or you want to modify it in some other way, <a href="https://cad.onshape.com/documents/b2a11375a79d75983a8c5fb7/w/04b8751a00be636366eadd74/e/76b4ccbf78230bd512d73e04">you can find the document for this design on Onshape here.</a></p> <p>This is my first functional design, so let me know how I did! If there's anything I can improve on, be sure to leave a comment about it. I love to get better at this stuff, and any tips on that help a lot.</p> <h3>Print instructions</h3><h3>Category: Music Print Settings</h3> <p><strong>Resolution:</strong> 0.2mm</p> <p><strong>Infill:</strong> 20%-100%, higher infill=higher strength</p> <p><strong>Notes:</strong></p> <p>Wall count: 3</p> <p>Supports: Everywhere</p> <p>Print all parts with a brim!</p> <p>Print Clamp_1 and Mic_Insert UPSIDE DOWN For best results. While this does result in more support on Mic_Insert, it seriously reduces the probability that the part will pop off the plate while printing. Use strong supports, I used grid pattern @ 35%.</p> <p>The female thread on my clamp looked like it failed at first, but when I screwed the insert in the first time, a bunch of crap came out and revealed the proper thread.</p> <h3> Post-Printing</h3> <p><strong>Required Hardware</strong></p> <h3> ALL 3D Printed parts:</h3> <ul> <li>1x Clamp_1_Mk<strong>X-X</strong></li> <li>1x Clamp_2_Mk<strong>X-X</strong></li> <li>1x Mic_Insert_Mk<strong>X-X</strong><br/> <em>Which version should I use?</em><br/> For each of your parts, the version number (MkX-X) should be the same, ideally being the largest number of all available versions (where MkX-X translates to version X.X). Hardware</li> </ul> <hr/> <ul> <li>1x M3x15mm bolt, flat or button head</li> <li>1x M3x20-30mm bolt depending on the length of your spring</li> <li>3x M3 nut</li> <li><p>2x small elastic bands--dental elastics work great<br/> <strong>Assembly</strong></p> <p>The hinge uses the M3x15mm screw and one M3 nut. Clamp_2 has a cutout on the bottom for the nut. Refer to the CAD models if necessary.</p> <p>The other side of the clamp has a tab on each piece: one with a hole and one with a slot. Using the tab with the hole, put your longer M3 bolt through the hole so that the bolt's head faces the other tab. Next, place the pen spring around the shank of the bolt, and secure it using an M3 nut. Holding that M3 nut in place, Add another M3 nut to the bolt, and torque the two nuts into each other to hold them in place. Push the bolt from the nuts towards the other tab so that the head of the bolt reaches just past the other tab. Move the bolt so that the shank of the bolt is inside of the slot in the other tab, and release the bolt. This will pull the two clamp halves together while allowing you to "stretch" the clamp open.</p> <p>Finally, the mic insert is screwed into the clamp using the integrated threads. To mount your mic, first stretch the two elastic bands between opposite arms on the insert. The microphone sits between the two bands.</p> <h3>Version Log</h3> </li> </ul> <p><strong>Version (Date Published)</strong></p> <p>Mk2-5 (9/28/2017)<em>: First published version.<br/> Mk2-5 (10/4/2017)</em>: Added Photos of print</p> <p>80mm: a version of Mk2-5 for an 80mm clarinet bell. still uses the same mic insert.</p>
With this file you will be able to print Vibration Dampening Microphone Mount for Clarinet (Spring Loaded, Toolless) with your 3D printer. Click on the button and save the file on your computer to work, edit or customize your design. You can also find more 3D designs for printers on Vibration Dampening Microphone Mount for Clarinet (Spring Loaded, Toolless).
