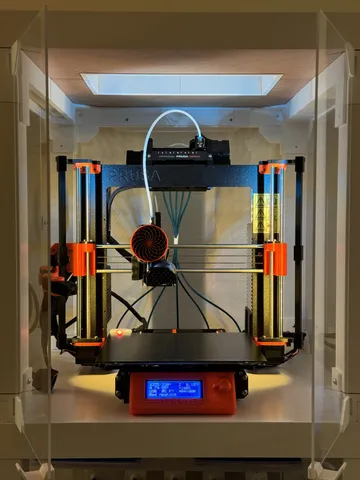
Vertical Minimalist LED Rails for Prusa i3MK3 3D Printers
prusaprinters
OverviewFor a video tour of this tower setup, please visit this reddit post. In this video I explain how this quick-release system works along with some of the other upgrades that I have made for my Prusa i3MK3S+ with MMU3! (:File OrganizationInside this post you will find GCODE, 3MF, STL, STEP, 3DM, and image files. The GCODE files are available as nested assemblies for easy and efficient printing. The 3MF and STL files are available as nested assemblies for the print bed.The STEP and 3DM Files contain all of the parts. This project was designed in Rhino3D, so the 3DM files contain the most information about layers, colors, and they come annotated with text. The STEP files contain the 3D models and only some 2D curves.The Light RailsPrinting the rails is simple. Just use the prescribed G-Code or slice up the STL files and 3MF files in Prusa Slicer!I prefer to use RGBW Adafruit Neopixels because they are a reliable and look great! It's nice to spring for the RGBW too because the dedicated white LEDs look nicer in my opinion than the combined light of RGB LEDs.Using Octoprint as a Controller for the LightsThese rails are designed to work well with a Raspberry Pi case that I designed for the Prusa i3MK3 that also has space for a breadboard. Here is the link to that Printables Post!The "OctoPrint WS281x LED Status" plugin works great for these LED's because it's intuitive and has a wide range of options for customization of color and animation sequences that can directly correlate with the status of your printer. Super fun stuff!Adafruit has a pretty great explanation on how the wiring for Neopixels works on Raspberry Pi's. Here is the linkShopping ListRGBW LED StripsHere is the link I used.22 AWG solid core electrical wireHere is the link I used.JST connectorsHere is the link I used.Heat shrink tubingHere is the link I used.Soldering ironHere is the link I used.Cord protectorHere is the link I used.Barrel Jack PCB MountHere is the link I used.Barrel Jack Power SupplyHere is the link I used.CapacitorsHere is the link I used.MicrochipsHere is the link I used.Small fanHere is the link I used.ResistorsHere is the link I used, I think?AssemblyFor the rails, the tops are designed to be pressure fitted onto the top of the 3D printer's Z-axis caps. Just give it a gentle press and they should lock into place. Taking the rails, slide the led strips into them. Cut them to size and solder wiring to them that is long enough to reach whatever power source or control box it is that you're using.Unscrew the two screws that are closest to the front of the printer on the bottom z axis caps.Feed the wiring through the bottom caps of the rails. Then, slide the bottom caps onto the rails and screw it into the bottom of the Z-axis caps. You'll need slightly longer screws. You might be able to find some in the spare parts that came with your printer.After that, make sure your wiring is all good, close up the Raspberry Pi case, and you're in business!
With this file you will be able to print Vertical Minimalist LED Rails for Prusa i3MK3 3D Printers with your 3D printer. Click on the button and save the file on your computer to work, edit or customize your design. You can also find more 3D designs for printers on Vertical Minimalist LED Rails for Prusa i3MK3 3D Printers.
