VeggieMake: intro to 3D printing
pinshape
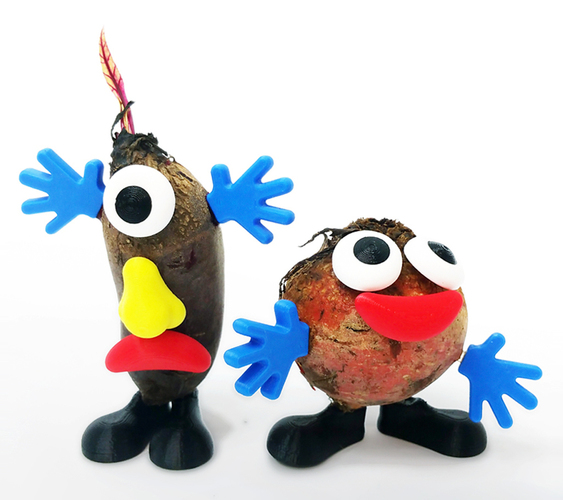
Students are given a VeggieMake, a toy that transforms produce into a cute character, but the pieces don't attach to the fruit or vegetable. Students must design pins to connect the parts, making it an easy project with minimal emotional investment. The small pins print quickly, and students can make changes rapidly. This reinforces the idea that 3D printing is useful for rapid prototyping and creative iterations. The VeggieMake encourages students to use unattractive fruits and vegetables. Objectives: Learn basic principles of 3D printing and design. Apply design skills to create VeggieMake pins. Understand iterative design principles and utilize prototyping for improvements. Precisely measure (optional, if digital calipers are incorporated). Integrate creative thinking with design skills to create a new VeggieMake piece. Audiences: Grade 5 to adult Subjects: Math, Design, Art Skills Learned (Standards): Introduction to 3D design using Tinkercad and pen and paper. Introduction to 3D printing layering technology by seeing own designs printed. Reasoning and deduction through changing designs after observing different iterations. Lesson/Activity: Note: An educational resource is provided in the resource section. Activity Introduction: Introduce the concept of iterative design and prototyping. It's challenging to achieve exceptional results on the first attempt, making it essential for teachers to provide feedback throughout the process. The VeggieMake encourages students to use unappealing fruits and vegetables. What To Do: Have each pair or group of three choose an unsightly fruit or vegetable for their creation. Distribute one set of VeggieMake parts to each pair or group of three, asking them to start creating creatures. They will quickly realize that the pieces can't be attached. Explain that each group needs to design a pin to attach the parts to the produce. (If not doing the measure extension) Explain that the holes are designed to be 4 mm x 4 mm but may vary due to 3D printing imperfections. Have students draw ideas for a pin, encouraging them to create multiple designs. Depending on the age group, require measurements in their pen and paper design. Introduce Tinkercad: Students can work through available tutorials or follow these shortcuts: drag and drop a square, change dimensions, add a triangle, group it with the square to make a 'house,' and add a hole for a door. As students finish their designs, they download them as STL files. Explain how to slice the designs for 3D printing. Discuss layering technology at this time (if needed). The first designs should be sliced at 300 mm to print quickly. Print the first version of student designs. Only one pin is printed until the students have shown that their design works in multiple VeggieMake pieces. Students try out their design and make changes as needed, encouraging them to continuously optimize their design. Once students know their pins will work in more than one VeggieMake piece (to account for 3D printing variability of holes), they can print eight copies at a finer slicing (200 mm works well). Materials: VeggieMake parts (no pins) for each pair or group of three students Ugly fruit and vegetables for each pair or group of three students Computer for each pair or group of three students Access to Tinkercad (tinkercad.com) Slicing software for designs 3D printer with filament Pen and paper for brainstorming ideas Handouts and Assets: Handout to create a VeggieMake workshop (also see VeggieMake for Education - Explore Making.pdf in Thing Files) 3D Printed Parts Kits can be ordered from ExploreMaking (email for details)
With this file you will be able to print VeggieMake: intro to 3D printing with your 3D printer. Click on the button and save the file on your computer to work, edit or customize your design. You can also find more 3D designs for printers on VeggieMake: intro to 3D printing.
