vakits 5mm LED Cross Enclosure
pinshape
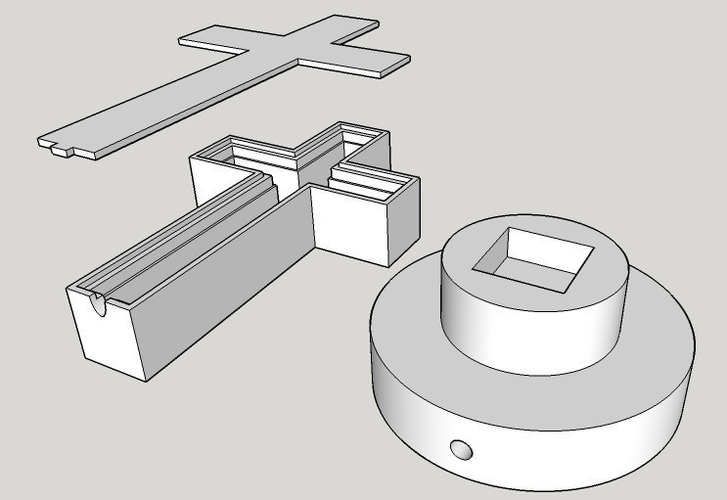
I bought a pair of blank LED cross PCBs at a Hamfest couple of years ago, intending to install them as assisted brake lights in my truck. However, being lazy, that never happened. Fast-forwarding to 2017 and getting a new 3D printer, I finally have the perfect opportunity to do something with these crosses. The cross design allows the PCB to fit snugly inside, and a thin backplate snaps onto it once assembled. When powered up, the LEDs shine brightly through the front layer. You can purchase the PCB kit directly from the company at http://vakits.com/led-crucifix. To print this correctly, use these settings: Layer Height: 0.1mm, Wall Thickness: 0.5mm, Wall Line Count: 1, Top Thickness: 0.8mm, Top Layers: 8, Bottom Thickness: 0.8mm, and Bottom Layers: 8. Infill should be set to 60%. After assembly, you can either solder the wires directly onto the board or make it removable like I did. The metal strips are made from aluminum duct tape, used for heating/AC duct work. Attach the wires to these strips using two-part conductive epoxy. This way, turning off the LEDs is as simple as pulling out the cross. The LEDs on this board are wired in parallel, requiring careful consideration of power and current dropping resistors based on the specific LEDs chosen. My LEDs draw 30mA continuous at 3.2-3.8v. To power this from a standard USB port, place two 100Ω 1/4 watt resistors in series with the positive lead of the USB connector, connected in parallel to achieve 50Ω at 1/2 watt and handle the current needed by 12 LEDs each drawing 0.03 amps.
With this file you will be able to print vakits 5mm LED Cross Enclosure with your 3D printer. Click on the button and save the file on your computer to work, edit or customize your design. You can also find more 3D designs for printers on vakits 5mm LED Cross Enclosure.