Vacuum Table for CNC Machine
thingiverse
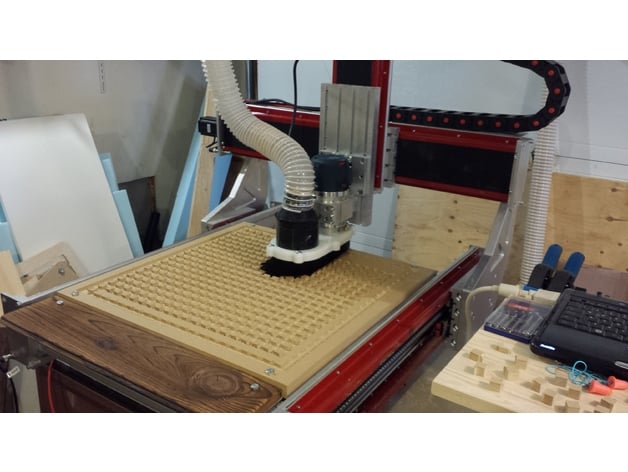
This is a 2ft. x 2ft. vacuum table designed specifically for the CNCRouterparts "Benchtop Pro" CNC Router machine. Process (in a nutshell): Obtain your MDF wood and get ready to create something amazing! Load the file into Fusion 360, which is free for hobbyists like you. Select or create your tool and regenerate the tool-paths - this might take some time. My computer uses up to 5GB RAM and 5-10 minutes to make any changes to the main air chamber tool path. Process output files while keeping operations separate. Load the file into Mach3, a licensed software that's a must-have for your CNC machine. Set your "zero" for X and Y carefully, but be sure to follow the notice below for setting your Z-zero correctly. Run operation to cut the main chamber. Run operation to cut the vacuum port. Flip material, re-zero, and get ready for the next step. Run operation to cut guide holes - these holes are not through the material, so don't worry about that! Assemble everything using duct tape and a shop vac. Fasten to work table securely. Selectively drill out holes for your media size using a cordless drill and drill bit. You're done! Enjoy your new vacuum table! NOTICE: When cutting the main air chamber, you must use 2 passes. The file included doesn't automatically do this because my computer couldn't render the two passes without crashing. To achieve 2 passes, simply calibrate your Z-zero to 0.25 above your material on the first pass, and then calibrate Z-zero to true material top on your second pass. Bolt Holes (recommended) can be added by creating a sketch on the material border or by manually drilling them. This will keep both pieces of MDF square and tight to the table, while clamps may result in some slippage. See pictures for more detail! Required material: * Air filter mask * Eye and ear protection * Two pieces 2x2' MDF, 1" thick * Duct tape - for sealing the two tables pieces together around the outer edge * Shop vac - I used a small Rigid-brand "5HP Max" shop vac * Bolts, clamps or other fastening hardware * Cordless drill and 1/8" drill bit - for drilling out guide holes to match your media size Optional material: * M8x60 bolts, washers and t-slot inserts - for "Benchtop Pro" machine * Glue - for gluing the two pieces of MDF together around the outer border and also across all of the inner support "cubes." This can be achieved by spreading glue, sandwiching the two pieces together and then clamping or applying even force (e.g. weight) across the entire surface on a LEVEL surface. Note: STL file will not work, and is only uploaded to satisfy Thingiverse programming. Fusion 360 does NOT seem to export in any formats compatible with Thingiverse.
With this file you will be able to print Vacuum Table for CNC Machine with your 3D printer. Click on the button and save the file on your computer to work, edit or customize your design. You can also find more 3D designs for printers on Vacuum Table for CNC Machine.