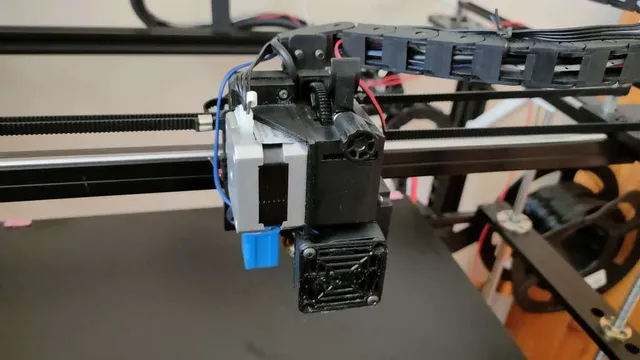
V6 Titan pancake direct drive extruder for X5SA Pro
prusaprinters
Big update coming! Dual 5015! First of all, this is a remix from this original desingIt's a great desing that saved me when I upgraded my Tronxy X5SA 400 Pro with an E3D V6 clone and a pancake motor (28mm of height, everything of or below 30mm can fit) for the extruder. It uses the original Titan clone, the E3D one won't work. The nozzle must have a J-head to snap into the extruder itself, and it will work better with flexible filaments if it is for direct drive, so it doesn't have the space to mount the bowden coupler.Please be advised that I modified this object for a X5SA 400 Pro, which should be extremely similar to the X5SA Pro, and probably compatible with the X5SA (please COMMENT if it is not).In my remix I tried to improve the general aspect, the cable managment, the fit of the screws to the metal plate (some screws were bad aligned) and the position of the inductor probe (which is now higher) and layer fan (which is now lower). In the files I also include a new fan plate which is thougher and avoids the heater block from melting it. The ducts for the fan must be a couple of milimiters higher than the Ender 3 style, so it should be pretty easy to modify your favourite fan duct to mount it in this model ;).The files include:A carriage mountAn extruder mountA layer fan mountA Tronxy logo fan grill for 30 and 40mm fansA filament sensor mount to the aluminium profilePrint SettingsResolution:0.2 - 0.3mmInfill: 20 - 30 %Filament: PETG is recommended to withstand the screws and the heat. Black for cool aspect Notes:Rafts and support are not needed if your printer is capable. 3-4 perimeters are great if you want to tap the screws of the sensor and fan directly into the model. 3D infill maximizes the strengh.And yeah, I know that in the fan grills, the interior of the O won't print, I just don't care enough to change it. Materials/MountingMaterials neededTo make this modification you will need:A V6 nozzle, either the original or the clonic.A pancake NEMA stepper motor of 30mm or less.A ribbon cable long enough to connect the stepper (1m for the X5SA 400, something like 60cm for the X5SA).A 30mm fan for the V6 or an adapter this one for the original fan. And optionally a fan cover grill like this or the remixes I made with the Tronxy logo.M3 bolts and nuts (just a couple of nuts if your printer had extra bolts).AssemblyDissasemble the extruder and disconnect it.Dissasemble the nozzle and fan block, and get the nozzle out.Mount the carriage into the metal plate.Mount the induction sensor and rout the cables of the sensor and endstop through the channel.Slide the fan into the nozzle if needed.Assemble the new stepper with the Titan extruder, and the extruder mount in the middle, and slide the nozzle in the extruder before closing it.Screw the extruder assembly to the carriage with the 4 bolts.Screw the layer fan to the new mount and screw the mount to the carriage at the side.Insert the heater and thermistor in the nozzle and finish the wiring.Printer configYou will have to set the new Vref for the pancake motor, which means opening the guts of the printer to turn a little knob about a turn :P.Now go and see this guide for some real help.Firmware configThis is best done if you have Marlin or similar (actually, anything else from the original firmware is perfect ;) ).You will have to do a PID Autotune and update your Linear Advance K if you have it. If not, go and set it up!Maybe also check the accelerations with the new weight of the carriage.As the nozzle moves forward with, you will have to set the new home offsets, don't forget it ;)Slicer configYes, we are done, right? Well, to get the benefits of your new drive, you will have to do multiple slicer changes like retraction, flow, and speeds.And that's it!There you go, a new direct drive for a low budget!Thanks to...Thanks to CartesianCreations for the original desing, WheresWaldo for the 40mm adapter and OutwardB for the fan grill.Also, lets all thank TeachingTech for the awesome guide.
With this file you will be able to print V6 Titan pancake direct drive extruder for X5SA Pro with your 3D printer. Click on the button and save the file on your computer to work, edit or customize your design. You can also find more 3D designs for printers on V6 Titan pancake direct drive extruder for X5SA Pro.
