USS Sulaco
prusaprinters
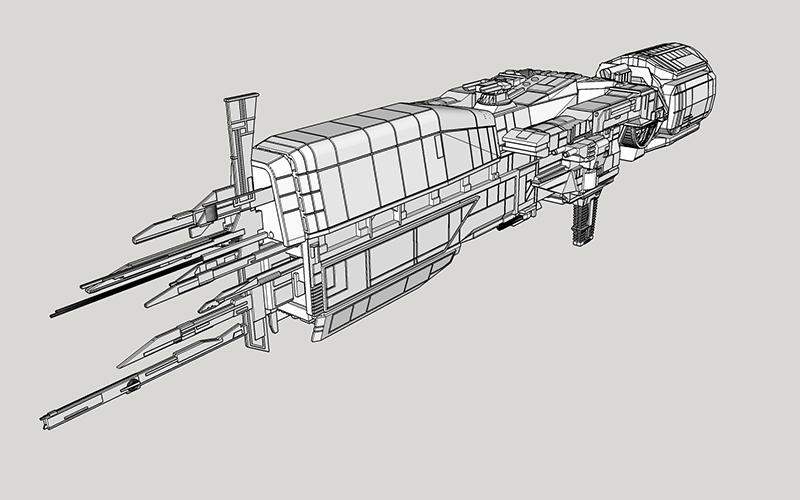
<p>This is my recently completed 800mm long model of the USS Sulaco from the movie Aliens.</p> <p>I broke the ship down into parts to get the best results from 3d printing for each part, and there are only 2 parts that need support (57 and 58).</p> <p>A couple of parts are optional, for example the dropship bay can be done open or closed, and the parts are labelled as optional in their filenames.</p> <p>A couple of part options are provided if you have access to a DLP printer, mainly for the guns, as otherwise you need to add barrels from styrene or brass rod/tube.</p> <p>Also the guns (part 85) are intended to have styrene tube added as barrels.</p> <p>Printing at 0.2mm layer height will take about 90 hours all up, and use about 1050gm of filament.</p> <p>It has a 12mm hole at the front and rear underneath so it can be mounted on a base.</p> <p>The bulk of the ship can actually be screwed together using M3 screws. I used 6mm, 8mm, and 10mm long screws. There are also a few places where M2x6 screws are used, in these cases i recommend using socket head (hex) screws, as these are visible externally. By using socket head they actually blend in and look like detail.</p> <p>The file part numbers include how many to print, and if its left or right. Ie: Sulaco82_left_x1.stl and Sulaco72x2.stl</p> <p>Since Thingiverse for some reason has the parts individually instead of a zip file, i've uploaded a zip for convenience here: <a href="http://members.iinet.net.au/~canison/Sulaco/Sulaco_STLs.zip">http://members.iinet.net.au/~canison/Sulaco/Sulaco_STLs.zip</a></p> <p>Assembly instructions can be downloaded here: <a href="http://members.iinet.net.au/~canison/Sulaco/SulacoInstructions.pdf">http://members.iinet.net.au/~canison/Sulaco/SulacoInstructions.pdf</a></p> <p>Come and join my facebook group and show me your build! <a href="https://www.facebook.com/groups/360348098234645/">https://www.facebook.com/groups/360348098234645/</a></p> <p>UPDATE 1/8/19: My bad, I forgot a part! The lower front face that the antenna connect to. Have now uploaded it as part "Sulaco14a.stl".</p> <p>Sorry!!</p> <p>Update 14/8/19: A couple of people pointed out a few things i'd forgotten in the instructions, so have updated them. Be sure to download the instruction zip file again.</p> <p>Changes:</p> <p>Step 8 - Add antenna from styrene beam/rod</p> <p>Step 64 - Add gun barrel from styrene tube</p> <p>Step 78 - Add antenna from styrene beam/rod</p> <p>Additions:</p> <p>Steps 80 to 93 for the guns.</p> <p>Update 12/9/19: have updated the instructions with actual part numbers to make it easier to plan printing.</p> <h3>Print Settings</h3> <p><strong>Printer Brand:</strong></p> <p>Anycubic</p> <p class="detail-setting printer"><strong>Printer: </strong> <div><p>All-metal Mega</p></div> <p><strong>Rafts:</strong></p> <p>No</p> <p class="detail-setting supports"><strong>Supports: </strong> <div><p>No</p></div> <p><strong>Resolution:</strong></p> <p>0.2mm</p> <p class="detail-setting infill"><strong>Infill: </strong> <div><p>25%</p></div> <p><strong>Filament:</strong> Filaform PLA Grey</p> </p></p></p> Category: Vehicles
With this file you will be able to print USS Sulaco with your 3D printer. Click on the button and save the file on your computer to work, edit or customize your design. You can also find more 3D designs for printers on USS Sulaco.