USB Touch Dimmable Led Desk Lamp v1.4
prusaprinters
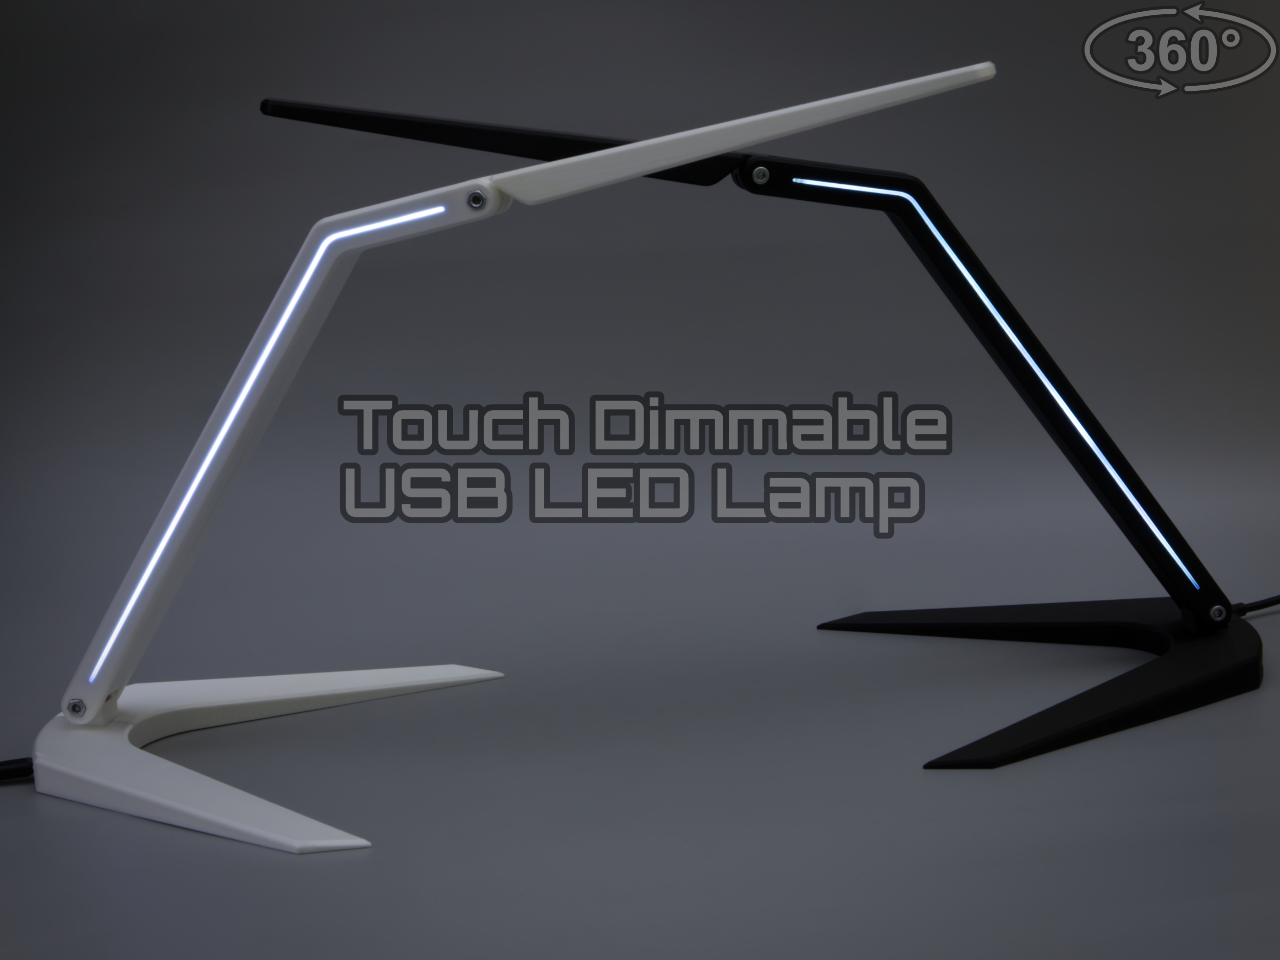
<p><br/><br/> <br/></p> <p><img src="https://lh3.googleusercontent.com/fife/ABSRlIqqbF_Jjk6kwIWHeFQJGaB5DtAQ7M_EKsdb4iX9W5CUYvWOku9I_ASEDp4K417GKdA7Z1EHQHcGPE9fhoJikFrE8Q7prnKsruJbxjiNUXmbrcteWxbTSvgk2SCSglXY1mOBqTXT7ujakAAuQyrAcnLQy0jVrxf_OKcsYOYtcQzoNM_iIUAgery2W-ZQuvKm2c4bNZouShBIyaRszfuEcWhq5SkS32881dcL2l_KcdNmn8HBuocaHTsdDvBVMHryaYx5ol3gdImz-W-BBN5NPFvKeOdZ4hgBHiU7tMTAuCIlQqc0ESD8Wn6Ybhr0bE8W9B_OxpM8iS941StMJid2RLsGGRIIdzcyq8o6GFcAu4n-R8MbQE9wykktFuqrXQEfjIYIe8flX5Chq6sHocYi-FhmPUQVVlD8nefnCsxVQ-evf1917f_a-irfT1zsryxKW2KYlbV7L6AlkC4Hk5KOuK0dSb-BJNpXvljvBIY8Xocg8Z51atUeIH6vE3mEZC2rognfUoD1gUUpXLY83Qorm-QCo-Aok3tJP9YHa17tsuHpEQjLdKXJYM9iZapCGbs5rhaiKrNe6fly7nx5oSxT35mnmZxAlnlB0R4iHJdBx-WKMwGFrOeSDvzbIeIeVWq8aIRkAXprw1pA9Lih6sFvCJFXsxPCzSXkTBfr0wcJ0HEFeQdUjEbzjUCK4yhmGxkhK_vglGDC1mCqV3iTvsMWuBzQ9iTSjadeOA=w1464-h971-ft"/></p> <p><br/></p> <ul> <li><p>If you don't see a gif animation here, then something broke, or you are blocking it. Turntable is 33cm.</p> </li> <li><p>Photo 4 shows pretty well how bright the default top with the 17cm LED COB is.</p> </li> <li><p>If you make one, consider uploading a picture. It's nice to see other's prints.</p> </li> </ul> <p>A modern desk lamp with an invisible touch switch/dimmer that senses your finger though the plastic. It has two boost converters with a micro USB connector that converts the 5v USB up to a higher voltage that you set. It has a 12v 6 Watt COB LED bar as the main light, and a 25cm long LED strip inside the arm. These two lights are run separately on each converter so the brightness can be set independently. The converters input are also bridged together, so it doesn't matter which side you connect the cable.</p> <p>This lamp can be printed in any color without getting any light bleeding through the moveable arm. The arm is the most complex part. It's made with 7 parts that all nest into each other. It has a 3 part isolator that is printed in black, which is what keeps the light inside. The light is only allowed to exit through the two light guides that goes through all the parts and emits light along the arm. This is just a detail light, although it does make the lamp easy to find in complete darkness.</p> <p>Both of my lamps where printed in PLA. The temperatures are quite low, but you do need to be careful with the COB, as these can easily overheat when run at the rated spec. I run it at around 11 volts so it does not overheat. The LED strip in the arm is run at around 8 volts, so it doesn't produce much heat either.</p> <ul> <li>This requires a high precision printer and precise assembly of the arm.</li> <li>Not printable on the mini, as the arm is too long.</li> <li>To power the lamp, you probably have an old phone "charger" that can be used. You will need a 5v with at least 1amp of current. Can also be powered with powerbanks.</li> </ul> <p><strong>Changelog:</strong><br/> The lamp has changed somewhat after I made mine:</p> <ul> <li>Added double walls to the center isolator where the wires enter and exit in the arm. This is to block more light. The chamber can be filled with something like black silicone to stop all light from leaking through.</li> <li>Replaced the small chamfers on the base with tapered ones. I think it looks better. Picture 5 is the most current model.</li> <li>Added small connection points to the outer case and isolators. This divides the light guides into 3 zones instead of a continuous line. This was done to make these parts less floppy, and easier to glue.</li> <li><strong>Added a simple version of the arm that does not have any lights, or switch. This is just 1 part, instead of 7 for the lit one.</strong></li> </ul> <p><strong>v1.1</strong></p> <ul> <li>Added a new top for a different COB LED bar. This is a 12x250mm long led. It makes the top about 8cm longer, so it will have even more reach over a desk.<br/> Search eBay for: "250x12 cob led" to find this one.<br/> Added a photo of this.</li> </ul> <p><strong>v1.2</strong></p> <ul> <li>Added two new tops for 10mm wide led strips. One for 15cm, and one for 20cm strips. These are more suited for regular led strips, since they are usually cut every 5cm.</li> <li>Added v1.2 comparison photo. The top for the default 17cm cob is not shown.</li> <li>You might want to print the legs solid if you use the longer tops, as the lamp will be fairly front heavy with them. A solid base will be a little more stable. Or it could be fixed down with double sided tape.</li> </ul> <p><strong>v1.3</strong></p> <ul> <li>Added a different set of legs. These are supposed to be used with metal rods, like tungsten, which is very heavy. Using solid tungsten rods will increase the weight of the base about 5 times, making it more stable, especially with the longer tops. You can use other metals as well, like steel and copper, but they are less than half the weight of tungsten. Tungsten is about twice as heavy as lead (lead is cheap but toxic, so I would rather not recommend that). <br/><br/> You will need 8 4x100mm rods to get the maximum weight. Each rod is about 20 grams (which is the same weight of a single PLA leg). I got 10 rods for about 25 dollars on eBay. <br/><br/> Another benefit is that the legs will be stiffer. <br/><br/> I have just ordered the tungsten rods so it will take quite awhile before I can test these, but it should work just fine. I will update this when I get them. I ordered mine from a eBay store called <a href="https://www.ebay.com/usr/klot-tool">klot-tool (link)</a></li> </ul> <p><strong>v1.4</strong></p> <ul> <li>Minor change to the base. The tungsten weights I got was slightly longer than advertised so I made the hole for the weights 102mm. The weight of a solid printed base with 8 tungsten rods is 5.5 times heavier than just a non solid base with no weights. Note that the heavy base is not absolutely necessary. It just makes the lamp more stable with the longer tops, and it just feels better to use.</li> <li>Also added a slot for the wires so they can be pulled out or into the legs. Makes it a little easier to work on the converters.</li> </ul> <h3>Print instructions</h3><h3>The Parts</h3><ul> <li>All parts has to be printed with 0.2 layer height. 0.3 can cause issues. No supports are needed for anything. All parts in the arm is glued together. All parts of the isolator (including the electronics) can be assembled and glued separately before it's glued inside the two outer case parts.</li> </ul> <p><br/></p> <p><strong>Top:</strong></p> <p>The top has a pivot that is slightly oversized. This is because the joint has to be very accurate. It will need some quick sanding to get the optimal fit, so it doesn't put too much pressure on the arm when the screw is tightened. If the joint gap is too large, the pressure can blow the glue joint on the arm open</p> <p>This part will deform if your cob gets too hot. Might be wise to print this part in petg if you have it in the same color as pla.</p> <p>It will be beneficial to add a modifier box around the joint in prusaslicer, so this area is printed solid.</p> <p>Top is printed upside down.</p> <p><strong>Outer Case:</strong></p> <p>It's the exterior shell of the arm. Has bridges over the pivot holes so that they are not printed in the air. This bridge will need to be cut away after printing.</p> <p>Printed solid</p> <p><strong>Simple Arm (optional)</strong></p> <p>Figured I would add a simple version of the arm. It's just 1 part. Has a tunnel for the wires going to the COB LED. This would be directly connected to the converter, so you will not get the switch or dimming. Brightness can still be set with the voltage on the converter though. I have not tested this arm.</p> <ul> <li>To add a switch to this, you can look for a micro usb switch. That would be added externally.</li> </ul> <p><strong>Isolators:</strong></p> <p>These 3 parts is what blocks the light from going through the outer case. Should only be printed in black. Should also be painted white on the inside, like I did. This will make the light more even.</p> <p>The center isolator has brackets for the wires that go to the dimmer. I used white wires here, as this will also make the light more even. Just mark them so you know positive and negative.</p> <p>The center isolator might need to be printed with a brim so it doesn't lift off the bed.</p> <ul> <li><strong>Note:</strong> The perimeter around the dimmer needs to be covered with something like black tape or black paper. If you don't, you will get some light bleeding through the edges.</li> </ul> <p>Printed solid.</p> <p><strong>Light Guides:</strong></p> <p>These will transfer the light inside the arm to the outside in a controlled way. Should be printed in a clear color.</p> <p>They can be a little difficult to insert into the left/right isolators. There are small clips that holds these in place, but they can be glued as well. I would be careful with superglue here, as it can cause a weird chemical "frosting" effect that can spread to other parts. It's caused by the fumes from the glue.</p> <p>I don't like the "hotspot" look that led strips usually have, so I glued some paper on the flat surface that faces the inside to diffuse the light.</p> <p>Printed solid</p> <p><strong>Lower Pivot:</strong></p> <p>This might need some minor sanding too, to get a good fit.<br/> Might as well print this solid too.</p> <p><strong>Base:</strong></p> <p>The legs for the base is printed standing on the edge. This is to avoid the "stair" effect on the tapered legs. The legs and lower pivot are glued together. The legs will still have this stair pattern on the joining edges. This can be sanded away so the joint between the legs is completely flat. The legs are made in a way to account for some of this material to be removed.<br/> <br/></p> <p><h3>What You Need:</h3><br/> <br/><br/> <br/></p> <p><strong>12v COB LED Bar</strong><br/> eBay Search: 17cm cob led</p> <p>These are 1.5x17cm long COB LED bars. Usually around 5-8 watts.</p> <p>I'm not sure if they have resistors or not, but they certainly get hot when run at the rated spec. They can pass 100°C if supplied with enough power. When I run them at lower voltage (11-11.5), they hover around 45-50°C</p> <p>Comes with a pretty thick double sided tape, so most of the heat is not transferred to the plastic.</p> <p>Normally I would use a converter with current limiting with these, but there is no space for the smallest one I'm aware of. Instead, I run the COB at a lower voltage - around 11 volts. At this voltage the led does not get hot at all. It's fine even with PLA. You will need to do your own testing with your led, as it may require a different voltage to not overheat. It should be tested for several hours, as the heat and current can rise very slowly.</p> <p>Alternatively, you can use an led strip in the top. They have resistors so they don't need current limiting. It can still overheat if it has dense led's though, but that is easy to avoid with a lower voltage.</p> <p><strong>USB Boost\Step Up Converter</strong><br/> eBay Search: usb boost 28v</p> <p>This is a boost/step up converter with a micro usb port. Can take between 2-24v on the input, and will boost it to 5-28v. In our case the input will be the 5v usb port.</p> <p>In my case, the converter for the 12v led strip is set to about 8v, and the one going to the dimmer is around 11v.</p> <p>I suggest you buy a bunch of these, as some might have a slight high pitch whining noise that you might hear.</p> <p>The inputs on both converters is connected with wires. This has to be done so both will power up regardless of what side you put the cable on.</p> <p>My lamp uses about 1 amp in total, so there is very little heat.</p> <p>The converter is glued into the legs.</p> <p><strong>Wires</strong><br/> eBay Search: 26AWG silicone wire</p> <p>I'm using 26AWG silicone wires on everything. Bigger wires might be too big to fit in the brackets along the center isolator.</p> <p><strong>12v LED Strip</strong><br/> eBay Search: 12v led strip</p> <p>This is for the arm's detail light. Should have pretty dense led's, so the light along the arm will be more even.</p> <p>It should probably be glued to the center isolator instead of relying on just the tape long term. You wont have access to it if it comes off.</p> <p><strong>12-24v Touch Dimmer</strong><br/> eBay Search: led touch inline dimmer</p> <p>The board inside the dimmer is taken out of the case and installed in the top of the arm. It works through the plastic. You might notice that the dimmer is somewhat glitchy at first. This will get better after it's used for a while. I think it goes through some sort of calibration when it starts up after power is disconnected.</p> <ul> <li><strong>Note:</strong> The perimeter around the dimmer needs to be covered with something like black tape or black paper. If you don't, you will get some light bleeding through the edges.</li> </ul> <p><strong>Nuts & Screws</strong></p> <p>You will need 2 30mm m4 screws (and nuts) for the arm. You might need to cut or file down the screw a couple millimeters so it's flush with the arm.</p> <p>The screws are partially threaded. If you have full threads, the pivot might be a little loose.</p>
With this file you will be able to print USB Touch Dimmable Led Desk Lamp v1.4 with your 3D printer. Click on the button and save the file on your computer to work, edit or customize your design. You can also find more 3D designs for printers on USB Touch Dimmable Led Desk Lamp v1.4.