Upgraded TEVO Tornado Hot End Fan Mount
thingiverse
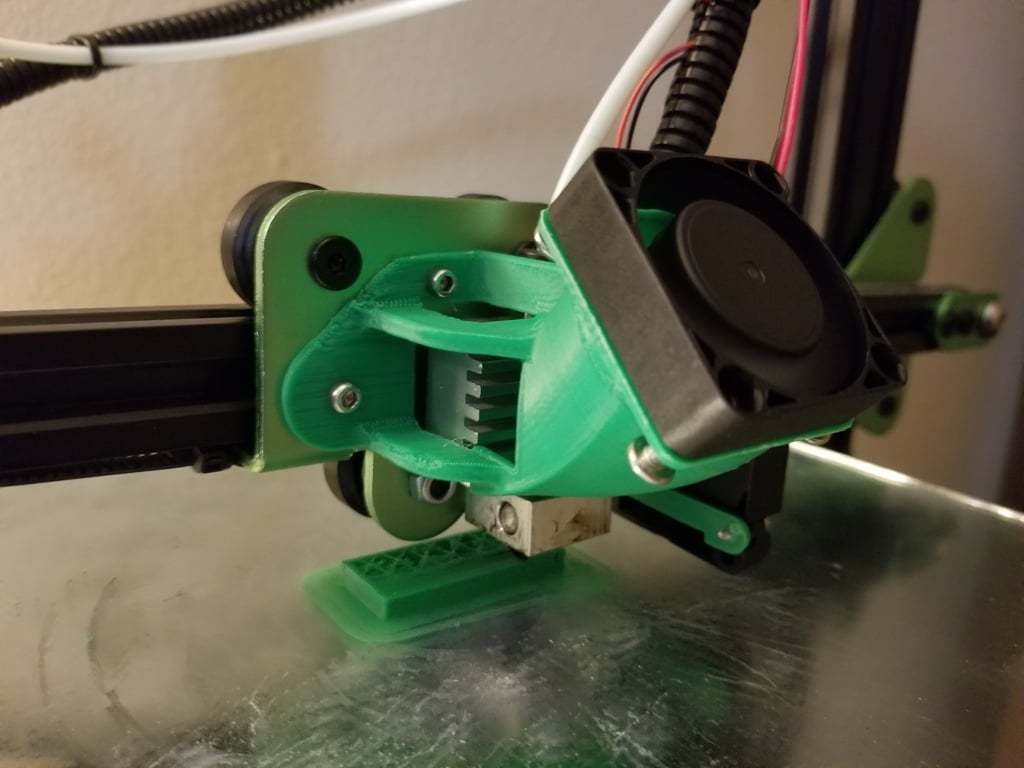
This is a surprisingly simple-to-print hot end fan mount upgrade that works beautifully with the TEVO Tornado. It uses two original fans from the stock hot end and attaches easily to the X-carriage. This upgrade has several advantages over the metal cage that comes standard on the printer, including directing airflow directly onto the heat sink for more stable temperatures and greater efficiency. Additionally, it positions the heat sink fan higher above the print bed, reducing the chance of sucking up strings from the print. This upgrade works perfectly with my Tornado, which I purchased in mid 2018. However, I can't confirm if it will work on all other models. For printing, position the fan holder so that the face holding the larger fan is flat against the print bed. If you have trouble orienting the model, here are the angles of rotation I used in Repetier: X:225, Y: 0, Z: 180. You will need to use supports for the edge of the mounting plate section and a brim with the print due to its small base on the bed. ABS is an ideal material to use because it can withstand heat better than PLA. However, if you only have PLA, it should still work fine. Build Instructions (Short): Unscrew all the screws that hold the fans in place and the existing fan mount. Screw the fans onto the new fan mount, starting with the heat sink fan. For the bottom two screws on the heat sink fan, screw them into the other side of the fan, keeping the face without a sticker away from the heat sink. Mount the part cooling fan by attaching the "Screw End" file to the lower bolts and then mounting it onto the new fan mount using the top two screws. Finally, attach the whole thing to the X-carriage and do a PID tune. Build Instructions (Less Short): For assembly, start by taking apart the original fan mount and keeping track of your screws. Un screw the ones that hold the entire fan mount into the X-carriage, then take out the four screws that hold the heat sink fan in place and the part cooling fan. Notice the two different sizes of screws used for the part cooling fan; the larger ones correspond to the lower holes. Carefully separate the fan wires 3-4 inches from the wire tube thing that holds all the wires together. Slide the part cooling fan vent into the part cooling fan and slip the screws through the bottom holes on the fan, holding the vent in place. Screw on the "Part Cooling Fan Screw End" model onto the bottom two screws you just put into the part cooling fan. Before mounting the part cooling fan, mount the heat sink fan by orienting it to face the same direction as before but with the screws going into the other side of the fan. Mount the new fan mount onto the X-carriage by lining up the holes and screwing in the remaining two screws. After finishing the process, do a PID tune on your printer because the previous tune is accounting for the heat sink fan blowing on the hot end. There are many videos on doing a PID tune on Youtube if you don't know how to do it. Most things are easier said than done, but after typing this ridiculously long set of instructions, I can say that attaching this upgrade is actually quite simple! Happy printing!
With this file you will be able to print Upgraded TEVO Tornado Hot End Fan Mount with your 3D printer. Click on the button and save the file on your computer to work, edit or customize your design. You can also find more 3D designs for printers on Upgraded TEVO Tornado Hot End Fan Mount.