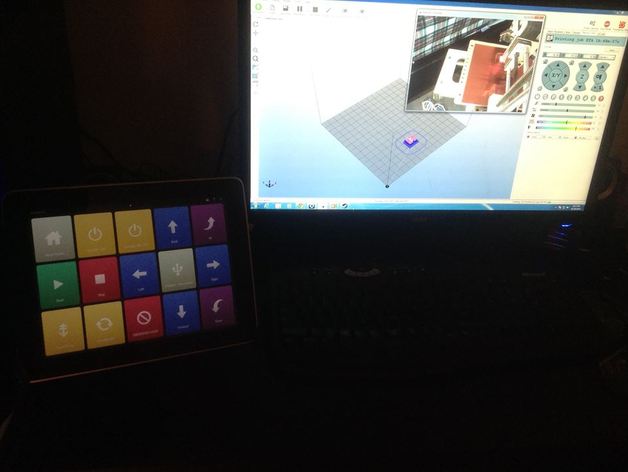
Universal 3d Printer Remote Control / Touch Interface via iPad (Instructions)
thingiverse
Hi Everyone, Just Check Out This Cool Tutorial! Check Out This Amazing Example Video https://www.youtube.com/watch?v=me-b0lQUsnU -- The Most Epic Tutorial Ever! Just Watch Me Transform My iPad into a Remote Control / Touchpad Panel for My 3D Printer in Under an Hour (for Free!). Any Old iPad Will Do, although You May Be Able to Repurpose Other Tablets Too. So Here's the Lowdown: When I Wanted to Save Time Booting Up Repetier Host, Connecting to My 3D Printer, Clicking Through Multiple Menus, and Toggling Bed/Extruder Buttons (you know the Drudge), I Had a Brilliant Idea: I'd Create a Remote Control / Touchpad Panel using my iPad. And that's Exactly What I Did! It Takes Just a Handful of Tap-Tap-Taps to Warm Up My Printer and Get it Ready for Printing in Under 5 Seconds. This has Been Super Handy for Calibration too - just Tap Those Buttons on Your Touchscreen and test out Your x/y/z Axis, feed Plastic, Calibrate Rest Position - you Name It! Here Are the Instructions You'll Need: * Actions iOS App (free) * AutoHotKey Macro Script Program (also free) * Repetier Host Summary: basically what we'll Be Doing is using a Macro Program to Create Mouse Clicks and Keyboard Macros that We can Use with Repetier Host on Our iPad. it's Based on Coordinates and Desktop Mouse Clicks, which Means You Must have Repetier Host Open in Full Screen for This to Work. Step 1: Download and Install the Actions App I Won't Go into the Details of the Tutorials, but Rest Assured, It's Super Simple and Should Only Take about Five Minutes to Figure Out! Step 2: Get Your AutoHotKey Up and Running There are Loads of Tutorials Available Online, but Here's a Brief Guide: just Install it and you'll Be Creating Scripts for Key and Mouse Combinations in No Time. this will Be the Basis of our Remote Controller Important: If You're Having Trouble Figuring Out the Coordinates for Your Menus (and Trust Me, They'll Vary Depending on Your Desktop Resolution), You Must use the Window Spy Tool that Comes Bundled with AutoHotKey. This will Give you the Mouse Coordinates - basically, just Hover Over a Location on your Screen and It will Display them for You! So Now That We have our Coordinates, let's Create Our Macros Let Me show You an Example of How to Macroize Your Home Button: Our Macro Script would Look like this: Alt-CTRL-A :: Click 1509,406 return The Alt-CTRL-A is the Keyboard Shortcut we've Bound to This action - essentially, it will Tell Our Computer to click The Mouse at the specified Coordinates. in my case, this Homes the Printer. it shouldn't Take Long To Set Up Macros for All the Other buttons you need. Setting Bed/Extruder Temperatures Now Let Me Show You how We can auto-set our Temperatures: in This Example, we've Bound ALT-CTRL-C to Our Macro Script that Clicks on the temperature window Twice and enters the Value 65: Our Macro script Would look Like This: Alt-CTRL-C :: click 1862,577 click Send {BS} Send 65 return That's All! You're Done! Thanks for Reading My Epic Tutorial. Enjoy Your new Remote Controller!
With this file you will be able to print Universal 3d Printer Remote Control / Touch Interface via iPad (Instructions) with your 3D printer. Click on the button and save the file on your computer to work, edit or customize your design. You can also find more 3D designs for printers on Universal 3d Printer Remote Control / Touch Interface via iPad (Instructions).
