Union Jack Keyfob
prusaprinters
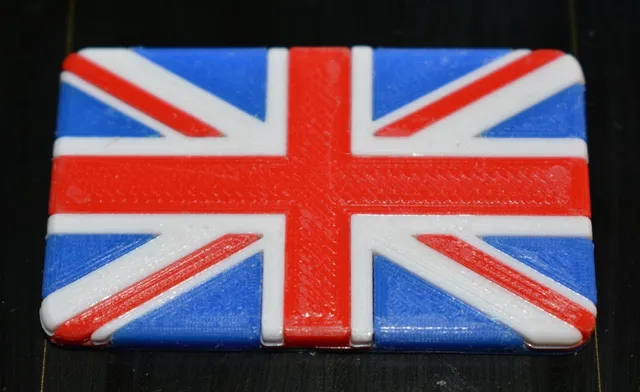
Herewith yet another keyfob, this time the Union Jack, the UK's national flag - and published here just in time for the Queen's 70th Jubilee.This one's been a long time coming, mainly due to the complexity of how to facilitate the interlocking nature of the colours and their arrangement (procrastination aside of course!)It's designed in 3 levels, with the top one being in 4 parts for the white elements around the four corners. The middle is printed in red and the base in blue.As a snap-fit with the usual clearance of 0.1mm between mating surfaces, it is best to build the flag from the base up, i.e. blue, red and white layers in sequence.The white elements need extra care as they are quite small and fiddly and will require plenty of patience when removing any stringing etc. before assemblyIt is best if all the various elements are assembled together first - prior to pulling out the superglue and applying it!When it's clear that everything will fit, it can be disassembled, the base receiving the first layer of glue, the red layer placed into the blue and then the same done with the white corners going into the red layer.I recommend using thin tweezers to fit the various pieces into place!Print SettingsPrinter Brand:PrusaPrinter:i3 MK3Rafts:Doesn't MatterSupports:Doesn't MatterResolution:0.05-0.07mm - as fine as possible.Infill:20% with brims on the blue & red pieces.Filament: Generic PLA Good old Red White & Blue!Notes:Brims are recommended as the mating surfaces of both halves need to be perfectly flat to have as little seam or gap around the edge - any such gap will spoil the final result.rnPost-PrintingLife is a (3D?) jigsaw...When preparing the white sections, you'll find there is a very tiny fraction of the first layer splayed out slightly wider than the rest of their respective column heights. This is largely due to the heatbed keeping the medium hot and thus slightly 'squishy' to help adhesion to the bed.However, this very small extra width (just a few microns) is just enough to hinder or even prevent the white corners from being able to interlock with the rest of the printed pieces, so it must be trimmed back for the white sections to interlock with the rest.Once it's clear all is well and ready for gluing, assembly is straightforward if the proper sequence is follwed - be sure to lay out the white elements as they will appear when assembled, so that they don't get mixed up while the glue is steadily drying and the corner pieces are only then searched through for the correct piece. (If the glue dries before you're ready, you'll either have a wasted print or you'll have to scrape off and clean up any superglue residue before trying again.)The upper edges of the fob are filletted with the intent that two entire separate halves are printed and bonded together, each completed half then mated back-to-back, thereby creating a unified, double-sided keyfob at the end of all the assembly.As there is an upside and a downside for the Union Jack, there are thus both front and back sets for each half, which need to be assembled separately before the final back-to-back gluing phase is done.One trick to use with applying the superglue along the straight channels, is to use a thin needle with an equally thin bead of superglue on it and draw this along the bottom of the channel, then placing the correct & prepared white corner piece over this and 'snapping' it down into place by pressing on it gently ~and not with a finger!~ but with either a thin metal spatula or back end of a pair of tweezers.The ideal is not to apply too much glue as this can ooze out up around the sides, requiring further cleanup of the glue itself and also any white glue-traces off the colour pieces.One half of the keyfob...Plenty of patience is essential for this one!Because the red sections are very fragile, they require much the same care as with the white corners. This middle layer is only 0.5mm along its bottom edge, so be careful! It is probably best to use a new or very sharp, narrow craft knife/ scalpel to remove the brim around the edge and under a decent (x3 or better) magnifier, with a piece of thick grey or white (for contrast) cardboard or hardboard (NOT metal, for the blade's sake!), underneath.rnrnBe careful, as there is only about 1 or 2 layers' difference between the brim and the red layer-bottom itself. Again, care is required NOT to flex or bend the red layer, either when removing it from the heatbed or anytime after that & before glueing, as the red diagonals which sit in the corners can come loose from the layer-bottom.rn rnFor this sort of work, I suggest using either of the following: rnhttps://www.ebay.co.uk/itm/LED-SOLDERING-IRON-STAND-HELPING-HANDS-MAGNIFYING-GLASS-MAGNIFIER-CROCODILE-CLIP/124213172998 (similar to https://www.thingiverse.com/thing:3486257)rnor more recently as in my case, rnhttps://www.ebay.co.uk/itm/5-Digital-Microscope-Magnifier-Remote-Control-HD-3MP-Microscope-For-Soldering/402247915197. (Just copy & paste the link or search with the link text in your browser if the link itself doesn't work.)This second option offers a greater magnifying range of 5.5mm - 19mm full-frame and, albeit 10x more costly, you can output the image to a full-size HD TV if you have one, you can record it and the quality of result is vastly better!How I Designed ThisDownloaded the image from http://www.jdawiseman.com/papers/union-jack/union-jack.html on how to draw the Union Jack properly, drew it up in Fusion360, extruded various sections and then mulled over how to provide a way for the red layer to hold its various elements in place.Next, it was a case of offsetting the lines of the mating edges to enable fitting after print-cleanup. Then, the various layers were assembled into their respective final positions in CAD and the outside edges then filletted/ rounded. That done, the front side was mirrored so that when placed back to back, the colours of each half line up, one over another. This is then seen when viewing the seam around the edge of the keyfob - everything should line up, with the flag the correct way up when viewed with the keyring hole on the left-hand side.Building the layer cake...Drawing the Union Jack - In the model I used the exact same proportion numbers in millimeters....and the final result after some judicious layer merging, drilling and filletting, ready to 3D print.Category: Keychains
With this file you will be able to print Union Jack Keyfob with your 3D printer. Click on the button and save the file on your computer to work, edit or customize your design. You can also find more 3D designs for printers on Union Jack Keyfob.