Under Cabinet LED Light Style 1
thingiverse
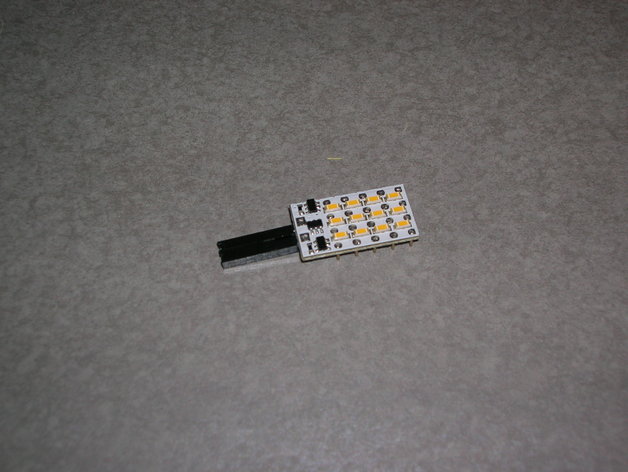
I purchased several 12V LED lamp units designed to replace halogen bulbs in under cabinet light fixtures, however, standard bases were too large and cumbersome due to high-temperature requirements. I came up with a simple design that holds the "bulb" via integrated clamp functionality. This design utilizes two M3 press-fit inserts for the M3 screws to engage into; I recommend using 8mm length screws as my available 10mm options are slightly long but still workable. A simple Molex 2-position wire housing performs exceptionally well for connecting to the light fixture. The accompanying STL files and FreeCAD files can be edited as desired, with the option to purchase the M3 inserts from Grainger and the Molex housings and terminals from Mouser. Inserts: https://www.grainger.com/product/GRAINGER-APPROVED-Press-Insert-4ZU25?s_pp=false&picUrl=//static.grainger.com/rp/s/is/image/Grainger/4ZE96_AS01?$smthumb$ Housings: http://www.mouser.com/ProductDetail/Molex/50-57-9002/?qs=/ha2pyFaduh6M3JhjTACB17sRZCRrk8oHpIUpdMrRyL2HptJlAoKdQ== Terminals: http://www.mouser.com/ProductDetail/Molex/16-02-0096/?qs=sGAEpiMZZMs+GHln7q6pm+S0pk2Wo0Xx7oS4OmuX+foQ== Instructions: Print at 20% line infill with four top and bottom layers, as well as three perimeters. Maintain hot-end temperature at 225°C and bed temperature at 110°C throughout the printing process. Support material generation is highly recommended for the clamp area, given that counter sinks are situated on the print's underside. The M3 insert holes require drilling out to 5/32" dimensions, while no additional post-processing steps need to be applied to the main base.
With this file you will be able to print Under Cabinet LED Light Style 1 with your 3D printer. Click on the button and save the file on your computer to work, edit or customize your design. You can also find more 3D designs for printers on Under Cabinet LED Light Style 1.