Ultralight Newtonian truss tube telescope - 114 mm (4.5 inch) main mirror
thingiverse
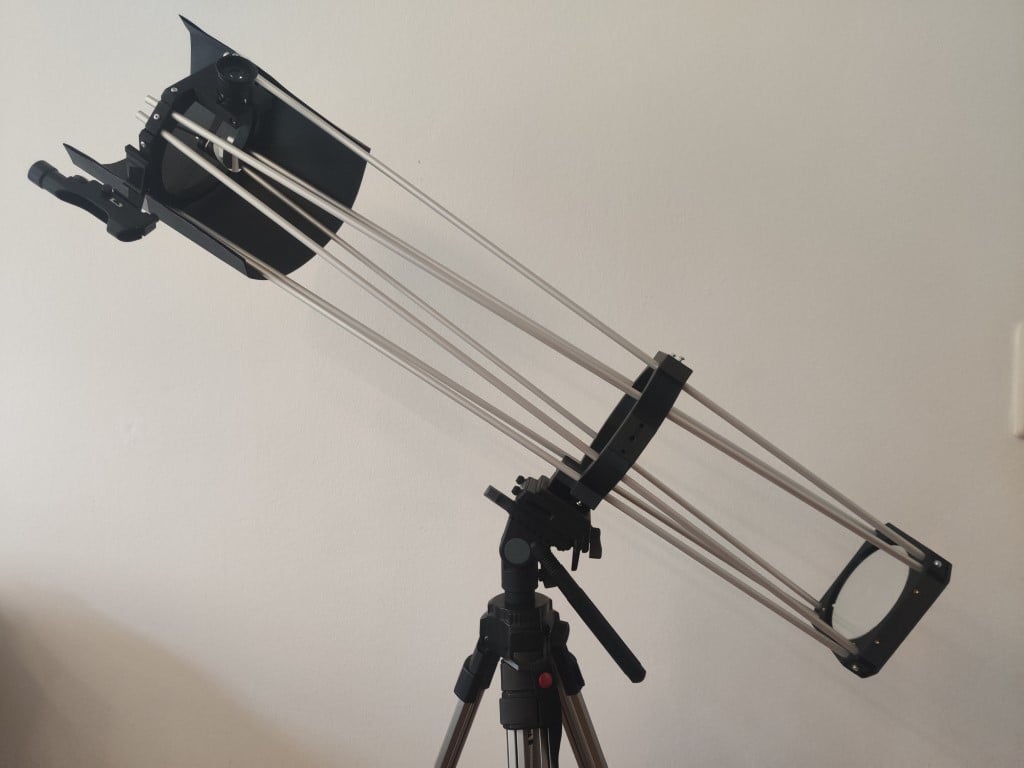
This is a Newtonian telescope with a 114 mm diameter mirror and therefore a bit more light gathering and resolving power than the typical beginner 70 mm refractor telescopes. Perfect for seeing craters on the moon as well as rings on Saturn and stripes on Jupiter. The spherical 114 mm diameter, 900 mm focal length mirror can often be found online in a set with the 25 mm diagonal mirror for around 30 - 70 €. Do not worry to use a cheap spherical mirror - with the 114/900 specification it will be a sharp image and just as good as a parabolic mirror. Together with eight 8 mm outer diameter 1000 mm length aluminium or wood rods, a handful of 3 mm threaded inserts for creating threads in prints and a bunch of ~16 mm long M3 screws this is still cheaper than a usual beginner telescope. Note, that you will also need a cheap Kellner or slightly better Plössl eyepiece (~10 €) or an eyepiece set and a (photographic) tripod with quarter-inch-screw mount. There are also m6 threads in the side of the telescope so you can attach a Dobsonian telescope mount, and I have included an stl for a dovetail mount for a cheap equatorial mount that could be used. You will also need two springs, e.g. from a ballpoint pen, which are used in the friction focuser and the diagonal mirror holder. The focuser works by sliding the eyepiece in and out - a light, simple solution that works quite well. The magnification of the telescope is given by the focal length of 900 mm divided by the focal length of the eyepiece. An eyepiece with 10 mm is a good start and would give a 900mm/10mm= 90-fold magnification. Eyepieces must not be shorter focal length than 4 mm with this telescope and be advised that some of the best views are available not at maximum magnification but with a bit more overview, e.g. 10 mm or 20 mm. Note that you should not cut the rods to their final lengths before checking the focus. Have a look at some terrestrial objects and get them in focus so that you can find the optimum length of the rods. Also leaving the rods a bit longer means that you can slide the top ring with the spider and diagonal mirror a bit further from the main mirror and get objects that are not very far away but at a distance ~30 m in focus. The truss rod design and the sliding top plate also means you can get a webcam in focus directly. A cheap red dot viewfinder can be mounted to the telescope - this is needed to find Jupiter or Saturn in the sky but is not absolutely needed for the moon. Main mirror cell assembly: The design is inspired by the propdob foldable telescope from roelblog.nl and has the mirror resting on three screws in the back and two points on the side of the mirror. A cable tie without its head is glued to the side centerline of the mirror and is gliding on two Teflon pieces that slot into the main_mirror_cell, to provide two resting points when the telescope is pointed near the horizon. The cable tie / strip of material gliding on Teflon glued to the side of the mirror make sure it is always supported from the center of gravity. When the telescope is pointing more upwards the mirror is resting on three screws in the back that allow for collimating the telescope. The three screws that go into the main_mirror_cell.stl (you need M3 threaded inserts here as everywhere else) press against the main_mirror_attachment so as to not scratch the mirror. This main_mirror_attachment is glued with double sided sticky tape (silicone glue would be better) to the mirror and has one screw going backwards so that the mirror cannot fall out as the screw and main_mirror_screw_holder (parts a and b) hold this screw in place, but allow a collimation movement as well as sideways movement. I keep my mirror slightly loose in the main mirror cell so as to not deform it. Ideas for other cell designs where the mirror is not loose are welcome and I can make alternative designs available here. Collimation alignment tips and tricks for alignment are available online, it is a bit complicated to learn but not bad once you understand it - even without additional tools star collimation is possible. Otherwise, there are also Chesire eyepieces that you can print. A bit of double-sided sticky tape is needed to glue the diagonal mirror in place and to secure the back mirror against falling out. The back mirror is loose in its cage so as to not deform it (a bit overkill for such a small mirror but does not hurt either). An advantage of the truss rod design is the ability to disassemble the telescope for storage or travel. Apart from that the ultralight design also minimises the print volume. Have fun with building your own telescope and please post a make. Let me know if you have ideas for design changes and I am happy to draw alternative parts. Happy making! PS: be realistic about the expectations of astronomical views, this telescope cannot compete with large telescopes - look for sample images of Saturn through a 114 mm telescope before building. It is good fun nevertheless and one learns a lot about optics and astronomy. Also be patient, “seeing” that is cloud cover, haze, atmospheric turbulence all make the views bad one day and great on the next day. Note, that the above church-tower and moon views are worse quality than looking by eye - a handheld smartphone photograph through an eyepiece does not do this telescope justice.
With this file you will be able to print Ultralight Newtonian truss tube telescope - 114 mm (4.5 inch) main mirror with your 3D printer. Click on the button and save the file on your computer to work, edit or customize your design. You can also find more 3D designs for printers on Ultralight Newtonian truss tube telescope - 114 mm (4.5 inch) main mirror.