Ultimate Skylark Antenna tracker all in one box!
myminifactory
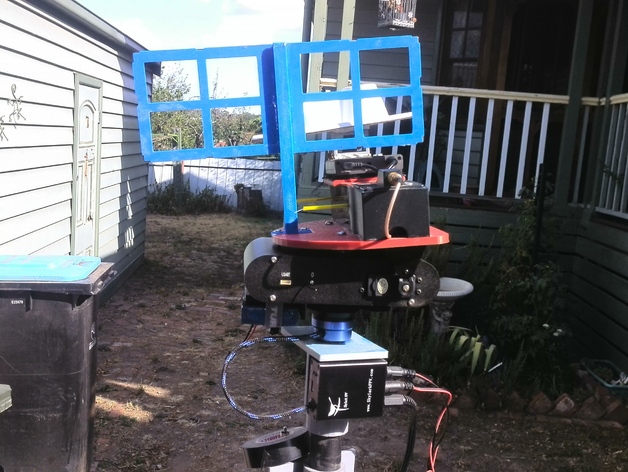
UPDATE: 1/11/2016 The JR Module now fits the EZUHF module which was larger than the DTF that I was using. The clips where the module locks into have been adjusted so they work with all JR modules, actually making a nice snap lock noise when secured. I've been using this all-in-one box for over 12 months now, and it has both video and RC control pointed at the plane at all times, giving me total freedom to fly anywhere I want. This setup literally means the sky is the limit! This all-in-one box will bolt straight up to the Skylark Antenna tracker, and probably would work the same with the My Fly Dream antenna tracker. The tracker doesn't struggle at all with this setup, and I'll be posting a video shortly of how it performs. Running Video: https://youtu.be/SbkTmRkjKxs The way it works is simple: my FrSky Taranis TX talks to a 2.4 RX running in SBUS, then the 2.4 FrSky RX sends SBUS to the OpenLRS UHF JR TX module, which then talks to the plane's UHF RX. You could also set this up running CPPM as well if you didn't want to use SBUS. I have a 3s Lipo running the tracker, a 2s Lipo running the Video RX, FrSky 2.4 RX, and JR OpenLRS UHF module. I used a 2s Lipo to avoid using a BEC, as using power from the antenna tracker would result in noise on the video feed due to its small PCB tracks. Assembly is almost impossible to do incorrectly, thanks to cut-outs in the base where the parts mount into place. Start by putting the JR module part on the base first, then add both sides and super glue everything together. Finally, glue the end plate in place. Nylock nuts were used in the box's sides to screw down the lid, but anything of a similar size would work. To install the video RX cable, cut off the RCA ends and replace them with female RCA inputs that you solder to the correct female plugs. A DC plug is located at the end of the box, which powers up all the video and RC control gear. Printing: The parts infill can be pretty much whatever you want it to be. I printed most things at 90% infill for optimal strength. Moxon Antenna: If you're wondering how good this antenna works, I've been out to 23k (one way) with no packet loss and could have gone much further. The right side of the Moxon antenna needs to be printed with support material, while everything else is printed without any supports. The wire used on the Moxon was 20 gauge magnet wire bought from eBay, which I then connected to a pigtail extension that goes from the JR module to the Moxon. Wires need to be soldered onto the Moxon end (antenna elements). Note: The DTF UHF Deluxe only needs to be printed if you're using that module instead of the JR, but I had both so I made it for both. Any questions? Please post and I'll be happy to answer.
With this file you will be able to print Ultimate Skylark Antenna tracker all in one box! with your 3D printer. Click on the button and save the file on your computer to work, edit or customize your design. You can also find more 3D designs for printers on Ultimate Skylark Antenna tracker all in one box!.