Ultimate Parametric LACK Enclosure
prusaprinters
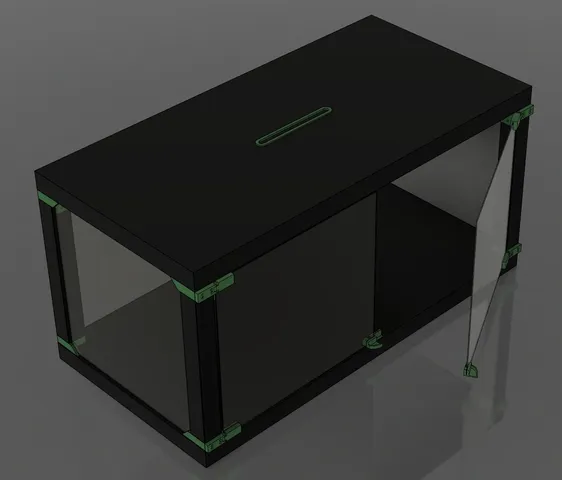
Ultimate Parametric LACK Enclosure This is a complete overhaul of the Original Prusa i3 MK3 ENCLOSURE -Ikea Lack table - Prusa Research project by user cisardom. All parts were designed from the ground up in Fusion 360. SUPER IMPORTANT PLEASE READ BELOW: The download includes the project file for the enclosure. It is fully functional, feel free to open the door once you open it. ;) The entire project file must be downloaded and imported into Fusion 360 in order to utilize the parameters. This was done to make it easier to get a full set of 'bespoke' parts in one go. With my project, all you need to know is the thickness of your wall panels, and you can have parts that will fit snugly, no glue required. UPDATE 2/18/2019 After multiple user requests, the enclosure has been updated to allow an MMU to fit inside. This will require new plexi dimensions, and slightly longer screws for the top brackets. New plexiglass should be 480mm tall. Please note this has not been tested and should be considered a beta until it has been printed and used by an MMU user. Project Goal: Redesign parts to allow users to easily remix all components at once to fit a wide variety of options. With this remix you can expect the following improvements: Supports wall panels from any thickness up to 48mm! Increase strength of retaining tabs for wall panels by making them thicker! Easily removable hinges/front doors post assembly! Two hinge options - print in place or choose a more durable hinge with a metal pin (5x22mm)! Redesigned door handles and catch - these parts have a sleeker look, and use 8x3mm magnets in pockets! (think of the square nut catch on some of your Prusa parts) Increase height of all 'cone pedestals' with one setting if you quickly want to add enclosure height post assembly! No need to edit all parts one at a time, just measure your wall panel's thickness and input your desired settings into the parameter list! All parts will automatically update at one time! This enclosure is fully compatible with any previously purchased vitamins/hardware used in the original enclosure. The exception to this is the magnets. The new door handles use round magnets (8x3mm) for easier sourcing online and in local hardware stores. You may also notice it is very 'wide'. My personal enclosure uses two LACK tables side by side with the inner legs removed. The parts are still fully compatible with one table, it was just modeled with my enclosure design to illustrate its versatility. Print Settings Printer Brand: Prusa Printer: i3 MK3 Rafts: No Supports: Doesn't Matter Resolution: For the Hinges - 0.2mm; For Everything else - Doesn't matter. Infill: 20%-75% Filament: Fusion Filaments 3D870 HTPLA Green Notes: SUPER IMPORTANT Please read the 'Instructions' category before printing parts! The provided parts have 'example' parameters. These parts willONLY work with wall panels of 2.05mm thickness. (the panel thickness I used in testing) YOU MUST USE THE FUSION 360 FILE TO GENERATE YOUR OWN BESPOKE/CUSTOM PARTS! BOM - Bill of Materials Please Read Entirely Before Proceeding: Construction 2-4x Ikea LACK table - https://www.ikea.com/us/en/catalog/products/10324278/#/20011408 Plexiglass/wall panel options If you already have plexiglass from the original enclosure, great, no need to buy more. It'll fit. However the provided dimensions from Prusa will leave gaps on each side of the walls. Here is a link to purchase the panels as sized by Prusa: https://www.printedsolid.com/products/acrylic-sheets-for-prusa-lack-enclosure Here is a link to purchase cut-to-size flame retardant MDF. This is a good option if you want something cheaper than all plexiglass, and won't need to see in the back or sides of the enclosure. http://www.woodsheets.com/mdf-sheet-cut-to-size/?material=Flame%20Retardant%20MDF For the doublewide enclosure you can order all side/back panels in 12mm thick flame retardant MDF for only 25 bucks!! Massive savings over ordering in plexiglass and they are much thicker walls! Not a big deal, but if you want the 'CAD Sized Dimensions' they are listed below if you would like to buy plexiglass that leaves little to no gap: Please note, you may choose any thickness panel you desire. The printed parts are sized to the thickness of the wall, not the other way around. For Single LACK: 3x Wall Panel, 440mm x 450mm - Back and Side Panels 2x Front Panel, 440mm x 225mm - Front Panels For Double LACK:(the one in the CAD model) 1x Wall Panel, 440mm x 1000mm - Back Panel 2x Wall Panel, 440mm x 450mm - Side Panels 2x Front Panel, 440mm x 490mm - Front Door Panels Electronics Fire/smoke detector Indoor/Outdoor Thermometer LED stripe 24V, 30 cm (24V for MK3, 12V for MK2/S If you want to use a 12V LED strip with the MK3, use a separate power supply.) Twin cable, 100 cm 2x WAGO 221 or similar compact lever connector Screws *Here we have another small deviation from the official instructions. Some users report that the screws listed in the article are a bit small and don't 'bite' very well. User alieneila posted a comment on the original, stating to use "#14 2" and #14 1" instead of the listed screw sizes. Using these myself, I can recommend them and confirm they work. 12x #14 x 1″ 4x #14 x 2″ Small Hardware: 16x M3-0.5x12mm (used to secure the hinges) 4x Neodymium magnets, 8x3mm - https://www.amazon.com/GBYMIUY-Refrigerator-Magnets-Cylinder-Whiteboard/dp/B079233TKY/ 5mm x 22mm Metal Shaft - for use with the durable hinge option - you can either order a custom size from somewhere like misumi or cut your own - https://www.amazon.com/Sutemribor-100mm-Straight-Helicopter-Airplane/dp/B076XW73Q7/ Philips screwdriver Allen keys/bit set Super Glue/adhesive - I personally use these sheets of 3M 468MP and cut to size -https://www.amazon.com/Gizmo-Dorks-Adhesive-Transfer-Sheets/dp/B01HP2CEG8/ Drill + bits Measuring tape Marker A lot of the BOM here is pulled from the article, so I wanted to give credits here: https://www.prusaprinters.org/cheap-simple-3d-printer-enclosure/ A comment by user alieneila - in reply to CorneliousJD regarding the screw sizes in the original Thing. You can find her original comment by browsing the comments there. Instructions How to edit the parameters in Fusion 360 Included in the zip file of this Thing you will find the .f3d file. This is the 'project file' for the enclosure parts and contains all the goodies we need to make our parts custom! If you don't have it already, download Fusion 360 and create an account: https://www.autodesk.com/campaigns/fusion-360-for-hobbyists Once installed, download the project file and open with F360. If you do not know how to open an F3D file, please follow the instructions found in the link below: https://knowledge.autodesk.com/support/fusion-360/troubleshooting/caas/sfdcarticles/sfdcarticles/How-to-import-or-open-a-file-in-Autodesk-Fusion-360.html You should see my enclosure on the screen, as well as the feature tree at the bottom, the component list on the left side, and a taskbar at the top that contains actions you can do. First thing you need to do is decide on the hinge choice. Both options are available, one is simply hidden. You can toggle which ones are hidden by finding the desired hinge in the component list and clicking the small lightbulb next to it's name. If you look at the top of the screen in the taskbar, you will find a menu called 'Modify'. Please click this menu and choose the bottom option of the dropdown list: 'Change Parameters'. Once you click this, you will see a box pop up with a list of all editable parameters. To edit them, just click on the expression field and enter a new value. The onlycritical parameter to edit is the PlexiThickness option. The rest can be edited as desired, to strengthen them, reduce/increase tolerances, etc. Once you have the parameters set how you would like them, right click on each of the components in the list on the left, and select the option 'Save as STL'. Edit the output options in the new menu that appears if desired. Generally speaking, the default options will be fine. Congratulations! You now have parts that are completely custom to your needs!! Assembly For the most part, the instructions found at the article will work for these parts. There are only minor deviations to their instructions, which I will list below. Prep the bottoms of the pedestals with adhesive, I prefer 3M 468MP as it is easy to remove if needed but provides more than enough stick for our purposes. If using another LACK table as the base then apply the proper pedestal to each corner, and ensure it is secure. If you are using a separate/custom base, I recommend waiting to install pedestals until the end, so you can use the assembled enclosure to get exact spacing for the pedestals on your custom surface. The magnet catch is different in my design. To insert magnets into holes, just put a dot of CA in each one, then press magnet inside until it cures. You may alternatively place the magnet inside and fill the remainder of the cavity with hot glue. Depending on hinge choice, you may need to insert the 5mm shaft. I recommend filing a chamfer in one end of the shaft for easier insertion, then placing the hinges together and pushing the shaft through. The female portion of the hinge has slightly smaller holes to prevent the pin falling out, so some force may be required to get it all put together the first time. PLEASE NOTE: If you properly set your parameters, no glue should be needed to hold the wall panels to any of the printed parts. If there is any 'wiggle' or gap, then you need to adjust parameters to get a tighter fit and reprint. The panels are held in place with a friction fit. I will flesh these instructions out further in time with additional pictures, but this should do for now. If you have any questions please leave a comment. Category: 3D Printing
With this file you will be able to print Ultimate Parametric LACK Enclosure with your 3D printer. Click on the button and save the file on your computer to work, edit or customize your design. You can also find more 3D designs for printers on Ultimate Parametric LACK Enclosure.