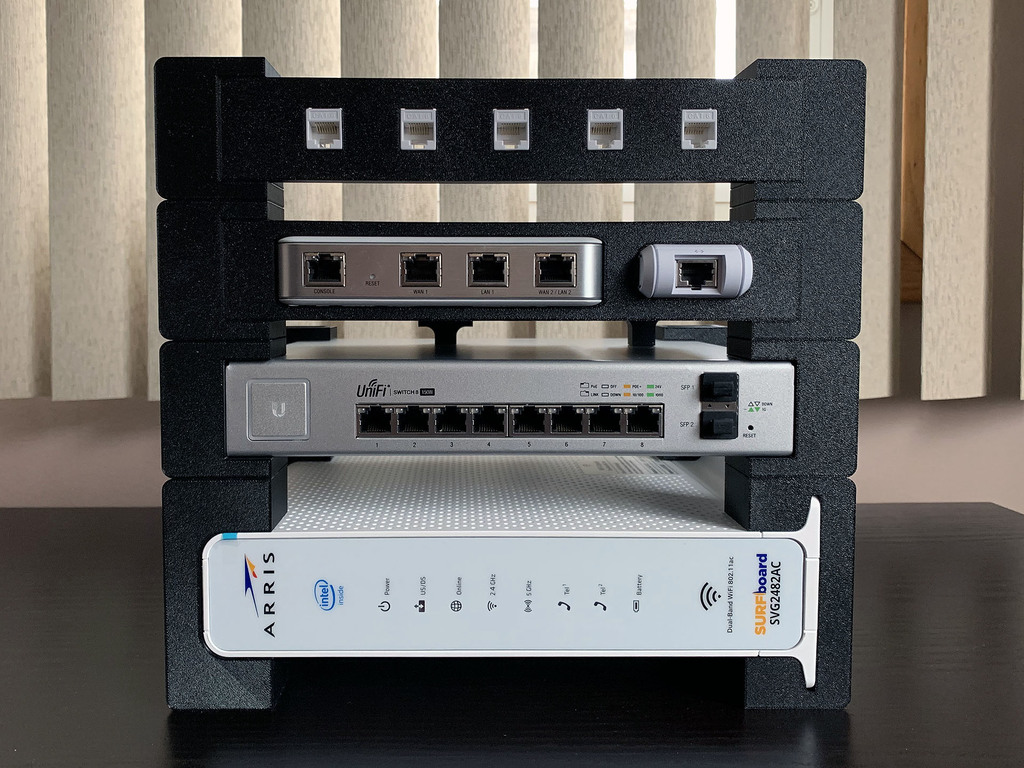
Ubiquiti Mini Rack
prusaprinters
<p>Over the summer I ran about 1000ft of CAT6 cable for my surveillance cameras and network drops to all bedrooms. My network was lacking before so at the same time I made the switch to an entire Ubiquiti managed network system. Since most of my network equipment is in the basement I wanted a nice way to keep it neat looking. Ubiquiti equipment does get quite warm, and everywhere I looked stacking one piece on the other wasn’t the best idea nor recommended option. I didn’t want to do a full size server cabinet since it was overkill for my application. I searched the web and couldn’t find much other than <a href="https://www.reddit.com/r/homelab/comments/7p245e/ubiquiti_unifi_3d_printed_mini_rack_sneak_peek/?st=JSH0E0I5&sh=8a2b3660">this</a> that a user on reddit came up with. Using that design as my inspiration I totally redesigned it for the specific equipment I am using in my house and 3d printed the parts. I understand the entire design may not be of use to everyone but the pieces are modular so you do not have to use all of them.</p> <p>My current network consists of:</p> <ul> <li>Arris SVG2482AC Cable Modem</li> <li>Ubiquiti UniFi Security Gateway</li> <li>Ubiquiti UniFi Cloud Key</li> <li>Ubiquiti UniFi US-8-150W Switch</li> </ul> <p>The Security Gateway and Cloud Key insert as well as the patch panel do require heat set M3 brass inserts. The ones I used were M3x5mm long and 4mm in diameter. To prevent the shelf that the USG/CK sit on from sagging there are two legs for it.</p> <p>Patch panel is made to accept CAT5e/CAT6 keystone jacks, I used <a href="https://www.monoprice.com/product?c_id=302&cp_id=30204&cs_id=3020401&p_id=5384&seq=1&format=2">these</a> from MonoPrice.</p> <p>Hardware you will need if used exactly as I have it in the pictures:</p> <ul> <li>12x Heat set M3x5mm long, 4mm diameter (two for each side of the patch panel, two for each side of the USG/CK insert, four for the legs for the insert)</li> <li>4x M3x6mm SHCS legs for USG/CK insert</li> <li>8x M3x20mm SHCS for patch panel to side legs and for USG/CK to side legs</li> </ul> <p>Side legs only need supports from buildplate. None of the other parts require supports. All parts are oriented the correct way for printing. Parts are optimized for printing with PETG. I used a 15% infill which was plenty with grid pattern. All parts are printed in Atomic CF PETG.</p> <h3>Print Settings</h3> <p><strong>Printer Brand:</strong></p> <p>Prusa</p> <p class="detail-setting printer"><strong>Printer: </strong> <div><p>i3 MK3</p></div> <p><strong>Rafts:</strong></p> <p>No</p> <p class="detail-setting supports"><strong>Supports: </strong> <div><p>No</p></div> <p><strong>Resolution:</strong></p> <p>0.2mm</p> <p class="detail-setting infill"><strong>Infill: </strong> <div><p>15%</p></div> <p><strong>Filament:</strong> Atomic CF PETG Black</p> <p><br/> <p class="detail-setting notes"><strong>Notes: </strong></p> </p><div><p>Parts are optimized for printing with PETG.</p></div> </p></p></p> Category: Computer
With this file you will be able to print Ubiquiti Mini Rack with your 3D printer. Click on the button and save the file on your computer to work, edit or customize your design. You can also find more 3D designs for printers on Ubiquiti Mini Rack.
