TyBot Rolo
pinshape
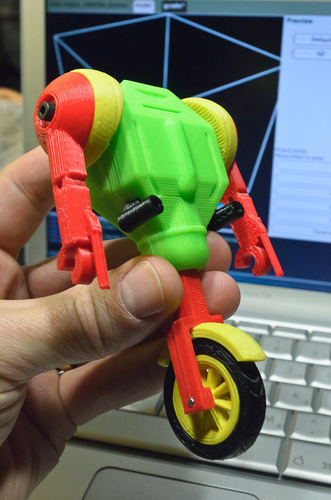
A toy robot action figure designed by a Boy Scout with the sole purpose of spreading kindness and doing good deeds everywhere it goes. UPDATE: The files for parts 1 & 2 have been revised to ensure smoother, cleaner meshes that are easier on the eyes. Instructions: Print all parts in different colors to give your robot some personality. Gather 6 screws or bolts of varying lengths to fit specific locations. We used M3 bolts from a previous project, but you can use any bolts that work for you. The screw holding the fender to the fork needs to be flat-headed so it doesn't get stuck. Glue the two halves of the fork together tightly. Assemble the wheel by gluing its halves together with the tire securely in place. Drill a hole through the center of the wheel and create a wire axle that fits perfectly. Make sure it spins freely. Drill out all pilot holes as needed to fit your screws or bolts. Test the upper fork assembly between the body sections. You might need to trim or file some parts for a snug fit. The body sections should squeeze together while still allowing the fork to swivel easily. Assemble everything according to the plan and glue the lower cannons in place. Now, go out there and have fun with your new robot!
With this file you will be able to print TyBot Rolo with your 3D printer. Click on the button and save the file on your computer to work, edit or customize your design. You can also find more 3D designs for printers on TyBot Rolo.