Two-Tone Portable Coat and Purse Hook
thingiverse
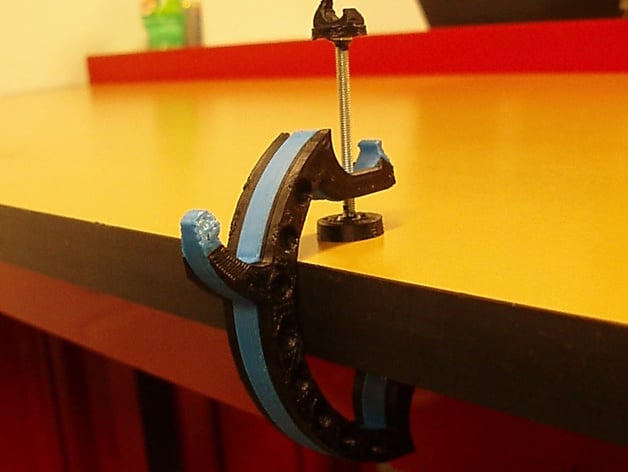
This multicolored portable coat and purse hook boasts a basic C-clamp mechanism for securely attaching to tables up to 1.75 inches thick. Its compact design (approximately 5 inches tall and 3.5 inches wide) allows easy storage and portability. The clamping mechanism ensures stability on the table and prevents accidental displacement or theft. However, some additional assembly is required. Included are Rhino, STL, and Gcode files, along with images to guide the assembly process. You'll need safety glasses, a jeweler's saw frame and blade, proper ventilation, epoxy, acetone, a small acetone-safe container, a Q-tip or small brush, three M4 nuts with .70 pitch, one M4x45 bolt with .70 pitch and a fully threaded 2-inch head, two differently colored filaments, sandpaper (100-200 grit), a half-round file, and optional vice/C-clamps and two wooden blocks the size of the hook. Follow these steps for assembly: 1. Download the provided files and set print settings as directed. Print the parts marked with 'a' in one color and those marked with 'b' in another. 2. Allow prints to cool before removing them carefully from the bed, ensuring proper adherence. Address any lifted corners if necessary. 3. Drill a #22 hole in one side of the middle piece. 4. Smooth the rough side of the middle piece using sandpaper and a flat, smooth surface for support. 5. Prepare an acetone-safe workspace with acetone, Q-tip/brush, and a small dish. 6. Line up and adhere two sides together using acetone, ensuring full adhesion. Practice on scrap pieces if needed. 7. Repeat step 6 to adhere the third piece to the first two. Clamp overnight for best results, with wooden blocks on either side for even pressure distribution. 8. Cut off the bolt head, keeping it square and maintaining thread integrity. Thread a nut onto the cut end. 9. Heat-set nuts into voids in top cap and hook using a hot soldering iron, ensuring level placement. Let cool. 10. Thread the bolt through both end caps and hook, with the flat disc end cap on the inside. 11. Epoxy the bolt to the end cap nuts and let set. Your portable coat and purse hook is now ready for use. Feel free to suggest improvements!
With this file you will be able to print Two-Tone Portable Coat and Purse Hook with your 3D printer. Click on the button and save the file on your computer to work, edit or customize your design. You can also find more 3D designs for printers on Two-Tone Portable Coat and Purse Hook.