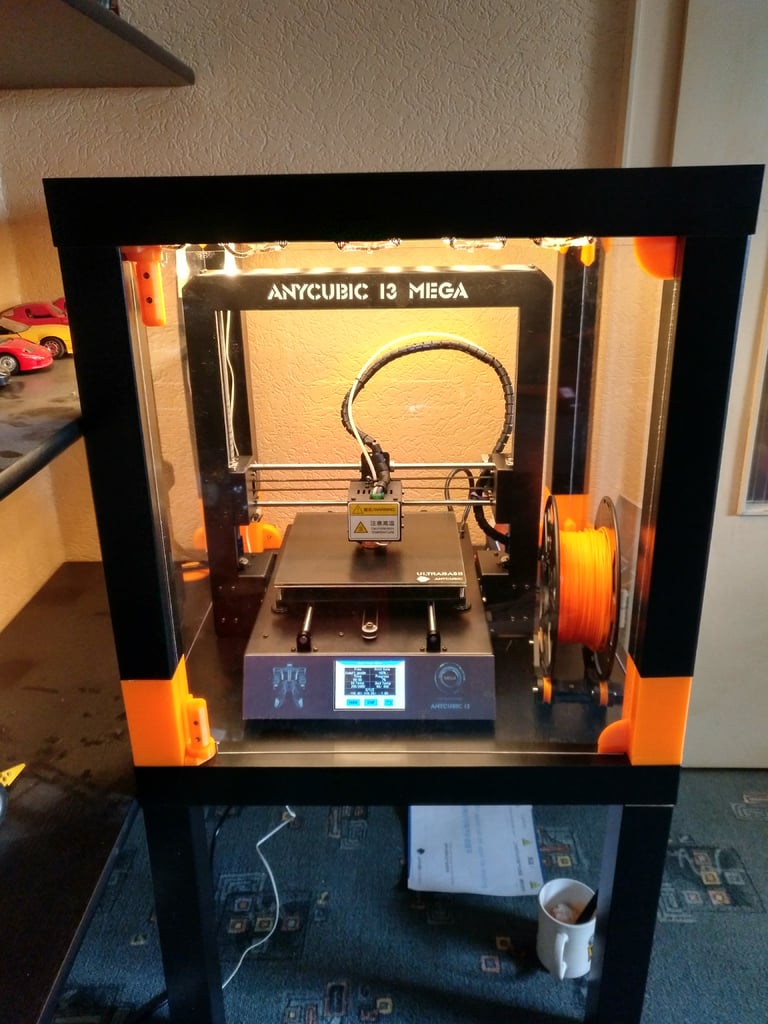
Two door enclosure for Anycubic i3 mega with Ikea Lack tables
thingiverse
###Update (18.09.2019): Update every file with a hex hole for an M3 nut. I made a mistake when measuring the holes while reworking the complete design using Fusion360. Sorry about that! * Update (22.04.2019): Complete redesign with Fusion360. Increased perspex spaces from 2.0mm to 2.5mm and 3.0mm to 3.5mm. I hope it fits without problems now. Added Fusion360 (*.f3d) files in separate ZIP-files. * Update (21.04.2019): Added original SketchUp (*.skp) files in separate ZIP-files. (Outdated) * Update (07.07.2018): Added version for 3mm Perspex * Update (09.09.2018): Updated Hinge_bracket_2mm_Perspex_x4.stl because it caused errors in Simplify3D. Use Hinge_bracket_2mm_Perspex_x4_v3.stl instead! * Update (23.10.2018): Added pictures of dimensions from my enclosure. Please read the notes below! * Update (28.11.2018): Reworked the whole file structure and fixed a problem with some round corners that should be sharp. ###The dimensions are measured from my enclosure. I strongly recommend building up the enclosure and measuring the needed dimensions yourself, because I have no idea how precise the lack tables are. ###For the holes, I recommend inserting the perspex into the holder and either drilling through the holes in the holders or marking the holes and drilling them when you take out the perspex again. ###I do not guarantee that the dimensions will fit with your enclosure. Template for my design was https://www.thingiverse.com/thing:2752385 by electron23. Because I didn't like the solution for holding the perspex, I redesigned it completely. By doing so, I designed it with a second door, so I can reach everything I need to. ###The design is made for 2mm perspex. I added all needed files for a 3mm version in a separate Zip-File, but I only printed the 2mm version. There is a 'Overview-STL file' so it's clear how to assemble the individual parts. The holes are designed for metric screws. I used these screws to assemble it (without spool holder, grip etc.): * 56x universal screw 3,0 x 25 (to fix the base at the lower table, the extensions at the legs from upper table and the hinge at the extension) * 8x allen screw M3x10 with M3 nut (to fix the perspex in the holder) * 8x allen screw M3x16 with M3 nut (to fix the doors in the holder) ***** Accessories (STL-Files not included): I used the spool holder from bmichels https://www.thingiverse.com/thing:2003149. Both cables, printer and lighting, are guided through 'Ikea Lack screw grommet with cap' by HotTabascoSauce, https://www.thingiverse.com/thing:2621880. As grips I'm using the 'Punisher knob' by harddrv1 https://www.thingiverse.com/thing:1282549. They weren't installed before I made the photos, they were actually printing in that moment. You can use whatever you want as grip. ***** If there are any questions, feel free to ask them in the comments.
With this file you will be able to print Two door enclosure for Anycubic i3 mega with Ikea Lack tables with your 3D printer. Click on the button and save the file on your computer to work, edit or customize your design. You can also find more 3D designs for printers on Two door enclosure for Anycubic i3 mega with Ikea Lack tables.
