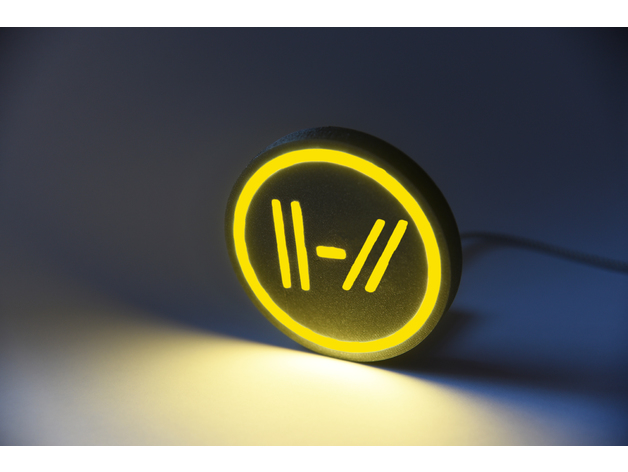
Twenty One Pilots - Animated RGB Logo
prusaprinters
<p>Animated Logo of the Twenty One Pilots that can be controlled via an Webinterface running on a Wemos D1 mini utilizing WS2812 LEDs.</p> <h3>Print instructions</h3><h3>Summary</h3> <p>I've designed and built an animated RGB logo from the new <em>Twenty One Pilots - Trench</em> album. It features a webserver running on ESP8266 that allowes for easy access to the different patterns, brightness and power control. Everything was designed in Fusion360. The code was written in Visual Studio using the Visual Micro plugin.<br/> <img src="https://github.com/NimmLor/esp8266-nanoleaf-webserver/blob/master/gallery/interface.jpg?raw=true" width="550px"/></p> <h3>Print Settings</h3> <p>Printer: HyperCube<br/> Rafts: Doesn't matter<br/> Supports: No<br/> Resolution: 0.2mm<br/> Infill: 50%<br/> Filament Fillamentum Vertigo Grey PLA</p> <p>Notes:<br/> Multi-Material/Dual extrusion recommended, but it works without too. Watch Devin's video from <em>Make Anything</em> below to see how to print something like this with a single extruder.</p> <h3>Bill of Materials</h3> <ul> <li>1x <a href="http://s.click.aliexpress.com/e/cBDdafPw">Wemos D1 mini</a> is recommended, but any other ESP8266 variant should work too, but it might require an additional step-down converter.</li> <li><a href="http://s.click.aliexpress.com/e/FyMPRmo">WS2812b led strip</a>, make sure you choose IP30 any other IP rating wouldn't make any sense and might not even fit.I would recommend buying a strip with 60 leds/m or more.</li> <li>1x <a href="http://s.click.aliexpress.com/e/buDr0PT2">3.3V to 5V Logic Level Shifter</a> (required if LEDs "glitch")</li> <li>1x <a href="http://s.click.aliexpress.com/e/Jd6QwHE">24Bit WS2812 RGB LED Ring</a>, make sure you choose the ring with 24 led pixel. The ring must have OD: 85mm; ID: 72mm.</li> <li>1x <a href="http://s.click.aliexpress.com/e/Vi3I19O">3 pin wire</a></li> <li><a href="http://s.click.aliexpress.com/e/bP2j0aWk">M3*8mm bolts</a> Bolts</li> </ul> <h6>The links above are affiliate links</h6> <h3>Assembly</h3> <h3>Print your parts</h3> <p>First print the dual extrusion part, it works by using a Y-Splitter or any other multi-material system that is out there. Make sure the logo parts are printed in plain white and check if you have a clean first layer, otherwise some lines will be visible.</p> <p>I've used Fillamentums Vertigo Grey in combination with generic white PLA.</p> <p>The other parts can be printed in any color, but I would recommend a dark color.</p> <h3>Printing the parts without Dual-Extrusion</h3> <p>It's not a problem if your printer isn't capable of dual-extrusion. Just follow Devin's video below on how to do prints like that with a single nozzle. Make sure you have Z-Hop set to a high value.</p> <p>The important part of the video starts at <strong>10:48</strong>.</p> <figure class="media"> <oembed url="https://www.youtube.com/embed/KV2AjyowXX4"></oembed> </figure> <p>Multi-Color-Printing with a single Extruder by Make Anything</p> <h3>Add in the LEDs</h3> <p>Now that you have printed your parts, you can slide in the leds into the top part. Just cut them on the marking with regular scissors. Make sure the arrow points always into the same direction.</p> <p>Afterwards solder some regular wire to connect all connections in series.<br/> The pixels of the logos must be connected in one line, you can't wire the ring in between.</p> <p>Don't solder anything to the first strip yet.</p> <p>I recommend to hook up the strips first and the ring in the end. I've soldered some led headers to the ring and criped a connector to be able to quickly remove the ring from the system.</p> <h6>Yes, I've messed up the wire colors...</h6> <p><img src="https://cdn.thingiverse.com/assets/5e/95/69/22/d7/wiring.jpg" width="550px"/></p> <p><img src="https://cdn.thingiverse.com/assets/11/80/aa/b8/56/DSC_9216.jpg" width="550px"/></p> <h3>Assembling the frame</h3> <p>After you have soldered the leds, solder wires to the <strong>5V, GND and D4</strong> pin. Afterwards push the wires through the hole of the stock and solder them onto the starting led strip piece.</p> <p>Next attach the 2x M3 bolts with 1x M3 nut each from the back of the stock through the back plate.</p> <p>At last screw in the 2x M3 bolts through the back onto the front piece.</p> <p><img src="https://cdn.thingiverse.com/assets/e8/06/1f/69/be/DSC_9205.jpg" width="550px"/></p> <h3>Software</h3> <p>The software runs on the ESP8266. The web app is stored in SPIFFS (on-board flash memory). I've forked <a href="https://github.com/jasoncoon/esp8266-fastled-webserver">jasoncoon's esp8266 fastled webserver</a> and added some extrac functionality, made a proper config area and created custom patterns for the logos.<br/> Amazon Alexa support and Node-RED integration will follow soon.</p> <p><strong>The software and detailed setup instructions can be found on <a href="https://github.com/NimmLor/esp8266-logo-webserver">GitHub</a>.</strong></p> <h3>Upcoming Logos</h3> <p>New Logos will be released soon, you can request any "<em>ring</em>" logo in the <a href="https://www.prusaprinters.org/prints/1193-twenty-one-pilots-animated-rgb-logo/comments">comments</a>,<br/> or direct message me on <a href="https://www.thingiverse.com/Surrbradl08/about">thingiverse</a>,<br/> or on <a href="https://www.instagram.com/surrbradl08/">instagram</a>.</p> <p>Currently I'm thinking of building the following logos</p> <ul> <li>Avengers</li> <li>Apple</li> <li>Dell</li> <li>Burger King (probablys the next one)</li> <li>Instagram</li> <li>Trap Nation</li> </ul> <p><em>I will prioritise logos that are suggested to me.</em></p> <h3>Preview</h3> <figure class="media"> <oembed url="https://www.youtube.com/embed/R0lnP2zpz5U"></oembed> </figure> <p>(video is mirrored)</p>
With this file you will be able to print Twenty One Pilots - Animated RGB Logo with your 3D printer. Click on the button and save the file on your computer to work, edit or customize your design. You can also find more 3D designs for printers on Twenty One Pilots - Animated RGB Logo.
