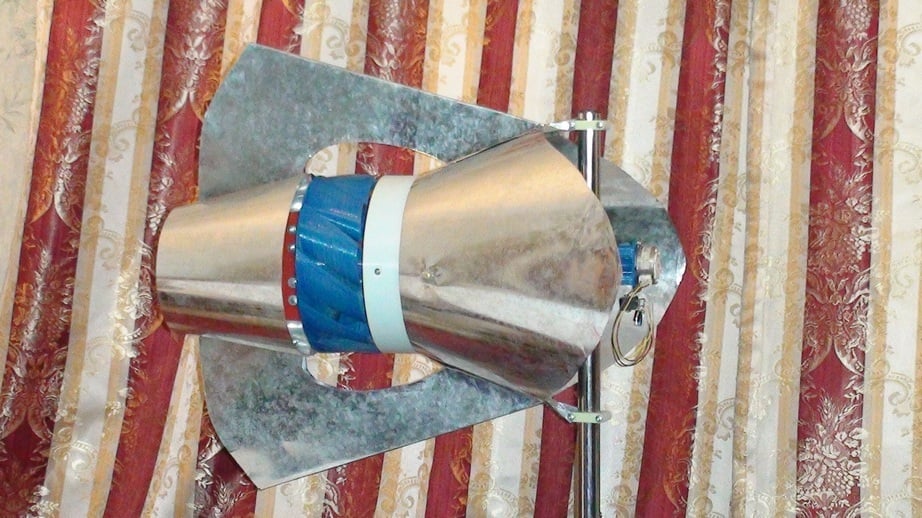
"Turbo R". Wind power generator
thingiverse
How to use an impeller with a radial flow direction in a wind power generator? To do this, you need to install a concentrator duct. I applied this in "Turbo R". The use of a concentrator, as shown by theoretical and experimental studies of various authors, allows you to slightly increase the flow rate and reduce the size of the propeller. For "one-piece" parts, downsizing is advantageous because most popular 3D printers have a small print area. By the way, with the usual axial propellers, the same story. "Less propeller, more power" is an appropriate slogan when your tool is a 3D printer. In addition to printed parts, you need: Screws and nuts with washers for them: M4x35-17 pcs M4x50-2 pcs M4x40-4 pcs M4x25-4 pcs M6 stud 2 washers and 12 nuts to the turbine shaft. (length depends on the shape of the concentrator) bearings 6x17x6 mm (606) 4 pcs. M4 x 260 stud 6 washers and 6 nuts to it (can be replaced with an assembly) - a horizontal strut of the concentrator duct. A metal tube with a diameter of 25 mm, wall thickness 1 mm, a hole with a diameter of 9 mm was drilled at the point of convergence with the turbine shaft - the vertical axis of rotation. (length depends on the shape of the concentrator) As a generator, a stepper motor with two windings from an old printer, of course, you need to choose a more suitable one. During the test with a wind of about 3 m / s, the stepper motor produced 6.1 volts, with a higher wind speed the result will certainly improve, but a specialized generator is still needed. The concentractor duct, stabilizers and rear fairing are made of 0.3 mm thick galvanized iron sheet. The concentrator is a truncated cone with an angle of 20° between the generatrix and the base (optimally, the angle should be smaller, but the generator and the vertical axis block part of the air flow). From the turbine side, its diameter is equal to the inner diameter of the turbine, on the other hand, the diameter and shape of the cut are chosen arbitrarily (remember that too large a diameter will only create additional drag). The shape of the stabilizers and the rear fairing is also arbitrary, in their manufacture it is important to understand that all elements made of tin are at the same time the stiffening elements of the entire structure. Tin can be connected with M3 bolts, soldered or welded. All these parts can be made from other materials such as plastic. Still need to make a front fairing for the generator. To shift the center of gravity to the vertical axis of rotation in this fairing or on an additional rod, you need to strengthen the additional weight. The hinge for the vertical axis must be strong and moisture resistant. Video https://www.youtube.com/watch?v=-7ZudDHCSgM
With this file you will be able to print "Turbo R". Wind power generator with your 3D printer. Click on the button and save the file on your computer to work, edit or customize your design. You can also find more 3D designs for printers on "Turbo R". Wind power generator.
