Tuergriff Alice im Wunderland für Ikea Haengeschrank
prusaprinters
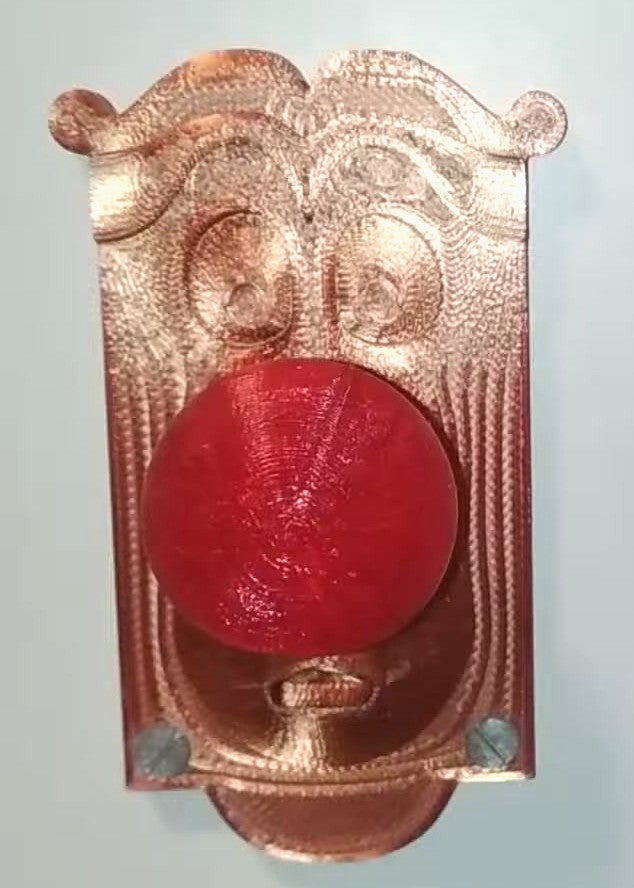
<p>Hallo,<br/>ich wollte für mein Ikea Hängeschrank im Bad andere Türgriffe haben, als der Standard.<br/>Da ist mir das redende Schloss/Tuergriff von Alice im Wunderland eingefallen. Also habe nach geeigneten Modelle gesucht und für meine Zwecke angepasst.</p><p>Das Original ist von sergioinglese (thingiverse)<br/><a href="https://www.thingiverse.com/thing:3034175">https://www.thingiverse.com/thing:3034175</a></p><p>Vielen Dank für das tolle Design.</p><p>Ich habe das Modell auf 50% verkleinert. Die Nase habe ich aus rotem TPU gedruckt. Auf der Rückseite sind 3 Löchter zum einschmelzen von 2mm Schmelzgewinden. Für die Nase habe ich es auch überarbeitet, da mir die schnell abgebrochen ist. Also einfach dort auch ein Schmelzgewinde von M2 einschmelzen und von der Rückseite mit einer M2 Schraube und einer Unterlegscheibe sichern.<br/>Dazu wird auch noch ein Video kommen.</p><p>Es macht Sinn das Modell mit 4 Wänden und 0.1 mm Schichthöhe zu drucken (erste Schicht 0.2 mm), da es sonst sein könnte, dass man das Überbrückungsinfill über den Schraublöchern sehen kann. Die 4 Wände werden benötigt, weil die Wandstärke für die Einschmelzgewinde 1.3mm betragen sollte. 0.4*3 wären allerdings erst 1.2mm.</p><p>Das zweite Montagevideo:</p><figure class="media"><oembed url="https://youtu.be/i5mLJeA_ZcE"></oembed></figure><p> </p><p>Das erste Montagevideo:</p><figure class="media"><oembed url="https://youtu.be/x2G-KmzlpBM"></oembed></figure><p> </p><p>Viele Grüße</p><p>juck.</p><p>Hello,<br/>I wanted to have different door handles for my Ikea wall cabinet in the bathroom than the standard.<br/>Then I thought of the talking lock / door handle from Alice in Wonderland. So have searched for suitable models and adapted for my purposes.</p><p>The original is from sergioinglese (thingiverse)<br/><a href="https://www.thingiverse.com/thing:3034175">https://www.thingiverse.com/thing:3034175</a></p><p>Thanks for the great design.</p><p>I scaled down the model to 50%. I printed the nose from red TPU. There are 3 holes on the back to melt in 2mm fusible threads. For the nose I also reworked it, because it broke off quickly for me. So just melt there also a fusion thread of M2 and secure from the back with an M2 screw and a washer.<br/>There will be a video about this as well.</p><p>It makes sense to print the model with 4 walls and 0.1 mm layer height (first layer 0.2 mm), otherwise you might see the bridging infill over the screw holes. The 4 walls are needed because the wall thickness for the Melt-in thread should be 1.3mm. 0.4*3, however, would only be 1.2mm.</p><p>The second assembly video (german):</p><figure class="media"><oembed url="https://youtu.be/i5mLJeA_ZcE"></oembed></figure><p> </p><p>The first assembly video (german):</p><figure class="media"><oembed url="https://youtu.be/x2G-KmzlpBM"></oembed></figure><p> </p><p>Many greetings</p><p>juck.</p><p>Translated with www.DeepL.com/Translator (free version)</p><h3>Print Settings</h3><p><strong>Printer Brand:</strong></p><p>Prusa</p><p> </p><p><strong>Printer: </strong></p><p>I3 MK3S</p><p><strong>Rafts:</strong></p><p> </p><p>No</p><p> </p><p><strong>Supports: </strong></p><p>No</p><p><strong>Resolution:</strong></p><p> </p><p>0.1mm</p><p> </p><p><strong>Infill: </strong></p><p>10 Gyroid</p><p><br/><strong>Filament:</strong><br/>Eryone PLA Silk Copper<br/>Eryone TPU Red translucent</p><p><strong>Notes: </strong></p><p>Nase ist aus rotem TPU von Eryone<br/>Nose is from red TPU from Eryone</p><p> </p><p>Category: DIY</p>
With this file you will be able to print Tuergriff Alice im Wunderland für Ikea Haengeschrank with your 3D printer. Click on the button and save the file on your computer to work, edit or customize your design. You can also find more 3D designs for printers on Tuergriff Alice im Wunderland für Ikea Haengeschrank.