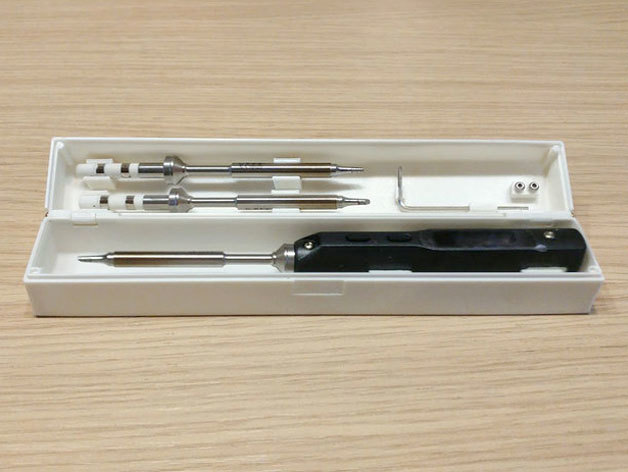
TS100 Soldering Iron Box with Tip Holders
prusaprinters
<p>A fully refactored version of the original box, requiring less material to print, with included spare screw holders.</p> <p>The soldering iron clamp is removable, so when and if it breaks, you don't have to print the whole case.</p> <h4>Change Log</h4> <h5>Update 2017-12-09</h5> <ul> <li><p>The grip of the front clips on the top cover is slightly decreased, because the tips are 0.2 mm wider on the front than on the back. It makes the tips easier to remove and insert, and the clips are less likely to break. ##### Update 2017-12-04</p> </li> <li><p>The box now requires two pieces of<strong>1.75 mm filament for hinges, instead of 2 mm nails</strong>. Cut out two 24 mm long pieces of the filament, and insert one in each hinge. ##### Update 2017-12-01 - Major Safety Fix</p> </li> <li><p>Top lid is now flipped, and tip clips are shortened by 1mm, so the tips would not come in contact with the soldering iron case under any circumstances. <em>There has been reported one case<strong>with the previous version</strong> that the tips on the top lid broke the LCD screen when the box closed. Even though it may work fine for you (as it currently does for me), the fact is that under certain circumstances that indeed could have happened. Therefore I flipped the top lid, and shortened the tip clips to additionally increase the distance between the tips and the soldering iron.</em></p> </li> </ul> <p><em>If you already have printed the older version I strongly advise to<strong>replace the top lid with this new version.</strong></em></p> <h5>Update 2017-11-30</h5> <ul> <li><p>Some printers are unable to reproduce sharp edges, such as on the bottom of the clamps, so they end up being too loose for the groove on the bottom part of the box. So I made an upgraded version of the bottom part, with trails that provide extra grip for the clamps. <em>If you already have printed the old version of the bottom part, and you find your clamp being too loose, you can either try to print a clamp in a vertical (standing-up) position, or you can just glue your clamp to the base.</em></p> <p>##### What's New</p> </li> <li><p>Refactored from the scratch</p> </li> <li>Thinner sides (requiring less material to print)</li> <li>Added 2 spare screw holders</li> <li>The top and the bottom part are of the same height</li> <li>Using 2 pieces of 24 mm long 1.75 mm filament for the hinges</li> <li>Additional TS100 soldering iron and soldering tip models for virtual testing in the design phase<h3>Print Settings</h3> </li> </ul> <p><strong>Printer Brand:</strong></p> <p>Prusa</p> <p><p class="detail-setting printer"><strong>Printer: </strong> <div><p>i3 MK2S</p></div><strong>Rafts:</strong></p> <p>No</p> <p><p class="detail-setting supports"><strong>Supports: </strong> <div><p>Yes</p></div><strong>Resolution:</strong></p> <p>0.30</p> <p><p class="detail-setting infill"><strong>Infill: </strong> <div><p>90%</p></div></p> <p><strong>Notes:</strong></p> <ul> <li>Perimeters: 3 (to ensure that the hinges don't break)</li> <li>Infill: 90% (infill is used just on a very few parts, so it does not affect the overall material consumption, but on the hinges it is critical to be as solid as possible)</li> <li>Material: PET or ABS</li> </ul> </p></p></p> Category: Tools
With this file you will be able to print TS100 Soldering Iron Box with Tip Holders with your 3D printer. Click on the button and save the file on your computer to work, edit or customize your design. You can also find more 3D designs for printers on TS100 Soldering Iron Box with Tip Holders.
