TronXY X3 Z Axis Motor
prusaprinters
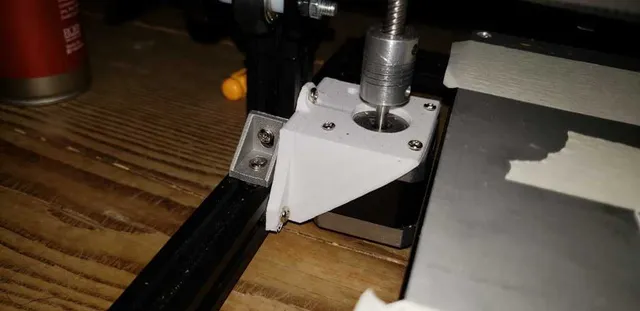
the first time i built my printer, i hated how much unnecessary time i spent puting the Z motors.. everything was loose or not in perfect alignment. Then i found Lexa's one and i loved it, except for one thing.. i had to screw the piece first and then the motor, which for me, was troublesome or unconfortable, so I created this piece which has the scew holes outside, so.. if you t-nut wasnt placed correctly you can fix it without too much trouble. TL;DR; the screw holes are outside from the motor case so you can put the motor or the screws in whatever order you want. YOU WILL NEED: 3x m4 screws (i used only the 2 from the original ones, one on top and one on the side) 3x m4 nuts (t-nut or else) EDIT: V2: smaller holes and better fitting. (needs to be tested) Print Settings Printer: Ttronxy x3 Rafts: Doesn't Matter Supports: No Resolution: 0.2 Infill: 20% Notes: im so sorry, but the ideal print way is as in the last img and, ideally, with a fan, since i kept modifying the file, i found it was better to just fix the position in the slicer rather than in Fusion 360 Category: 3D Printer Parts
With this file you will be able to print TronXY X3 Z Axis Motor with your 3D printer. Click on the button and save the file on your computer to work, edit or customize your design. You can also find more 3D designs for printers on TronXY X3 Z Axis Motor.